Table of Contents
This article shows how Azure Service Bus Queue trigger Azure Function.
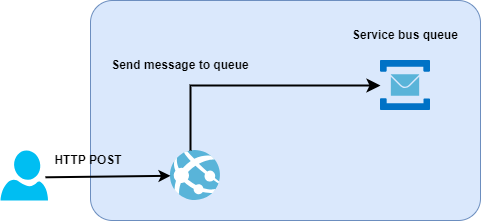
In this article, we will create a solution using ASP.NET Core Web API to send messages to Azure service bus queue and process the messages using Azure function as shown in the diagram above.
Creating an Azure Service Bus Namespace in the Azure Portal
In the first part, we will create ASP.NET Core API to send messages to the Service Bus Queue, and in the second part, we will consume the messages using Azure function, as shown in the following diagram
1. Type Service Bus into the Azure portal search bar and click
Create to provision a new Service Bus namespace.
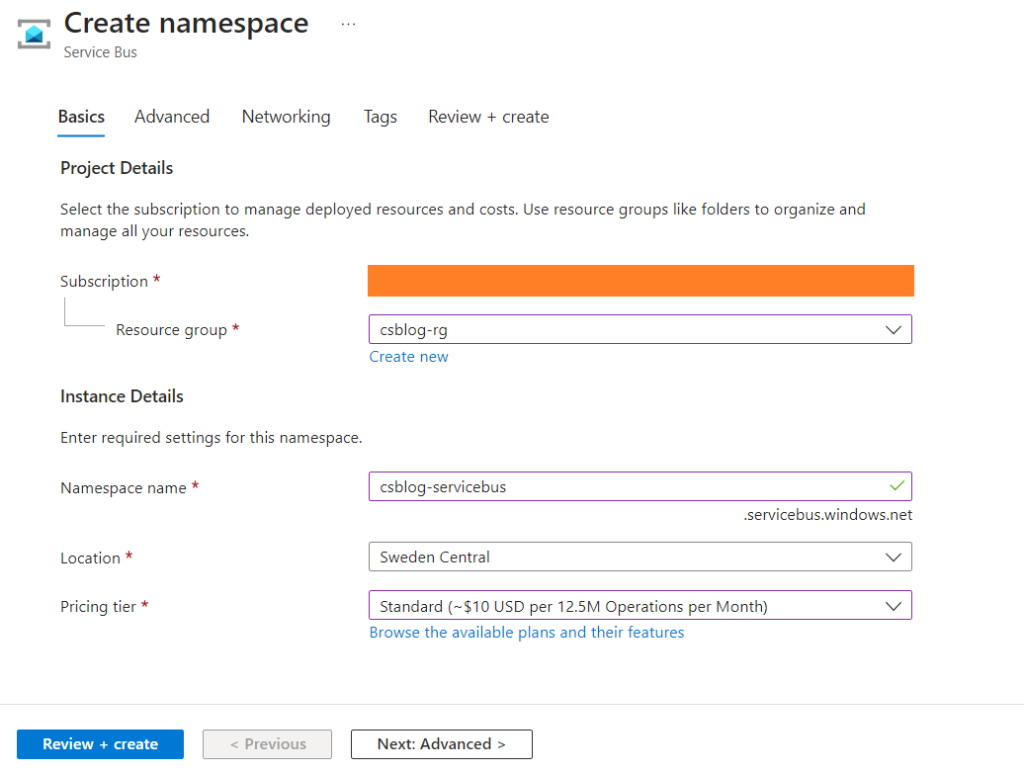
2. Enter the required information for the new Azure Service Bus namespace, and click Review + create, as
shown in the following screenshot.
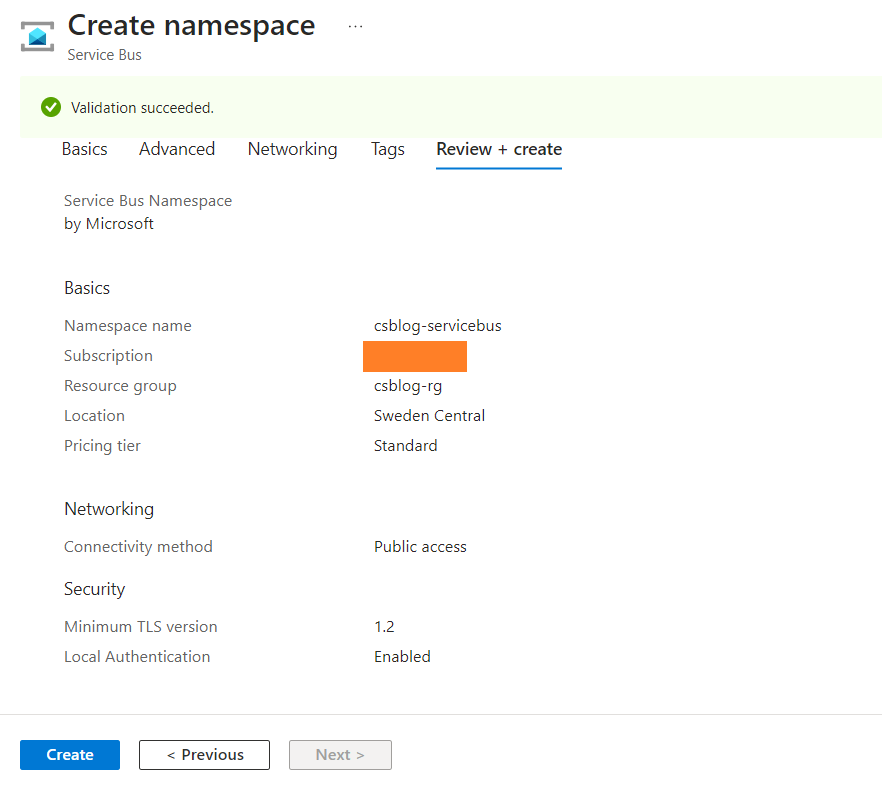
3. Click Create when validation is successful and then click Go to resource once the namespace is created, as shown in the following diagrams.
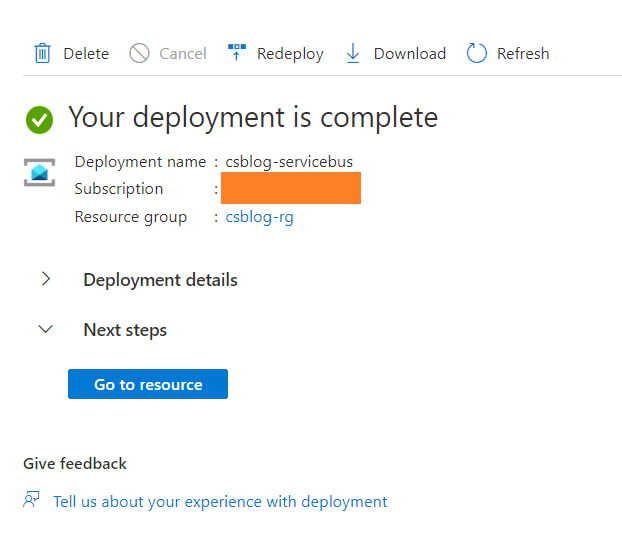
4. Click + Queue to create an Azure Service Bus Queue inside the created namespace as highlighted in the following screenshot.

5. Enter the required information, and click Create.
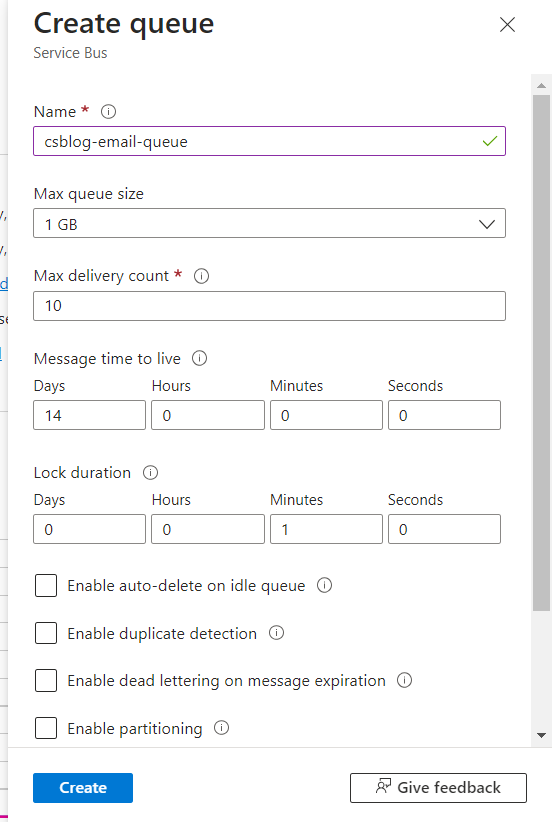
Creating Shared Access Policy (SAS)
Azure Service Bus Queues can be accessed in various ways, including Azure Active Directory or SAS policies.
To interact with Azure Service Bus Queue, we will create a shared access policy to authenticate our application.
1.In the Entities section, click Queues and select the queue that has been created as shown below.
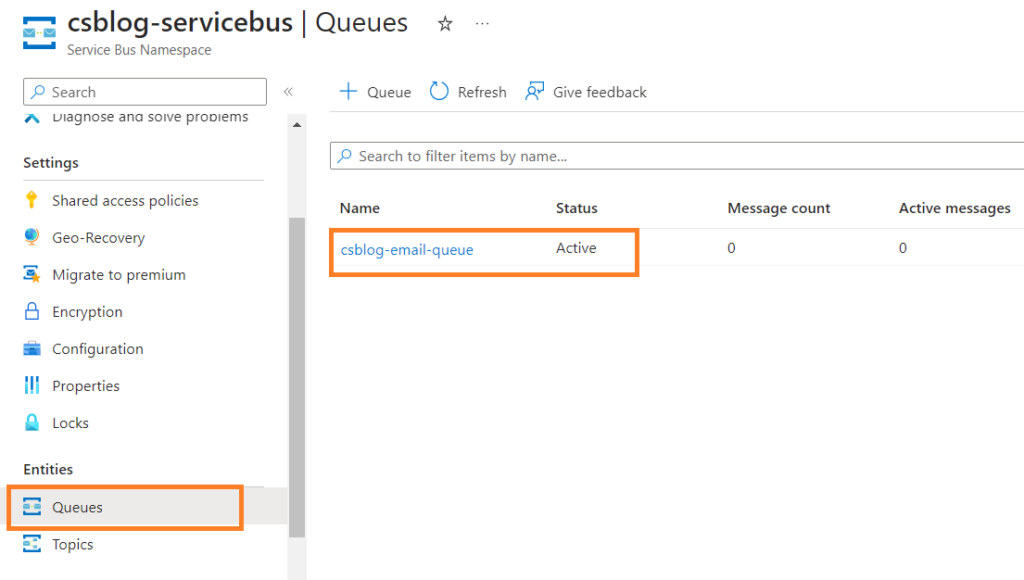
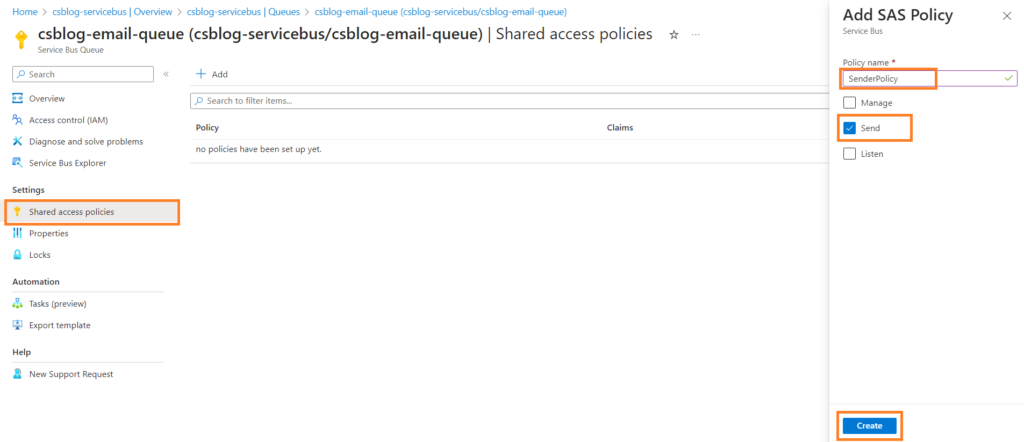
2. To add a new policy, click Shared access policies in the Settings section and then click Add as shown below.
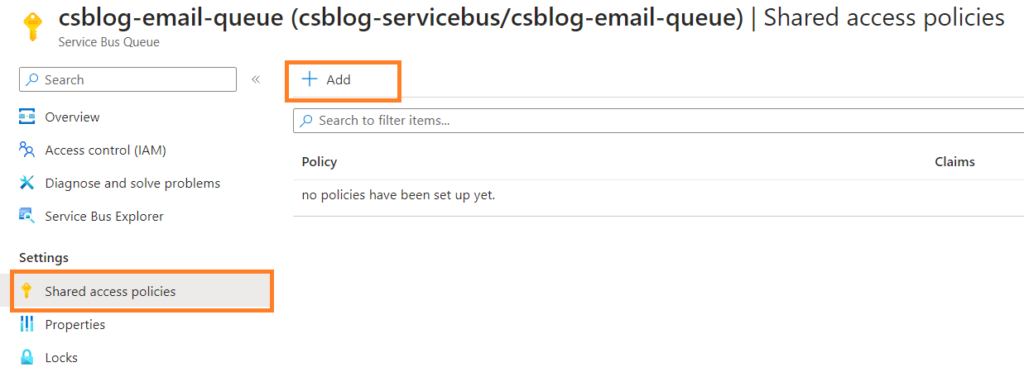
3. Enter the policy name and specify the scope for sending messages to the queue and click Create, as shown in the following screenshot.
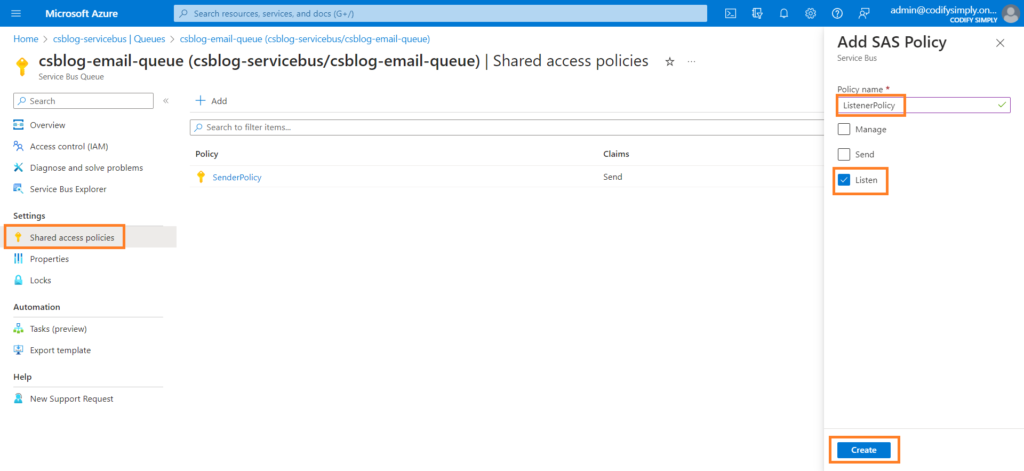
4. Create a new policy for listening to the Service Bus Queue. Enter the policy name and specify the scope in which to listen to messages from the queue, and click Create (see the following figure).
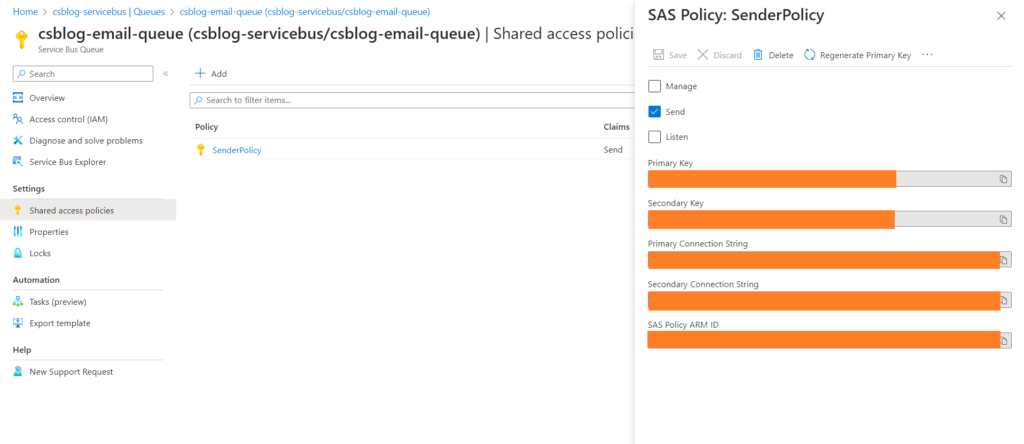
5. Once the SAS Policy is created, we copy the primary connections, and use them later to connect to the Azure Service Bus Queue( see screenshot).
The primary connection string with Listener scope.
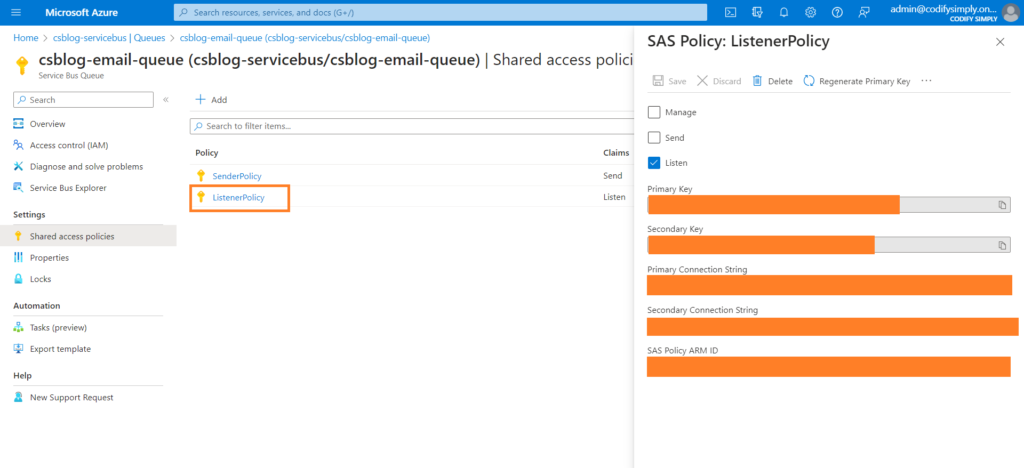
Now we should have two policies as shown below.

Creating a custom service to interact with Azure Service Bus Queue
We have provisioned an Azure Service Bus Queue and are ready to interact with it.
In this section we create a custom service to send messages to the Service Bus Queue using the Azure Software Development Kit (SDK) for ServiceBus.
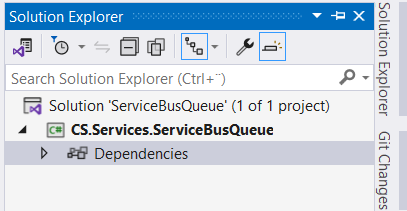
1. Open Visual Studio and create a new solution named ServiceBusQueue.
Add a new class library project to the solution named CS.Services.ServiceBusQueue.
2. Install the following NuGet packages
Azure.Messaging.ServiceBusMicrosoft.Extensions.AzureNewtonsoft.Json
3. Create a new class file named ServiceBusSettings that contains the name of the queue and the enqueue time for the scheduled message, as shown below
namespace CS.Services.ServiceBusQueue
{
    public class ServiceBusSettings
    {
        public string QueueName { get; set; }
        public DateTime EnqueueTimeUtc { get; set; }
    }
}
4. Create a new project folder named Interfaces and add an interface file named IServiceBusQueueSender
namespace CS.Services.ServiceBusQueue.Interfaces
{
    public interface IServiceBusQueueSender
    {
        Task SendMessageAsync(object data = null);
        Task SendMessageBatchAsync(List<object> data = null);
        Task<long> ScheduleMessageAsync(object data = null, DateTime? enqueueTimeUtc = null);
        Task CancelScheduledMessageAsync(long id);
    }
}
Our interface contains four asynchronous methods for sending messages or batches to the Azure Service Bus and for scheduling messages, as well as a method for cancelling a scheduled message based on the sequence number.
5. Add a new class file to the project called ServiceBusQueueSender that implements the IServiceBusQueueSender interface.
namespace CS.Services.ServiceBusQueue
{
    public class ServiceBusQueueSender : IServiceBusQueueSender
    {
        private readonly ServiceBusSettings serviceBusSettings;
        private ServiceBusSender ServiceBusSender { get; set; }
        public ServiceBusQueueSender(ServiceBusClient serviceBusClient, ServiceBusSettings serviceBusSettings)
        {
            this.serviceBusSettings = serviceBusSettings;
            ServiceBusSender = serviceBusClient.CreateSender(serviceBusSettings.QueueName);
        }
        public async Task SendMessageAsync(object data = null)
        {
            var message = Create(data);
            await ServiceBusSender.SendMessageAsync(message).ConfigureAwait(false);
        }
        public async Task SendMessageBatchAsync(List<object> data = null)
        {
            var serviceBusMessageBatch = await ServiceBusSender.CreateMessageBatchAsync().ConfigureAwait(false);
            foreach (var item in data)
            {
                var message = Create(item);
                serviceBusMessageBatch.TryAddMessage(message);
            }
            await ServiceBusSender.SendMessagesAsync(serviceBusMessageBatch).ConfigureAwait(false);
        }
        public async Task<long> ScheduleMessageAsync(object data = null, DateTime? enqueueTimeUtc = null)
        {
            var message = Create(data);
            var enqueueTime = DateTime.UtcNow;
            if (enqueueTimeUtc != null)
            {
                enqueueTime = (DateTime)enqueueTimeUtc;
            }
            else
            {
                enqueueTime = (DateTime)serviceBusSettings.EnqueueTimeUtc;
            }
            return await ServiceBusSender.ScheduleMessageAsync(message, enqueueTime).ConfigureAwait(false);
        }
        public async Task CancelScheduledMessageAsync(long id)
        {
            await ServiceBusSender.CancelScheduledMessageAsync(id).ConfigureAwait(false);
        }
        private static ServiceBusMessage Create<T>(T data)
        {
            if (data == null)
            {
                return new ServiceBusMessage();
            }
            else
            {
                var settings = new JsonSerializerSettings
                {
                    NullValueHandling = NullValueHandling.Ignore
                };
                var json = JsonConvert.SerializeObject(data, Newtonsoft.Json.Formatting.Indented, settings);
                var content = new MemoryStream(Encoding.UTF8.GetBytes(json)).ToArray();
                var result = new ServiceBusMessage(content);
                return result;
            }
        }
    }
}
The ServiceBusQueueSender has two private members of type ServiceBusSettings which contains settings for the Azure Service Bus Queue, and an instance of type ServiceBusClient , which we need to send messages to the Service Bus.
The ServiceBusQueueSender constructor gets two instances of ServiceBusClient and ServiceBusSettings using Dependecy Injection.
We create a ServiceBusMessage instance from the incoming data using the Create<T>(T data)method and send or schedule the message using the ServiceBusSender instance initialized in the constructor .
5. Create a folder project named Extensions.
6. Right-click the Extensions folder and add a new class file named ServiceBusSenderExtensions that contains an extension method AddServiceBusSender that will inject our ServiceBusQueueSender service with configuration settings into the intended application that will utilize it, as shown in the following code.
namespace CS.Services.ServiceBusQueue.Extensions
{
    public static class ServiceBusSenderExtensions
    {
        public static IServiceCollection AddServiceBusSender(this IServiceCollection services, Action<ServiceBusSettings> configureSettings)
        {
            return services.AddSingleton<IServiceBusQueueSender>(serviceProvider =>
            {
                var settings = new ServiceBusSettings();
                configureSettings(settings);
                return ActivatorUtilities.CreateInstance<ServiceBusQueueSender>(serviceProvider, settings);
            });
        }
    }
}
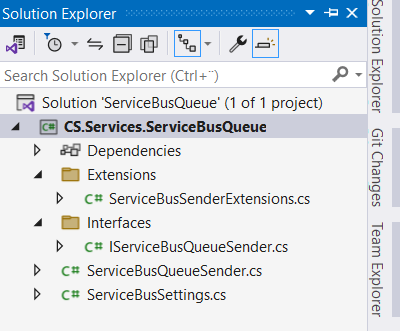
At the end of this section, your project should look like this.
Creating ASP.NET Core API to send messages to the Service Bus Queue
1. Right-click on the solution and add a new ASP.NET Core 6 Web API with name CS.ApiApp.
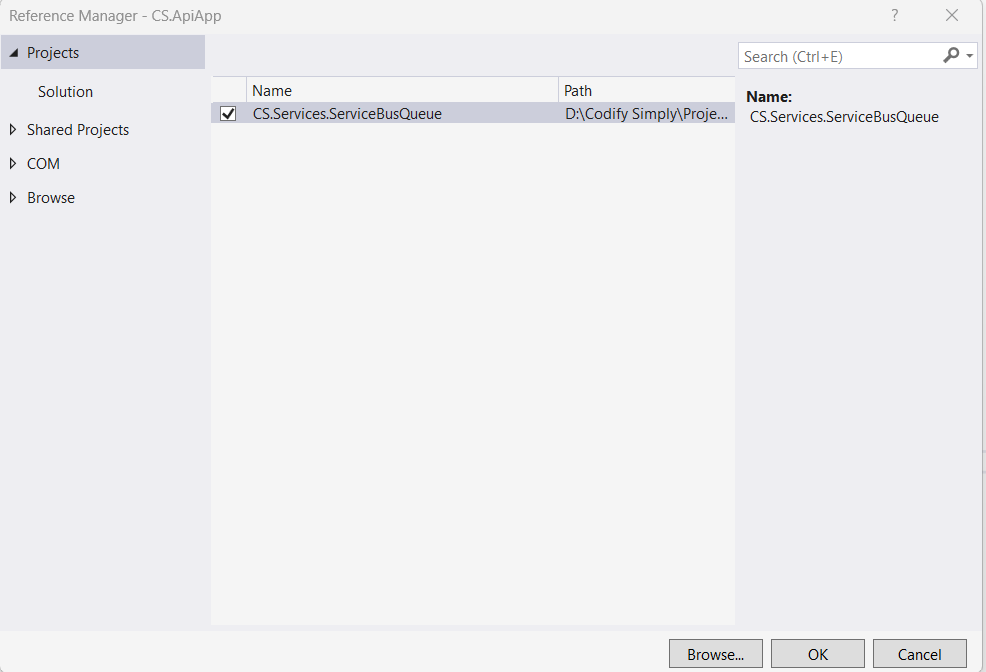
2. In Solution Explorer, right-click the CS.ApiApp project’s Dependencies node, and select Add Project Reference and in the Reference Manager dialog, select the CS.Services.ServiceBusQueue project, and select OK.
3. Add the Azure Service Bus Queue configuration to appsettings.json
{
  "ServicBusConnectionString": "YOUR PRIMARY CONNECTION STRING WITH SEND POLICY",
  "QueueName": "csblog-email-queue",
  "EnqueueTimeUtc": "1/1/2024 00:00:00 AM"
}
4. In the Program.cs file, add the following code to register the ServiceBusClient and ServiceBusQueueSender services in the Dependency Injection container.
builder.Services.AddAzureClients(clientBuilder =>
{
    clientBuilder.AddServiceBusClient(builder.Configuration.GetValue<string>("ServicBusConnectionString"));
});
builder.Services.AddServiceBusSender(settings =>
{
    settings.QueueName = builder.Configuration.GetValue<string>("QueueName");
    settings.EnqueueTimeUtc = builder.Configuration.GetValue<DateTime>("EnqueueTimeUtc");
});
5. Create a new project folder named Models, and add a class file named Appointment.
namespace CS.ApiApp.Models
{
    public class Appointment
    {
        [Required]
        public int AppointmentId { get; set; }
        [Required]
        public int PatientId { get; set; }
        [Required]
        public string PatientFirstName { get; set; }
        public string PatientLastName { get; set; }
        public string DoctorFirstName { get; set; }
        public string DoctorLastName { get; set; }
        [Required]
        public string PatientEmail { get; set; }
        [Required]
        public DateTime AppointmentStart { get; set; }
        public DateTime AppointmentEnd { get; set; }
        public string Description { get; set; }
    }
}
5. Create a new API controller named AppointmentController and modify the controller to receive an instance of IServiceBusQueue via the constructor as described in the following code snippet.
namespace CS.ApiApp.Controllers
{
    [Route("api/[controller]")]
    [ApiController]
    public class AppointmentController : ControllerBase
    {
        private readonly IServiceBusQueueSender serviceBusQueueSender;
        public AppointmentController(IServiceBusQueueSender serviceBusQueueSender)
        {
            this.serviceBusQueueSender = serviceBusQueueSender;
        }
        [HttpPost("book")]
        public async Task BookAppointment([FromBody] Appointment appointment)
        {
            await serviceBusQueueSender.SendMessageAsync(appointment).ConfigureAwait(false);
        }
        [HttpPost("book/batch")]
        public async Task BookAppointments([FromBody] List<Appointment> appointments)
        {
            await serviceBusQueueSender.SendMessageBatchAsync(appointments?.Cast<object>().ToList()).ConfigureAwait(false);
        }
        [HttpPost("schedule")]
        public async Task<long> ScheduledAppointment([FromBody] Appointment appointment, [FromQuery] DateTime enqueueTime)
        {
            var enqueueTimeutc = DateTime.UtcNow.AddMonths(2);
            return await serviceBusQueueSender.ScheduleMessageAsync(appointment, enqueueTimeutc).ConfigureAwait(false);
        }
        [HttpDelete("cancel/{sequenceNumber:long}")]
        public async Task CancelAppointmentNotificationFromQueue([FromRoute] int sequenceNumber)
        {
            await serviceBusQueueSender.CancelScheduledMessageAsync(sequenceNumber).ConfigureAwait(false);
        }
    }
}
6. Run and test the application by creating a batch message.
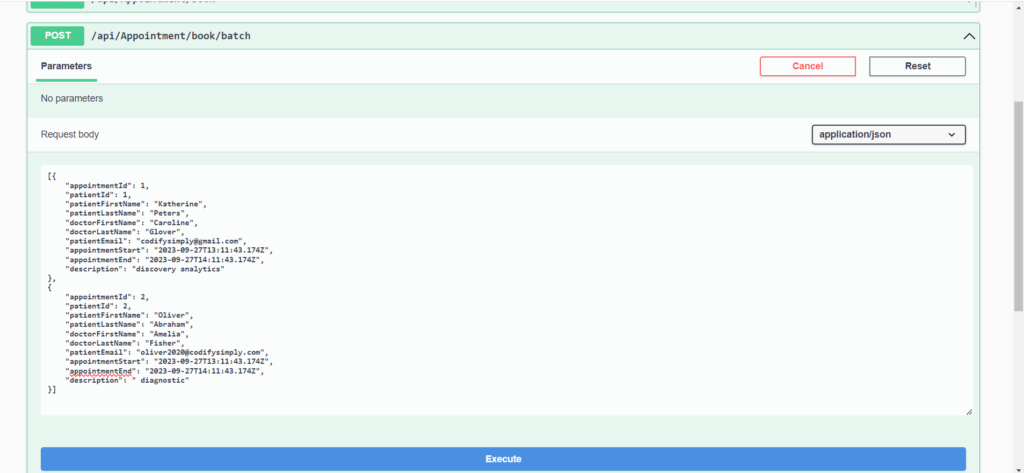
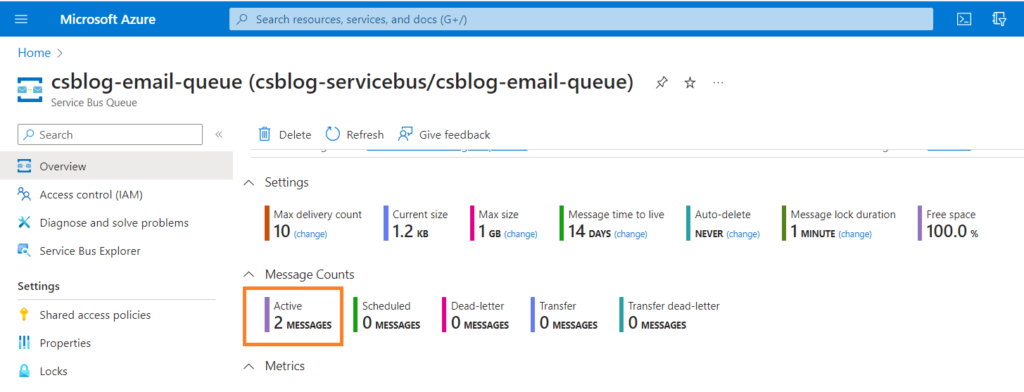
Navigate to the queue in the
Azure portal and you can see that there are two messages in the queue, as shown in the following screenshot.
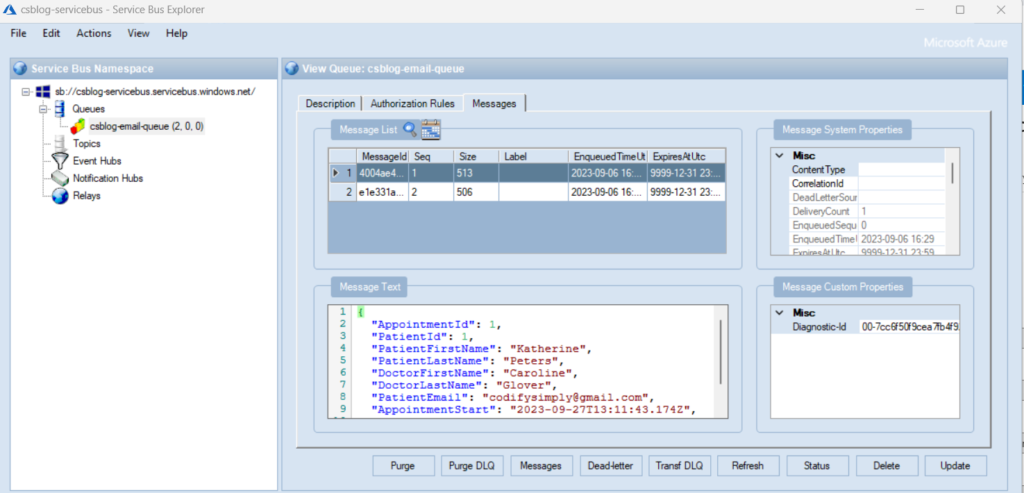
You can also use Service Bus Explorer app to see the messages in the queue.
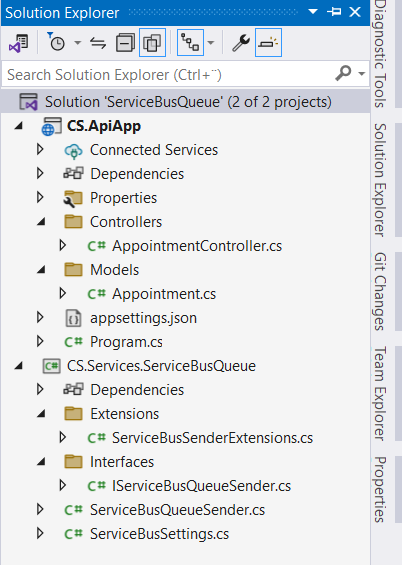
At the end of this section , your project should look like this.
Creating a custom service to send email via SMTP
In this section, we will create a reusable custom service for sending emails via SMT.
1. Right-click on the solution and add a new class library project named CS.Services.Mail.
2. Install the following NuGet package
Microsoft.Extensions.DependencyInjection
3. Create a new project folder named Models, and add a new class file named MailData with following properties.
namespace CS.Services.Mail.Models
{
    public class MailData
    {
        public List<string> To { get; set; } = new List<string>();
        public List<string> Bcc { get; set; } = new List<string>();
        public List<string> Cc { get; set; } = new List<string>();
        public string Subject { get; set; }
        public string Body { get; set; }
        public bool IsHtml { get; set; }
    }
}
4. Add a new class file to the project called MailSettings with the following properties, which are the configuration settings for the SMTP client.
namespace CS.Services.Mail
{
    public class MailSettings
    {
        public string From { get; set; }
        public string SmtpServer { get; set; }
        public int SmtpPort { get; set; }
        public string SmtpUser { get; set; }
        public string SmtpPassword { get; set; }
    }
}
5. Create a new project folder named Interfaces, and add a new interface file named IMailService with a single method for sending emails to the end user.
namespace CS.Services.Mail.Interfaces
{
    public interface IMailService
    {
        Task<bool> SendAsync(MailData mail);
    }
}
6. Add a new class file to the project called MailService that implements the IMailService interface.
namespace CS.Services.Mail
{
    public class MailService : IMailService
    {
        private readonly MailSettings settings;
        public MailService(MailSettings settings)
        {
            this.settings = settings;
        }
        public async Task<bool> SendAsync(MailData mail)
        {
            try
            {
                using MailMessage mailMessage = new MailMessage();
                using SmtpClient smtp = new SmtpClient(settings.SmtpServer);
                smtp.UseDefaultCredentials = false;
                smtp.EnableSsl = true;
                smtp.Port = settings.SmtpPort;
                smtp.Credentials = new NetworkCredential(settings.SmtpUser, settings.SmtpPassword);
                mailMessage.DeliveryNotificationOptions = DeliveryNotificationOptions.None;
                mailMessage.From = new MailAddress(settings.SmtpUser);
                foreach (var to in mail.To)
                {
                    mailMessage.To.Add(to);
                }
                foreach (var coptyTo in mail.Cc)
                {
                    mailMessage.CC.Add(new MailAddress(coptyTo));
                }
                foreach (var hidenCopy in mail.Bcc)
                {
                    mail.Bcc.Add(hidenCopy);
                }
                mailMessage.Subject = mail.Subject;
                mailMessage.Body = mail.Body;
                mailMessage.IsBodyHtml = mail.IsHtml;
                await smtp.SendMailAsync(mailMessage).ConfigureAwait(false);
                return true; ;
            }
            catch (Exception)
            {
                return false;
            }
        }
    }
}
The MailService uses Dependecy Injection to obtain an instance of MailSettings that contains the settings required to initialize theSmtpClient instance.
The SendAsync method initializes a MailMessage instance and an instance of SmtpClient, then gathers the required information from the incoming MailData parameter and sends an email using SendMessageAsync from SmtpClient.
7. Create a folder project named Extensions.
8. Right-click the Extensions folder and add a new class file named MailExtensions that contains a single extension method AddMailService that injects an instance of the MailService service with configuration settings into the intended application that will use the service, as shown in the following code.
namespace CS.Services.Mail.Extensions
{
    public static class MailExtensions
    {
        public static IServiceCollection AddMailService(this IServiceCollection services, Action<MailSettings> configureSettings)
        {
            return services.AddSingleton<IMailService>(serviceProvider =>
            {
                var settings = new MailSettings();
                configureSettings(settings);
                return ActivatorUtilities.CreateInstance<MailService>(serviceProvider, settings);
            });
        }
    }
}
Creating an Azure function to process messages
The Azure Functions app is an Azure Platform as a Service (PaaS) that lets you create pieces of code, connect them to your application, and use triggers to launch them.
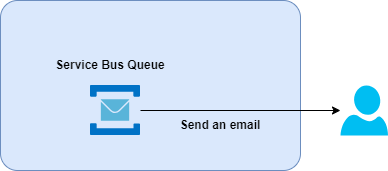
In this section, we will create an Azure function to process incoming messages in the service bus queue and send emails to the user, as described in the following diagram.
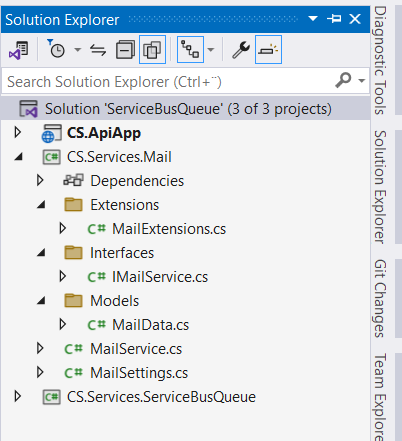
1. Right-click the ServiceBusQueue solution and add a new Azure Functions app project named CS.Functions.MailProcessor.
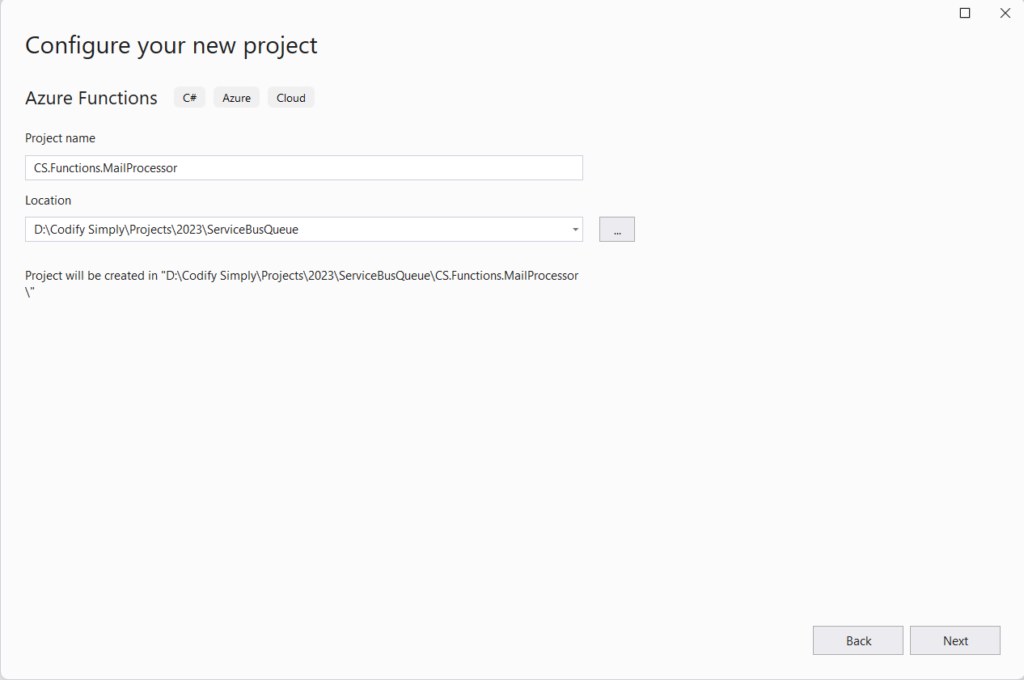
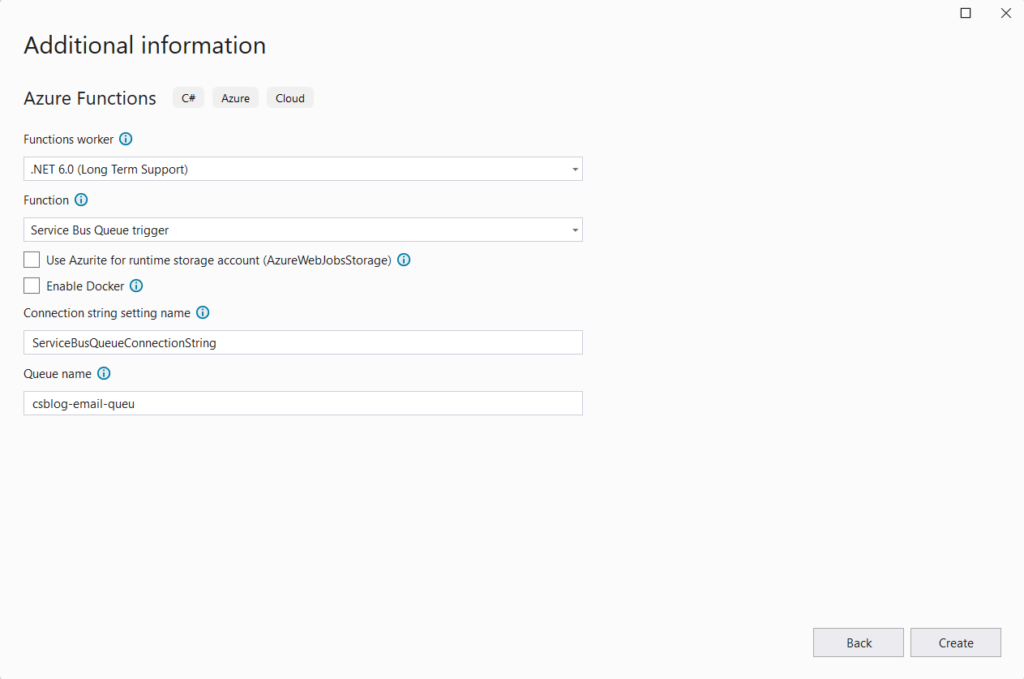
2. Select . NET 6 and Service Bus Queue Trigger and click Create, as shown below.
3. Once the project is created, update the function name to ProcessMail.
namespace CS.Functions.MailProcessor
{
    public class ProcessMail
    {
        [FunctionName("ProcessMail")]
        public void Run([ServiceBusTrigger("csblog-email-queue", Connection = "ServiceBusQueueConnectionString")]string myQueueItem, ILogger log)
        {
            log.LogInformation($"C# ServiceBus queue trigger function processed message: {myQueueItem}");
        }
    }
}
4. Install the following NuGet packages
Microsoft.Azure.Functions.Extensions
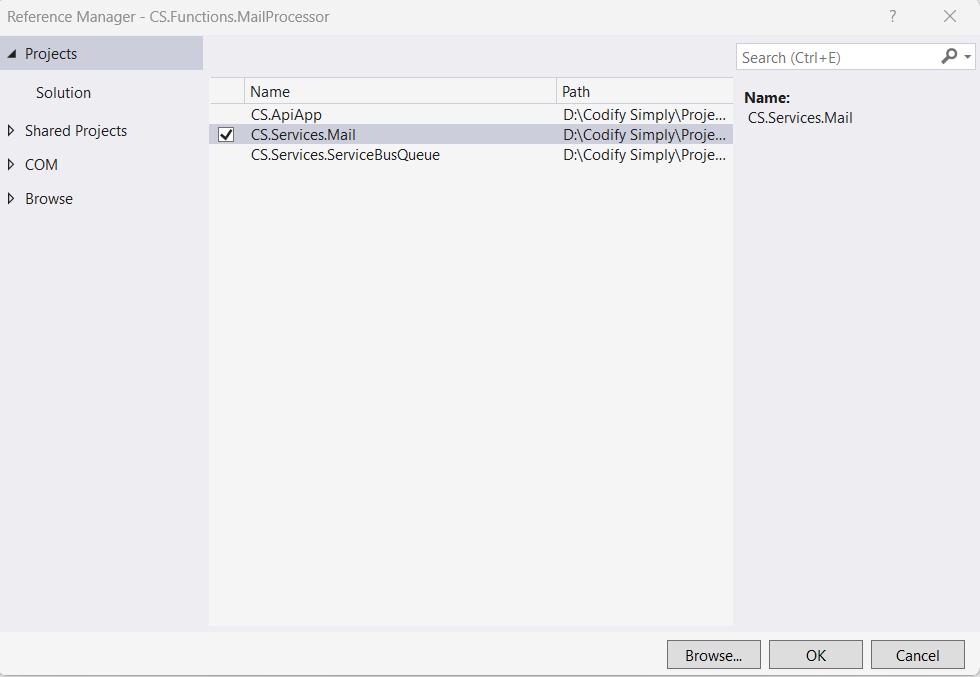
5. In Solution Explorer, right-click the CS.Functions.MailProcessor project’s Dependencies node, and select Add Project Reference and in the Reference Manager dialog, select the CS.Services.Mail project, and select OK.
Also read https://dotnetcoder.com/generic-repository-pattern-c/
6. Create a new project folder named Models, and add a class file named Appointment.
namespace CS.Functions.MailProcessor.Models
{
    public class Appointment
    {
        public int AppointmentId { get; set; }
        public int PatientId { get; set; }
        public string PatientFirstName { get; set; }
        public string PatientLastName { get; set; }
        public string DoctorFirstName { get; set; }
        public string DoctorLastName { get; set; }
        public string PatientEmail { get; set; }
        public DateTime AppointmentStart { get; set; }
        public DateTime AppointmentEnd { get; set; }
        public string Description { get; set; }
    }
}
7. Right-click the project and add a new json file named appsettings.json and add the primary connection string with ListenerPolicy and Smtp settings as follows.
{
  "ServiceBusQueueConnectionString": "YOUR CONNECTION STRINF WITH LISTEN POLICY",
  "SmtpServer": "smtp.gmail.com",
  "SmtpPort": 587,
  "SmtpUser": "YOUR SMTP USER",
  "SmtpPassword": "YOUR SMTP PASSWORD",
  "From": "YOUR EMAIL ADDRESS"
}
8. Create a Startup.cs class that inherits from the FunctionsStartup class from Microsoft.Azure.Functions.Extensions to register the dependencies as show below.
namespace CS.Functions.MailProcessor
{
    public class Startup : FunctionsStartup
    {
        public override void Configure(IFunctionsHostBuilder builder)
        {
            throw new NotImplementedException();
        }
    }
}
9. Override ConfigureAppConfiguration to load the configurations from the appsettings.json file.
namespace CS.Functions.MailProcessor
{
    public class Startup : FunctionsStartup
    {
        public override void Configure(IFunctionsHostBuilder builder)
        {
            throw new NotImplementedException();
        }
        public override void ConfigureAppConfiguration(IFunctionsConfigurationBuilder builder)
        {
            base.ConfigureAppConfiguration(builder);
            var context = builder.GetContext();
            builder.ConfigurationBuilder
                .AddJsonFile(
                    Path.Combine(context.ApplicationRootPath, "appsettings.json"),
                    optional: true,
                    reloadOnChange: false);
        }
    }
}
10. Update the Startup.cs file, add the following code to register the MailService in the Dependency Injection container.
namespace CS.Functions.MailProcessor
{
    public class Startup : FunctionsStartup
    {
        public override void Configure(IFunctionsHostBuilder builder)
        {
            var configuration = builder.GetContext().Configuration;
            builder.Services.AddMailService(settings =>
            {
                settings.SmtpServer = configuration.GetValue<string>("SmtpServer");
                settings.SmtpPort = configuration.GetValue<int>("SmtpPort");
                settings.SmtpUser = configuration.GetValue<string>("SmtpUser"); ;
                settings.SmtpPassword = configuration.GetValue<string>("SmtpPassword"); ;
                settings.From = configuration.GetValue<string>("From");
            });
        }
        public override void ConfigureAppConfiguration(IFunctionsConfigurationBuilder builder)
        {
            base.ConfigureAppConfiguration(builder);
            var context = builder.GetContext();
            builder.ConfigurationBuilder
                .AddJsonFile(
                    Path.Combine(context.ApplicationRootPath, "appsettings.json"),
                    optional: true,
                    reloadOnChange: false);
        }
    }
}
11. Update the ProcessMail function to process the incoming messages from the Service Bus Queue as follows.
namespace CS.Functions.MailProcessor
{
    public class ProcessMail
    {
        private readonly IMailService mailService;
        public ProcessMail(IMailService mailService)
        {
            this.mailService = mailService;
        }
        [FunctionName("ProcessMail")]
        public async Task RunAsync([ServiceBusTrigger("csblog-email-queue", Connection = "ServiceBusQueueConnectionString")]string myQueueItem, ILogger log)
        {
            if (myQueueItem != null)
            {
                var mail = Create(myQueueItem);
                await mailService.SendAsync(mail).ConfigureAwait(false);
            }
        }
        private static MailData Create(string data)
        {
            var appointment = JsonConvert.DeserializeObject<Appointment>(data);
            var mail = new MailData();
            mail.To = new List<string> { appointment.PatientEmail };
            mail.Subject = $"Appointment reminder for {appointment.AppointmentStart:g}";
            mail.IsHtml = true;
            StringBuilder sb = new StringBuilder();
            sb.Append($"Dear Mr./Mrs. {appointment.PatientFirstName} {appointment.PatientLastName}<br>");
            sb.Append($"This is a reminder that you have an appointment scheduled for ");
            sb.Append($"{appointment.AppointmentStart.ToString("dd.MM.yyy")} at {appointment.AppointmentStart.ToString("H:mm")}<br>");
            sb.Append("We look forward to seeing you.<br>");
            sb.Append("Best regards.");
            mail.Body = sb.ToString();
            return mail;
        }
    }
}
The ProcessMail class uses Dependecy Injection to get an instance of MailService that sends the mail using SendAsync .
The Create helper method deserializes the received data from the Azure Service Bus Queue and creates a MailData instance that is sent to the end user.
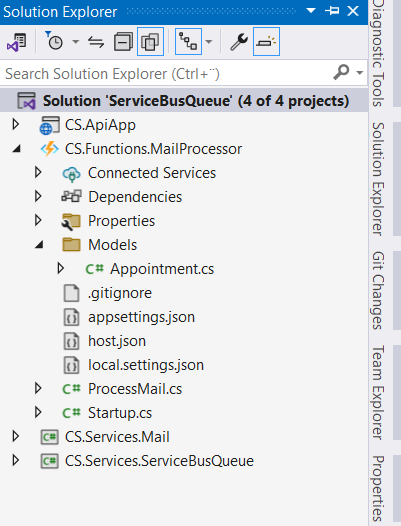
At the end of this section, your project should look like this.
Run the application
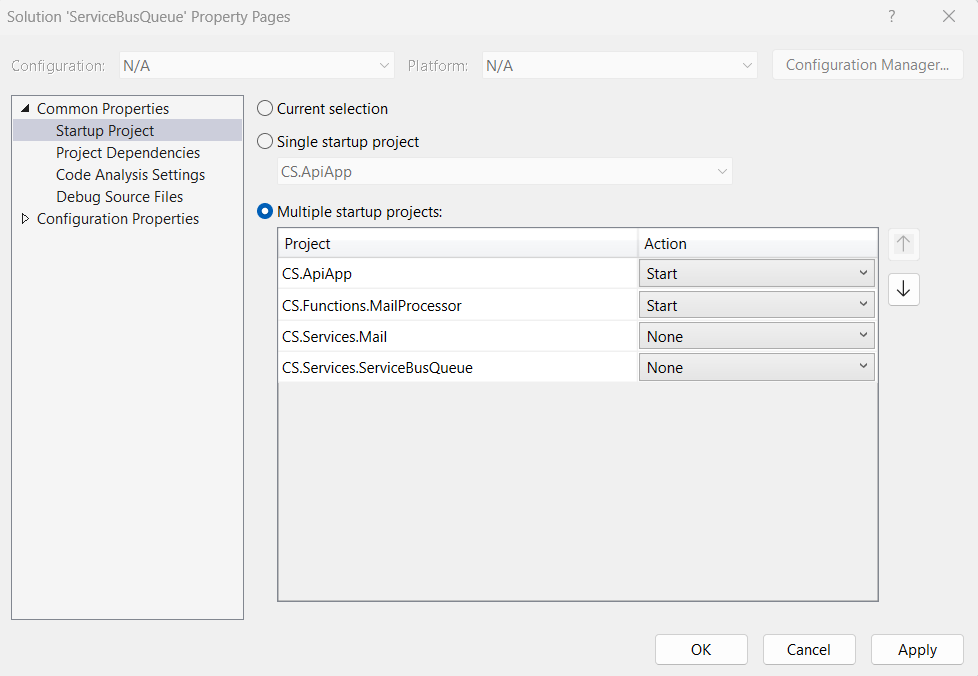
1. In Solution Explorer, right-click the solution, select Properties, and select Multiple Startup Projects.
2. Set CS.ApiApp and CS.Functions.Mail as startup projects, as shown in the following figure.
3. Run and test the application by creating a batch message.
4. Observe the result.

When deploying the application, use Azure Key Vault to set the secret.
The code for the demo can be found Here
Also read https://dotnetcoder.com/creating-a-blazor-dropdown-list-component/


