
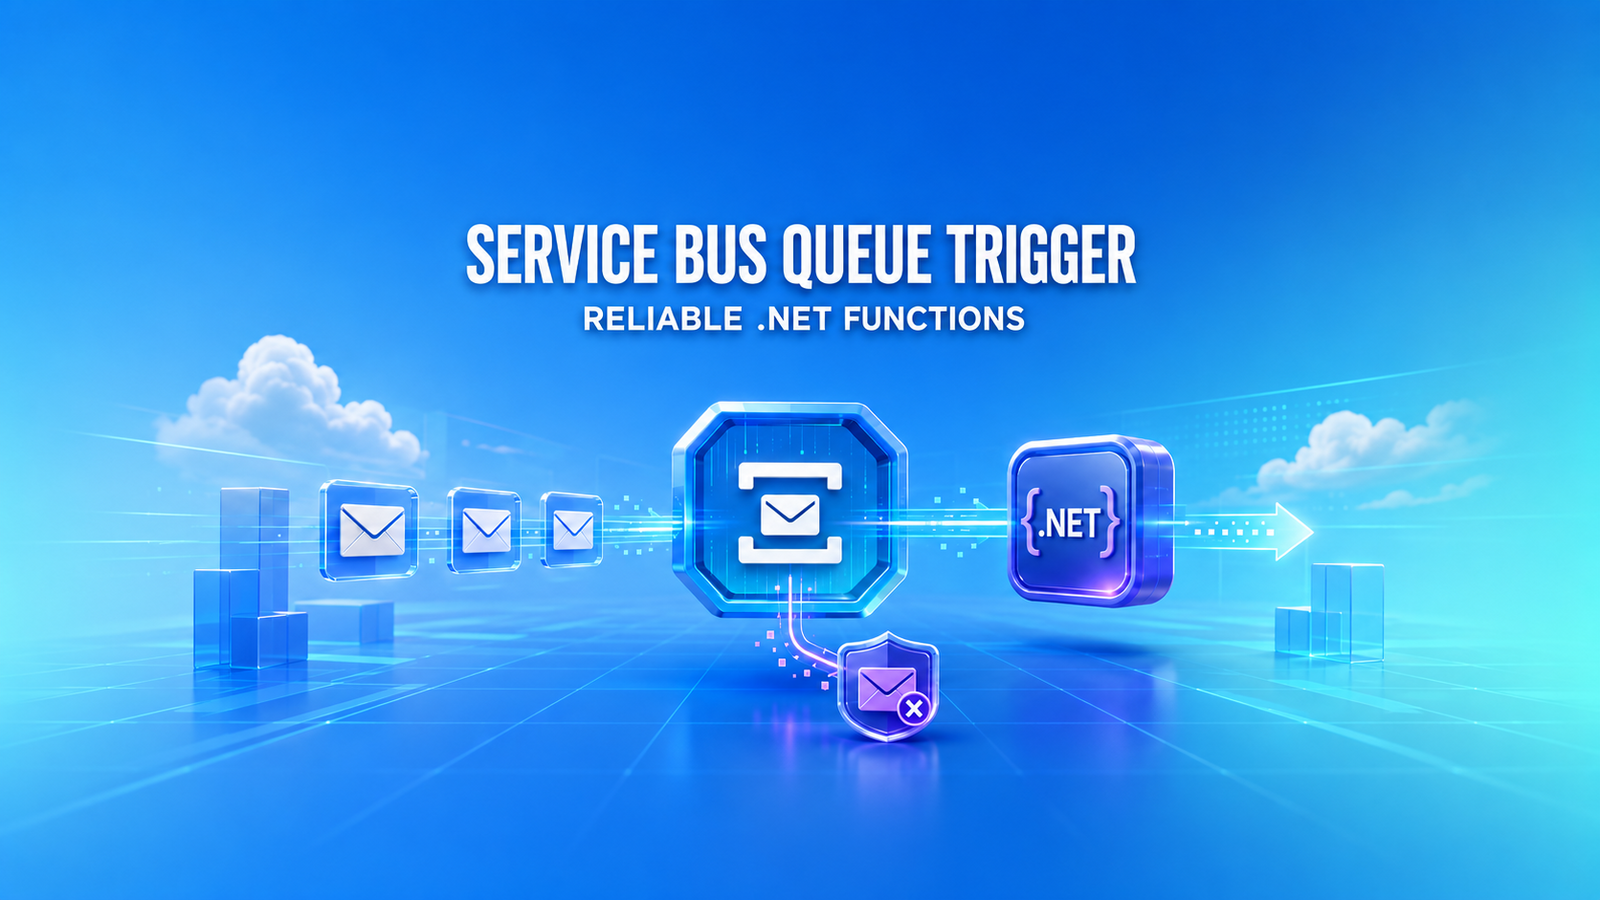
An Azure Service Bus queue trigger lets an Azure Function receive and process queued messages without polling the broker yourself. For a new .NET application, use the isolated worker model, authenticate the trigger with Managed Identity, and design the handler for at-least-once delivery. In practice, that means idempotent side effects, explicit handling of permanent failures, and monitored dead-letter messages.
This update uses .NET 10 and Azure Functions 4.x for the current implementation. The original 2023 ASP.NET Core sender and in-process Functions demo is preserved later as a historical, tested reference, but it should not be the starting point for a new production deployment.
Table of Contents
The production design in one minute
The happy path is simple: an API publishes a small message, the queue stores it, and a function processes it. Reliability comes from the decisions around that path:
- The sender owns the contract. Put an event identifier and the minimum data needed for processing in the message. Avoid sending an entire database entity.
- The consumer assumes duplicates. Peek-lock delivery is at least once, so the same message can be delivered again after a crash or a lost lock.
- Retryable and permanent failures are different. A transient dependency failure should be retried; malformed or unsupported data should be dead-lettered with a useful reason.
- Completion follows the durable side effect. Complete the message only after the database change, email handoff, or other business operation is safely recorded.
- The dead-letter queue is operational work. Alert on it, inspect it, and define a replay or disposal procedure before production traffic arrives.
This is not exactly-once execution. It is an at-least-once transport combined with an idempotent application boundary, which is the practical reliability model for most Service Bus consumers.
Create the .NET 10 isolated Functions project
Azure Functions 4.x supports .NET 10 in the isolated worker model. The in-process model is limited to .NET 8 and reaches end of support on November 10, 2026. Microsoft also retired the older WindowsAzure.ServiceBus and Microsoft.Azure.ServiceBus client libraries on September 30, 2026, so new code should use the Azure.Messaging.ServiceBus types exposed by the 5.x Functions extension.
A minimal project file can use the current Azure.Functions.Sdk project SDK. The versions below are supported baselines for the features used in this article; update to a later compatible patch when you create the project.
<Project Sdk="Azure.Functions.Sdk/1.0.0">
  <PropertyGroup>
    <TargetFramework>net10.0</TargetFramework>
    <Nullable>enable</Nullable>
    <ImplicitUsings>enable</ImplicitUsings>
  </PropertyGroup>
  <ItemGroup>
    <PackageReference Include="Microsoft.Azure.Functions.Worker"
                      Version="2.52.0" />
    <PackageReference Include="Microsoft.Azure.Functions.Worker.Extensions.ServiceBus"
                      Version="5.14.1" />
  </ItemGroup>
</Project>
ServiceBusReceivedMessage and ServiceBusMessageActions require the Service Bus extension version 5.14.1 or later. The worker package must be 2.50.0 or later for .NET 10.
The isolated worker uses normal .NET dependency injection. Register the application service that performs the durable, idempotent business operation:
using Microsoft.Azure.Functions.Worker.Builder;
using Microsoft.Extensions.DependencyInjection;
using Microsoft.Extensions.Hosting;
var builder = FunctionsApplication.CreateBuilder(args);
builder.Services.AddScoped<IReminderProcessor, ReminderProcessor>();
builder.Build().Run();
This keeps transport concerns in the function and business behavior in a testable service. The same ASP.NET Core dependency injection principles apply to the isolated worker.
Connect with Managed Identity
Do not place a namespace connection string in source control. Set Connection = "ServiceBusConnection" on the trigger and configure a group of application settings with the same prefix:
ServiceBusConnection__fullyQualifiedNamespace=my-namespace.servicebus.windows.net
ServiceBusConnection__credential=managedidentity
Those two settings use the function app’s system-assigned identity. For a user-assigned identity, add ServiceBusConnection__clientId with that identity’s client ID. During local development, omit the credential setting and let the Functions tooling use your developer identity, such as the account authenticated through Azure CLI.
- Assign Azure Service Bus Data Receiver at the queue or namespace scope to let the trigger receive messages.
- Assign Azure Service Bus Data Sender to the API identity that publishes messages.
- For accurate target-based scaling, the trigger identity also needs Azure Service Bus Data Owner, or a custom role that includes the required namespace management read permission. Without it, the extension silently falls back to a less accurate peek-based estimate.
Use least privilege deliberately: Data Receiver is enough for message processing, while the broader management permission is a separate scaling decision. If a legacy environment must keep a connection string, store it as an app setting backed by Azure Key Vault configuration, never in local.settings.json committed to Git.
Define an idempotent processing boundary
Peek-lock delivery deliberately favors duplicates over lost messages. A function can finish the business operation and crash before CompleteMessageAsync reaches Service Bus. The broker then makes the message available again. Service Bus duplicate detection can help prevent duplicate sends, but it does not remove the need for an idempotent consumer.
public sealed record AppointmentReminder(
    Guid AppointmentId,
    string PatientEmail,
    DateTimeOffset AppointmentStartsAt);
public enum ProcessingOutcome
{
    Processed,
    AlreadyProcessed,
    PermanentFailure
}
public sealed record ProcessingResult(
    ProcessingOutcome Outcome,
    string? ErrorCode = null,
    string? ErrorDescription = null);
public interface IReminderProcessor
{
    Task<ProcessingResult> ProcessOnceAsync(
        string messageId,
        AppointmentReminder reminder,
        CancellationToken cancellationToken);
}
ProcessOnceAsync should claim messageId in durable storage and record the business result atomically whenever the storage technology permits it. A unique key on the message ID is usually the simplest guard. If the operation calls a remote provider, use that provider’s idempotency key where available, or implement an outbox/inbox boundary so a retry cannot repeat the external side effect unnoticed.
Implement explicit message settlement
Automatic completion is convenient for simple handlers. Explicit settlement is more useful when the application needs to distinguish invalid input from transient failure. Set AutoCompleteMessages = false when you inject ServiceBusMessageActions.
using System.Text.Json;
using Azure.Messaging.ServiceBus;
using Microsoft.Azure.Functions.Worker;
using Microsoft.Extensions.Logging;
public sealed class ProcessAppointmentReminder
{
    private readonly IReminderProcessor _processor;
    private readonly ILogger<ProcessAppointmentReminder> _logger;
    public ProcessAppointmentReminder(
        IReminderProcessor processor,
        ILogger<ProcessAppointmentReminder> logger)
    {
        _processor = processor;
        _logger = logger;
    }
    [Function(nameof(ProcessAppointmentReminder))]
    public async Task RunAsync(
        [ServiceBusTrigger(
            "%AppointmentReminderQueue%",
            Connection = "ServiceBusConnection",
            AutoCompleteMessages = false)]
        ServiceBusReceivedMessage message,
        ServiceBusMessageActions actions,
        CancellationToken cancellationToken)
    {
        using var scope = _logger.BeginScope(new Dictionary<string, object?>
        {
            ["MessageId"] = message.MessageId,
            ["DeliveryCount"] = message.DeliveryCount,
            ["CorrelationId"] = message.CorrelationId
        });
        AppointmentReminder? reminder;
        try
        {
            reminder = message.Body.ToObjectFromJson<AppointmentReminder>();
        }
        catch (JsonException exception)
        {
            await actions.DeadLetterMessageAsync(
                message,
                "InvalidJson",
                exception.Message,
                cancellationToken);
            return;
        }
        if (reminder is null || reminder.AppointmentId == Guid.Empty)
        {
            await actions.DeadLetterMessageAsync(
                message,
                "InvalidContract",
                "The appointment identifier is missing.",
                cancellationToken);
            return;
        }
        try
        {
            var result = await _processor.ProcessOnceAsync(
                message.MessageId,
                reminder,
                cancellationToken);
            if (result.Outcome is ProcessingOutcome.PermanentFailure)
            {
                await actions.DeadLetterMessageAsync(
                    message,
                    result.ErrorCode ?? "PermanentFailure",
                    result.ErrorDescription ?? "The message cannot be processed.",
                    cancellationToken);
                return;
            }
            // Processed and AlreadyProcessed are both safe to settle.
            await actions.CompleteMessageAsync(message, cancellationToken);
        }
        catch (OperationCanceledException) when (cancellationToken.IsCancellationRequested)
        {
            throw;
        }
        catch (Exception exception)
        {
            _logger.LogError(exception, "Transient or unexpected processing failure");
            await actions.AbandonMessageAsync(
                message,
                cancellationToken: cancellationToken);
            throw;
        }
    }
}
The handler deliberately completes duplicate messages because the durable side effect already exists. It dead-letters data that cannot become valid through another attempt. A transient or unexpected exception abandons the message for another delivery and is rethrown so the invocation is recorded as failed. Do not log the full body when it can contain personal or secret data.
Tune concurrency, prefetch, and lock renewal
Start conservatively and measure. Concurrency is multiplied by the number of cores and again by the number of scaled-out instances, so a value that looks small can still create substantial pressure on a database or mail provider.
{
  "version": "2.0",
  "extensions": {
    "serviceBus": {
      "prefetchCount": 16,
      "maxConcurrentCalls": 8,
      "maxAutoLockRenewalDuration": "00:05:00",
      "clientRetryOptions": {
        "mode": "exponential",
        "tryTimeout": "00:01:00",
        "delay": "00:00:00.80",
        "maxDelay": "00:01:00",
        "maxRetries": 3
      }
    }
  }
}
These values are a starting point, not a universal recommendation. Increase maxConcurrentCalls only while downstream latency, throttling, and error rate remain healthy. Prefetched messages are already locked, so an oversized prefetch cache can cause locks to expire before the handler reaches them. Keep normal processing comfortably below the lock-renewal window, and move very long workflows to an orchestration or a continuation message.
The clientRetryOptions settings cover the extension’s communication with Service Bus. They do not configure retries of your function’s business execution. Execution retries are driven by message settlement, lock expiry, and the queue’s MaxDeliveryCount.
Operate the queue and dead-letter queue
- Alert on active message count, oldest-message age, dead-letter count, failed invocations, and processing latency.
- Log
MessageId,CorrelationId,DeliveryCount, outcome, and duration as structured properties. - Set
MaxDeliveryCountaccording to the failure mode and recovery time of dependencies. The Service Bus default is 10 deliveries. - Give dead-lettered messages a stable reason code and a short, non-sensitive description.
- Build an authenticated tool or runbook to inspect, repair, replay, or dispose of dead-lettered messages. The dead-letter queue does not clean itself automatically.
- Test a duplicate, malformed JSON, a permanent validation failure, a transient dependency outage, a lock loss, and a poison message before release.
A queue trigger is reliable only when the consumer and its operations are designed together. Managed Identity removes broker secrets, idempotency makes redelivery safe, explicit settlement makes failure intent visible, and DLQ monitoring closes the operational loop.
Historical 2023 in-process demo
Historical context: the following walkthrough is the original working demo published in 2023. It used the Azure Functions in-process model, [FunctionName], FunctionsStartup, SAS connection strings, and the older Service Bus client. Its screenshots and GitHub repository are retained because they document the original, tested result. Treat this section as migration context—not as the recommended template for a new deployment in 2026.
Creating an Azure Service Bus Namespace in the Azure Portal
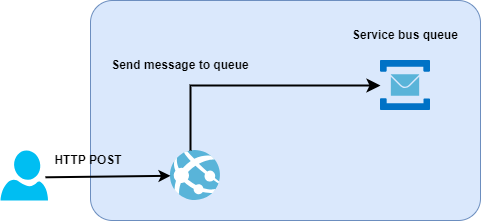
In the first part, we will create ASP.NET Core API to send messages to the Service Bus Queue, and in the second part, we will consume the messages using Azure function, as shown in the following diagram
1. Type Service Bus into the Azure portal search bar and click
Create to provision a new Service Bus namespace.
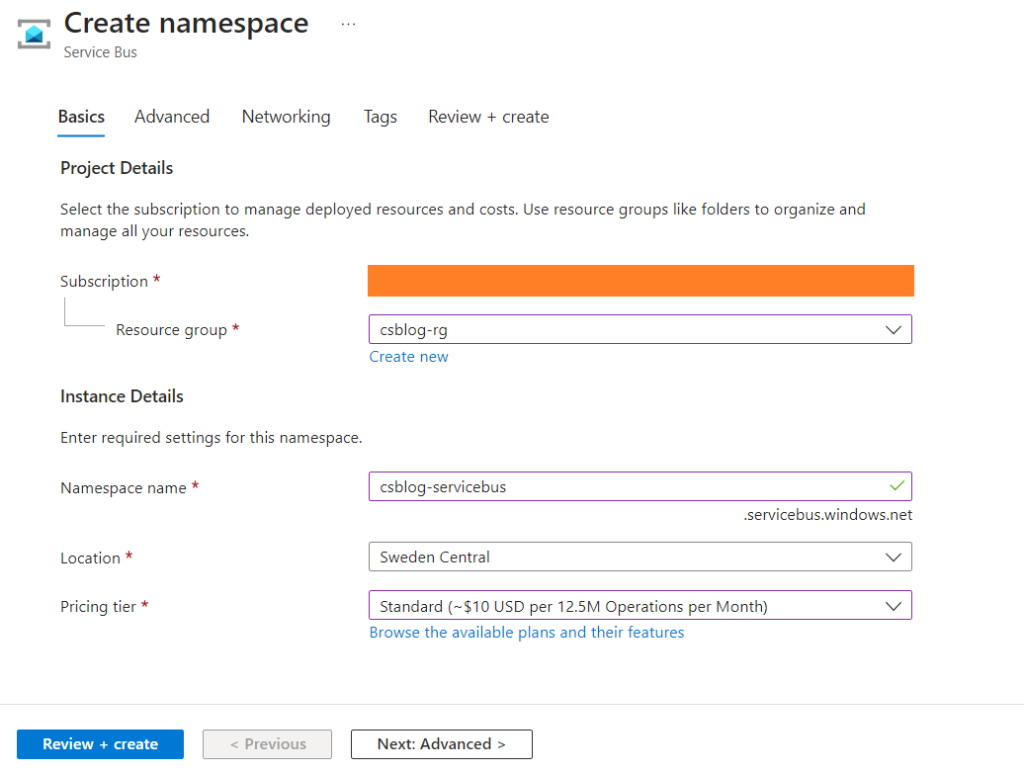
2. Enter the required information for the new Azure Service Bus namespace, and click Review + create, as
shown in the following screenshot.
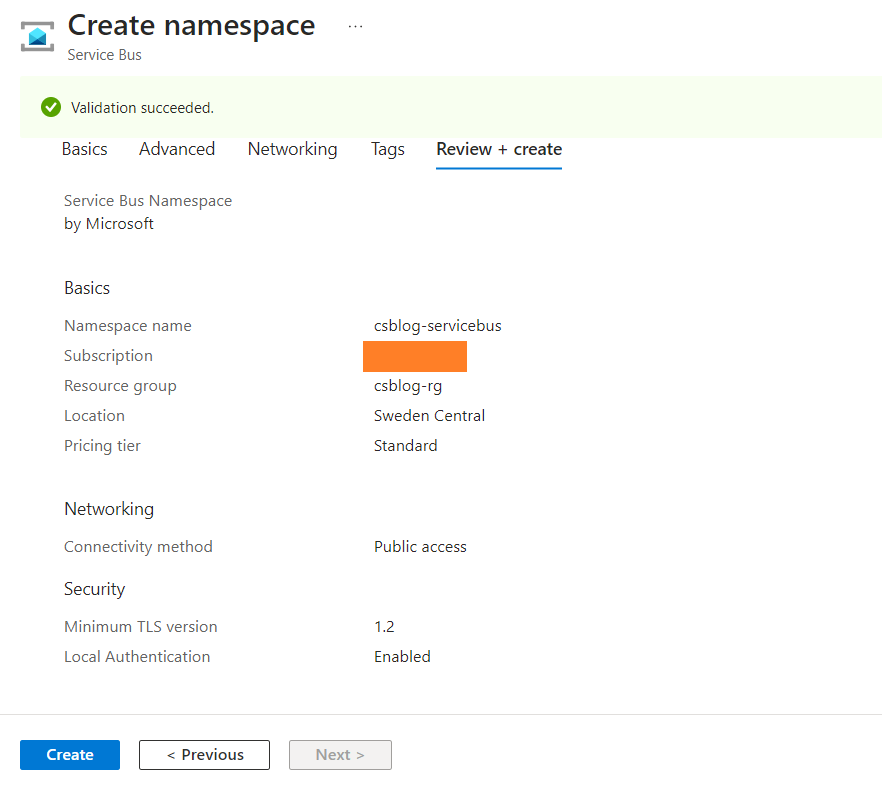
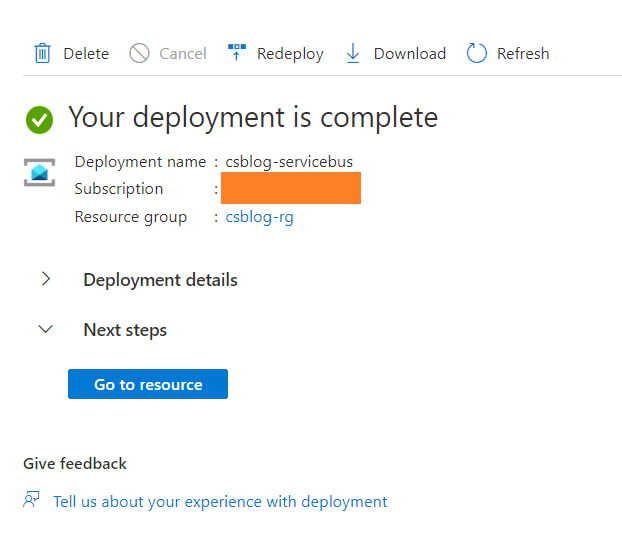
3. Click Create when validation is successful and then click Go to resource once the namespace is created, as shown in the following diagrams.
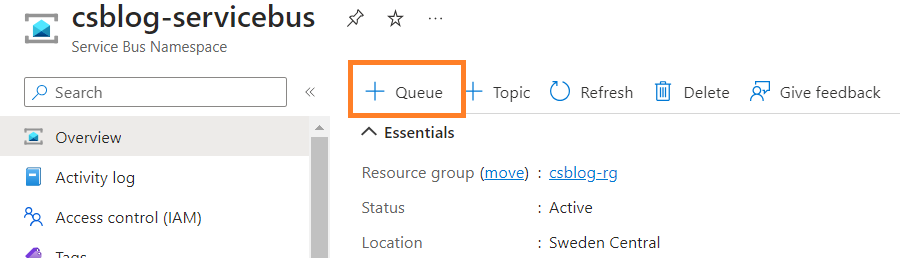
4. Click + Queue to create an Azure Service Bus Queue inside the created namespace as highlighted in the following screenshot.
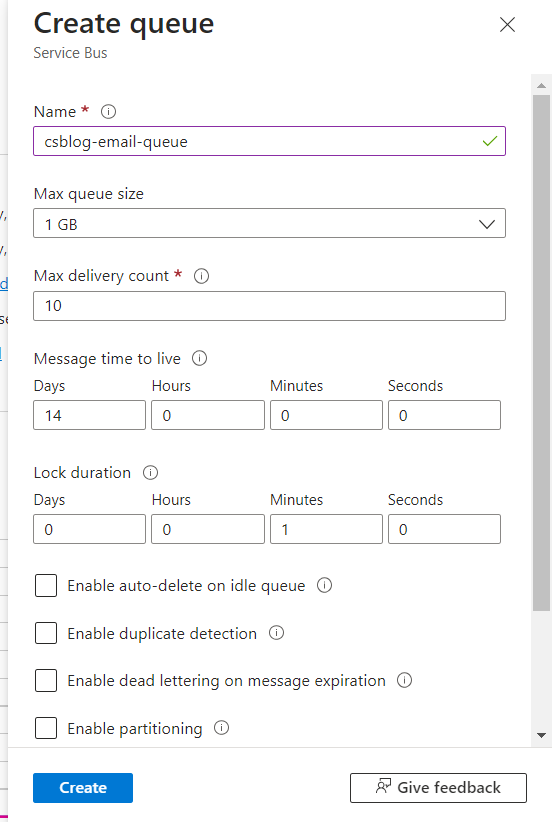
5. Enter the required information, and click Create.
Creating Shared Access Policy (SAS)
Azure Service Bus Queues can be accessed in various ways, including Azure Active Directory or SAS policies.
To interact with Azure Service Bus Queue, we will create a shared access policy to authenticate our application.
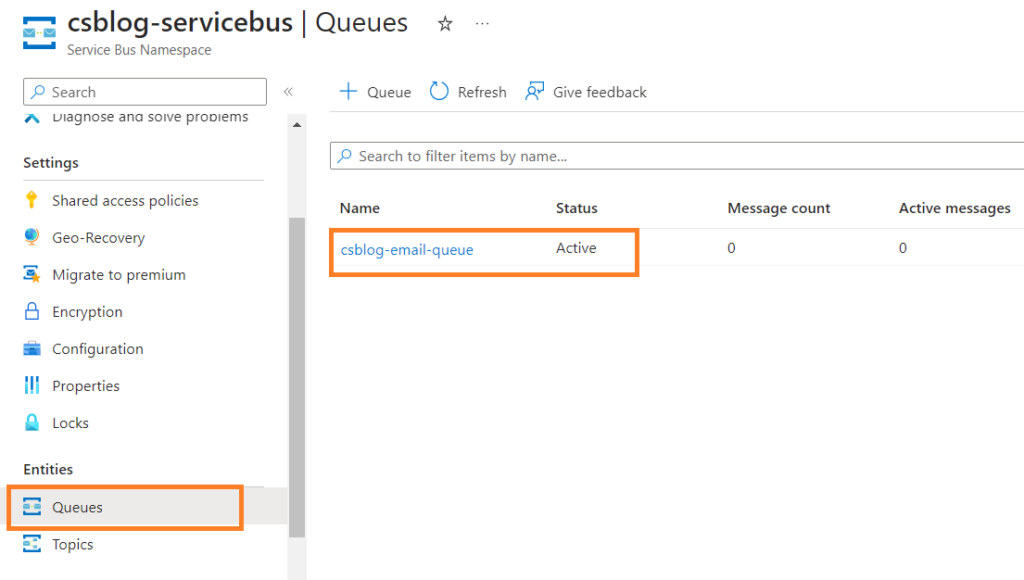
1.In the Entities section, click Queues and select the queue that has been created as shown below.
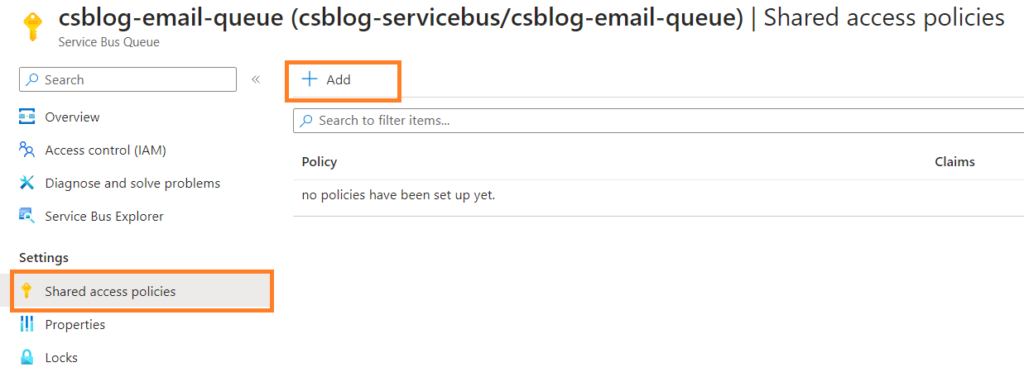
2. To add a new policy, click Shared access policies in the Settings section and then click Add as shown below.
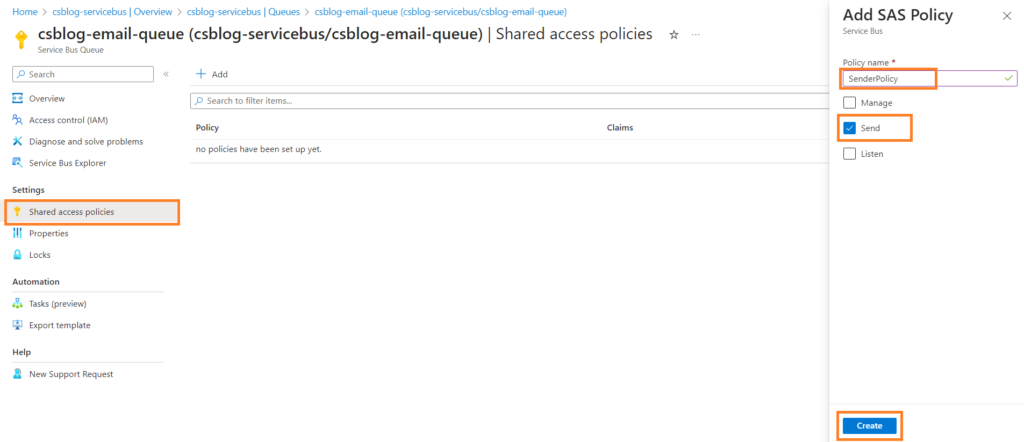
3. Enter the policy name and specify the scope for sending messages to the queue and click Create, as shown in the following screenshot.
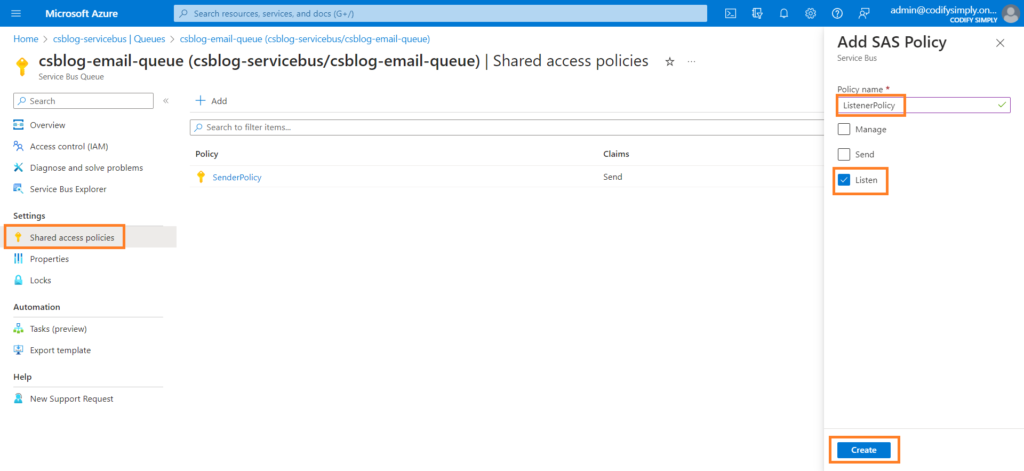
4. Create a new policy for listening to the Service Bus Queue. Enter the policy name and specify the scope in which to listen to messages from the queue, and click Create (see the following figure).
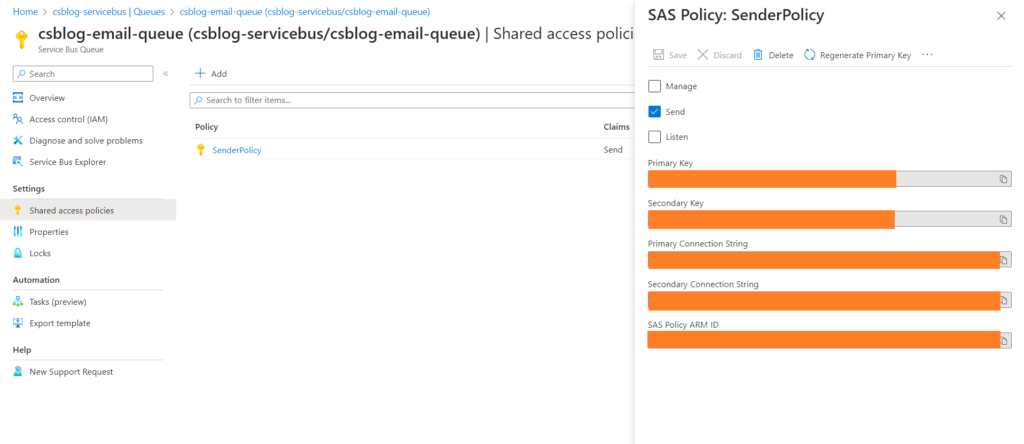
5. Once the SAS Policy is created, we copy the primary connections, and use them later to connect to the Azure Service Bus Queue( see screenshot).
The primary connection string with Listener scope.
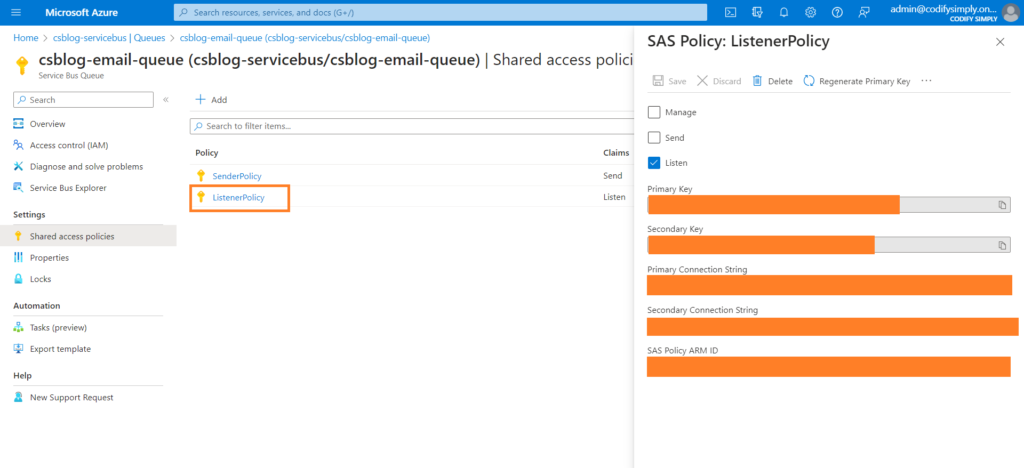
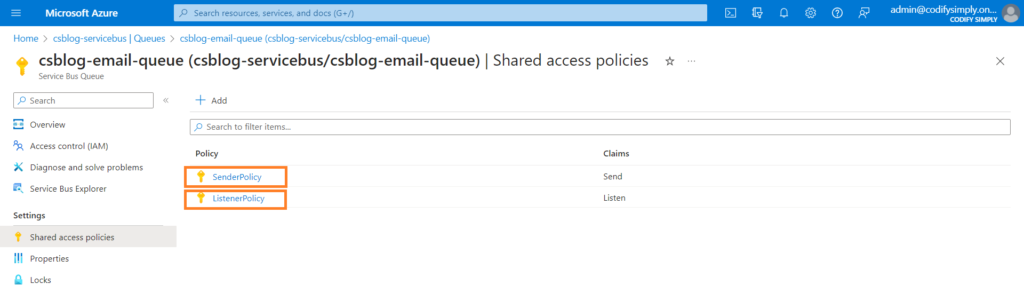
Now we should have two policies as shown below.
Creating a custom service to interact with Azure Service Bus Queue
We have provisioned an Azure Service Bus Queue and are ready to interact with it.
In this section we create a custom service to send messages to the Service Bus Queue using the Azure Software Development Kit (SDK) for ServiceBus.
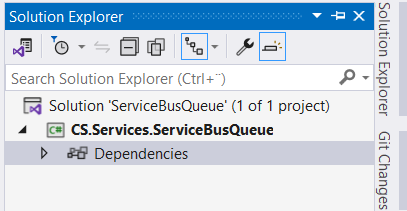
1. Open Visual Studio and create a new solution named ServiceBusQueue.
Add a new class library project to the solution named CS.Services.ServiceBusQueue.
2. Install the following NuGet packages
Azure.Messaging.ServiceBusMicrosoft.Extensions.AzureNewtonsoft.Json
3. Create a new class file named ServiceBusSettings that contains the name of the queue and the enqueue time for the scheduled message, as shown below
namespace CS.Services.ServiceBusQueue
{
    public class ServiceBusSettings
    {
        public string QueueName { get; set; }
        public DateTime EnqueueTimeUtc { get; set; }
    }
}
4. Create a new project folder named Interfaces and add an interface file named IServiceBusQueueSender
namespace CS.Services.ServiceBusQueue.Interfaces
{
    public interface IServiceBusQueueSender
    {
        Task SendMessageAsync(object data = null);
        Task SendMessageBatchAsync(List<object> data = null);
        Task<long> ScheduleMessageAsync(object data = null, DateTime? enqueueTimeUtc = null);
        Task CancelScheduledMessageAsync(long id);
    }
}
Our interface contains four asynchronous methods for sending messages or batches to the Azure Service Bus and for scheduling messages, as well as a method for cancelling a scheduled message based on the sequence number.
5. Add a new class file to the project called ServiceBusQueueSender that implements the IServiceBusQueueSender interface.
namespace CS.Services.ServiceBusQueue
{
    public class ServiceBusQueueSender : IServiceBusQueueSender
    {
        private readonly ServiceBusSettings serviceBusSettings;
        private ServiceBusSender ServiceBusSender { get; set; }
        public ServiceBusQueueSender(ServiceBusClient serviceBusClient, ServiceBusSettings serviceBusSettings)
        {
            this.serviceBusSettings = serviceBusSettings;
            ServiceBusSender = serviceBusClient.CreateSender(serviceBusSettings.QueueName);
        }
        public async Task SendMessageAsync(object data = null)
        {
            var message = Create(data);
            await ServiceBusSender.SendMessageAsync(message).ConfigureAwait(false);
        }
        public async Task SendMessageBatchAsync(List<object> data = null)
        {
            var serviceBusMessageBatch = await ServiceBusSender.CreateMessageBatchAsync().ConfigureAwait(false);
            foreach (var item in data)
            {
                var message = Create(item);
                serviceBusMessageBatch.TryAddMessage(message);
            }
            await ServiceBusSender.SendMessagesAsync(serviceBusMessageBatch).ConfigureAwait(false);
        }
        public async Task<long> ScheduleMessageAsync(object data = null, DateTime? enqueueTimeUtc = null)
        {
            var message = Create(data);
            var enqueueTime = DateTime.UtcNow;
            if (enqueueTimeUtc != null)
            {
                enqueueTime = (DateTime)enqueueTimeUtc;
            }
            else
            {
                enqueueTime = (DateTime)serviceBusSettings.EnqueueTimeUtc;
            }
            return await ServiceBusSender.ScheduleMessageAsync(message, enqueueTime).ConfigureAwait(false);
        }
        public async Task CancelScheduledMessageAsync(long id)
        {
            await ServiceBusSender.CancelScheduledMessageAsync(id).ConfigureAwait(false);
        }
        private static ServiceBusMessage Create<T>(T data)
        {
            if (data == null)
            {
                return new ServiceBusMessage();
            }
            else
            {
                var settings = new JsonSerializerSettings
                {
                    NullValueHandling = NullValueHandling.Ignore
                };
                var json = JsonConvert.SerializeObject(data, Newtonsoft.Json.Formatting.Indented, settings);
                var content = new MemoryStream(Encoding.UTF8.GetBytes(json)).ToArray();
                var result = new ServiceBusMessage(content);
                return result;
            }
        }
    }
}
The ServiceBusQueueSender has two private members of type ServiceBusSettings which contains settings for the Azure Service Bus Queue, and an instance of type ServiceBusClient , which we need to send messages to the Service Bus.
The ServiceBusQueueSender constructor gets two instances of ServiceBusClient and ServiceBusSettings using Dependecy Injection.
We create a ServiceBusMessage instance from the incoming data using the Create<T>(T data)method and send or schedule the message using the ServiceBusSender instance initialized in the constructor .
5. Create a folder project named Extensions.
6. Right-click the Extensions folder and add a new class file named ServiceBusSenderExtensions that contains an extension method AddServiceBusSender that will inject our ServiceBusQueueSender service with configuration settings into the intended application that will utilize it, as shown in the following code.
namespace CS.Services.ServiceBusQueue.Extensions
{
    public static class ServiceBusSenderExtensions
    {
        public static IServiceCollection AddServiceBusSender(this IServiceCollection services, Action<ServiceBusSettings> configureSettings)
        {
            return services.AddSingleton<IServiceBusQueueSender>(serviceProvider =>
            {
                var settings = new ServiceBusSettings();
                configureSettings(settings);
                return ActivatorUtilities.CreateInstance<ServiceBusQueueSender>(serviceProvider, settings);
            });
        }
    }
}
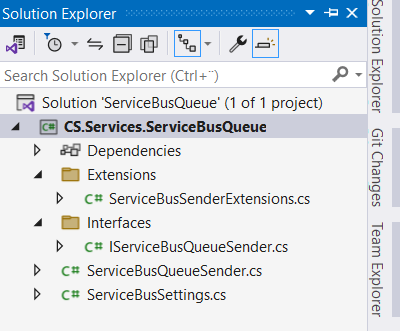
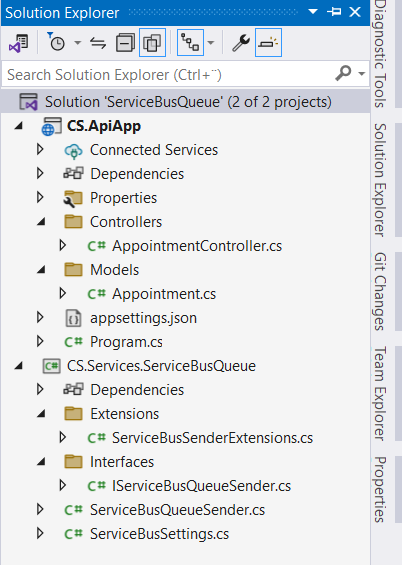
At the end of this section, your project should look like this.
Creating ASP.NET Core API to send messages to the Service Bus Queue
1. Right-click on the solution and add a new ASP.NET Core 6 Web API with name CS.ApiApp.
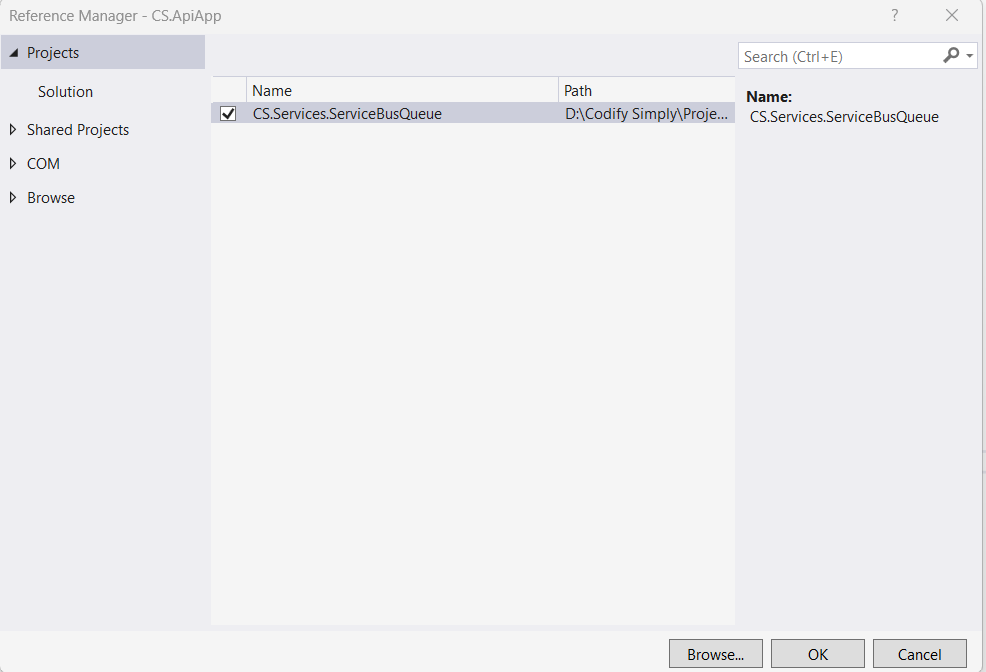
2. In Solution Explorer, right-click the CS.ApiApp project’s Dependencies node, and select Add Project Reference and in the Reference Manager dialog, select the CS.Services.ServiceBusQueue project, and select OK.
3. Add the Azure Service Bus Queue configuration to appsettings.json
{
  "ServicBusConnectionString": "YOUR PRIMARY CONNECTION STRING WITH SEND POLICY",
  "QueueName": "csblog-email-queue",
  "EnqueueTimeUtc": "1/1/2024 00:00:00 AM"
}
4. In the Program.cs file, add the following code to register the ServiceBusClient and ServiceBusQueueSender services in the Dependency Injection container.
builder.Services.AddAzureClients(clientBuilder =>
{
    clientBuilder.AddServiceBusClient(builder.Configuration.GetValue<string>("ServicBusConnectionString"));
});
builder.Services.AddServiceBusSender(settings =>
{
    settings.QueueName = builder.Configuration.GetValue<string>("QueueName");
    settings.EnqueueTimeUtc = builder.Configuration.GetValue<DateTime>("EnqueueTimeUtc");
});
5. Create a new project folder named Models, and add a class file named Appointment.
namespace CS.ApiApp.Models
{
    public class Appointment
    {
        [Required]
        public int AppointmentId { get; set; }
        [Required]
        public int PatientId { get; set; }
        [Required]
        public string PatientFirstName { get; set; }
        public string PatientLastName { get; set; }
        public string DoctorFirstName { get; set; }
        public string DoctorLastName { get; set; }
        [Required]
        public string PatientEmail { get; set; }
        [Required]
        public DateTime AppointmentStart { get; set; }
        public DateTime AppointmentEnd { get; set; }
        public string Description { get; set; }
    }
}
5. Create a new API controller named AppointmentController and modify the controller to receive an instance of IServiceBusQueue via the constructor as described in the following code snippet.
namespace CS.ApiApp.Controllers
{
    [Route("api/[controller]")]
    [ApiController]
    public class AppointmentController : ControllerBase
    {
        private readonly IServiceBusQueueSender serviceBusQueueSender;
        public AppointmentController(IServiceBusQueueSender serviceBusQueueSender)
        {
            this.serviceBusQueueSender = serviceBusQueueSender;
        }
        [HttpPost("book")]
        public async Task BookAppointment([FromBody] Appointment appointment)
        {
            await serviceBusQueueSender.SendMessageAsync(appointment).ConfigureAwait(false);
        }
        [HttpPost("book/batch")]
        public async Task BookAppointments([FromBody] List<Appointment> appointments)
        {
            await serviceBusQueueSender.SendMessageBatchAsync(appointments?.Cast<object>().ToList()).ConfigureAwait(false);
        }
        [HttpPost("schedule")]
        public async Task<long> ScheduledAppointment([FromBody] Appointment appointment, [FromQuery] DateTime enqueueTime)
        {
            var enqueueTimeutc = DateTime.UtcNow.AddMonths(2);
            return await serviceBusQueueSender.ScheduleMessageAsync(appointment, enqueueTimeutc).ConfigureAwait(false);
        }
        [HttpDelete("cancel/{sequenceNumber:long}")]
        public async Task CancelAppointmentNotificationFromQueue([FromRoute] int sequenceNumber)
        {
            await serviceBusQueueSender.CancelScheduledMessageAsync(sequenceNumber).ConfigureAwait(false);
        }
    }
}
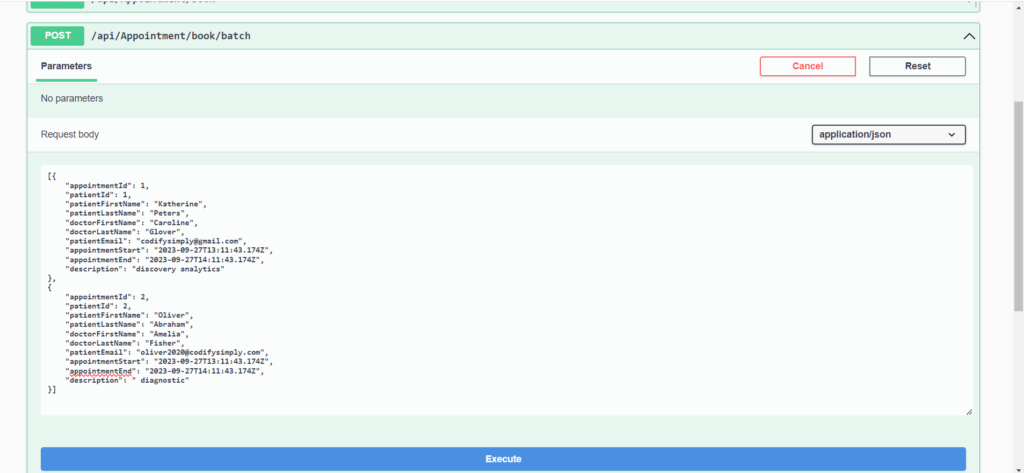
6. Run and test the application by creating a batch message.
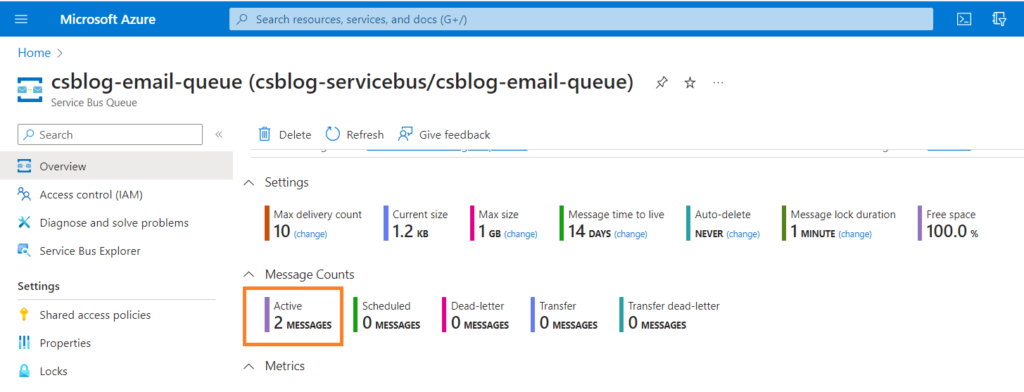
Navigate to the queue in the
Azure portal and you can see that there are two messages in the queue, as shown in the following screenshot.
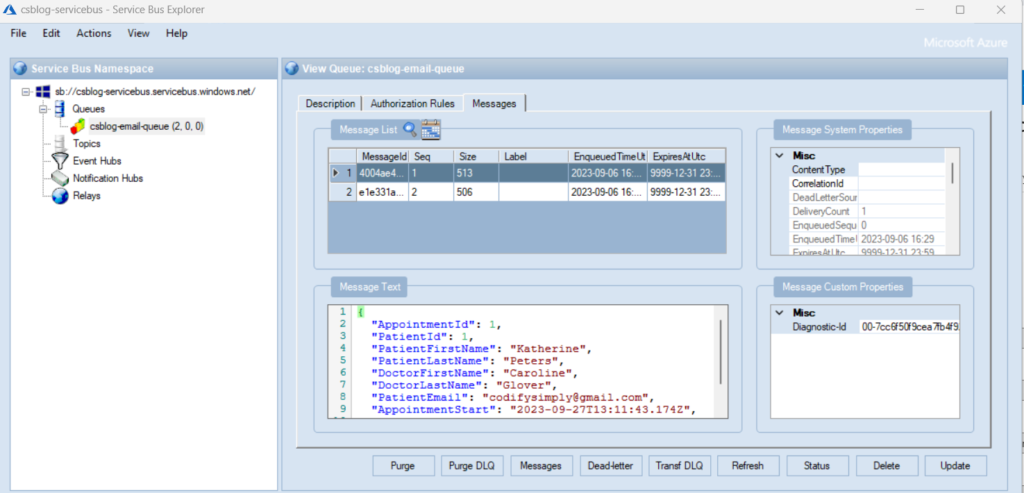
You can also use Service Bus Explorer app to see the messages in the queue.
At the end of this section , your project should look like this.
Creating a custom service to send email via SMTP
In this section, we will create a reusable custom service for sending emails via SMT.
1. Right-click on the solution and add a new class library project named CS.Services.Mail.
2. Install the following NuGet package
Microsoft.Extensions.DependencyInjection
3. Create a new project folder named Models, and add a new class file named MailData with following properties.
namespace CS.Services.Mail.Models
{
    public class MailData
    {
        public List<string> To { get; set; } = new List<string>();
        public List<string> Bcc { get; set; } = new List<string>();
        public List<string> Cc { get; set; } = new List<string>();
        public string Subject { get; set; }
        public string Body { get; set; }
        public bool IsHtml { get; set; }
    }
}
4. Add a new class file to the project called MailSettings with the following properties, which are the configuration settings for the SMTP client.
namespace CS.Services.Mail
{
    public class MailSettings
    {
        public string From { get; set; }
        public string SmtpServer { get; set; }
        public int SmtpPort { get; set; }
        public string SmtpUser { get; set; }
        public string SmtpPassword { get; set; }
    }
}
5. Create a new project folder named Interfaces, and add a new interface file named IMailService with a single method for sending emails to the end user.
namespace CS.Services.Mail.Interfaces
{
    public interface IMailService
    {
        Task<bool> SendAsync(MailData mail);
    }
}
6. Add a new class file to the project called MailService that implements the IMailService interface.
namespace CS.Services.Mail
{
    public class MailService : IMailService
    {
        private readonly MailSettings settings;
        public MailService(MailSettings settings)
        {
            this.settings = settings;
        }
        public async Task<bool> SendAsync(MailData mail)
        {
            try
            {
                using MailMessage mailMessage = new MailMessage();
                using SmtpClient smtp = new SmtpClient(settings.SmtpServer);
                smtp.UseDefaultCredentials = false;
                smtp.EnableSsl = true;
                smtp.Port = settings.SmtpPort;
                smtp.Credentials = new NetworkCredential(settings.SmtpUser, settings.SmtpPassword);
                mailMessage.DeliveryNotificationOptions = DeliveryNotificationOptions.None;
                mailMessage.From = new MailAddress(settings.SmtpUser);
                foreach (var to in mail.To)
                {
                    mailMessage.To.Add(to);
                }
                foreach (var coptyTo in mail.Cc)
                {
                    mailMessage.CC.Add(new MailAddress(coptyTo));
                }
                foreach (var hidenCopy in mail.Bcc)
                {
                    mail.Bcc.Add(hidenCopy);
                }
                mailMessage.Subject = mail.Subject;
                mailMessage.Body = mail.Body;
                mailMessage.IsBodyHtml = mail.IsHtml;
                await smtp.SendMailAsync(mailMessage).ConfigureAwait(false);
                return true; ;
            }
            catch (Exception)
            {
                return false;
            }
        }
    }
}
The MailService uses Dependecy Injection to obtain an instance of MailSettings that contains the settings required to initialize theSmtpClient instance.
The SendAsync method initializes a MailMessage instance and an instance of SmtpClient, then gathers the required information from the incoming MailData parameter and sends an email using SendMessageAsync from SmtpClient.
7. Create a folder project named Extensions.
8. Right-click the Extensions folder and add a new class file named MailExtensions that contains a single extension method AddMailService that injects an instance of the MailService service with configuration settings into the intended application that will use the service, as shown in the following code.
namespace CS.Services.Mail.Extensions
{
    public static class MailExtensions
    {
        public static IServiceCollection AddMailService(this IServiceCollection services, Action<MailSettings> configureSettings)
        {
            return services.AddSingleton<IMailService>(serviceProvider =>
            {
                var settings = new MailSettings();
                configureSettings(settings);
                return ActivatorUtilities.CreateInstance<MailService>(serviceProvider, settings);
            });
        }
    }
}
Creating an Azure function to process messages
The Azure Functions app is an Azure Platform as a Service (PaaS) that lets you create pieces of code, connect them to your application, and use triggers to launch them.
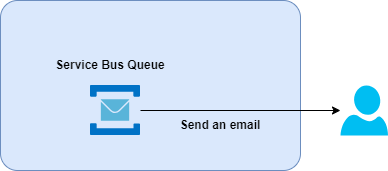
In this section, we will create an Azure function to process incoming messages in the service bus queue and send emails to the user, as described in the following diagram.
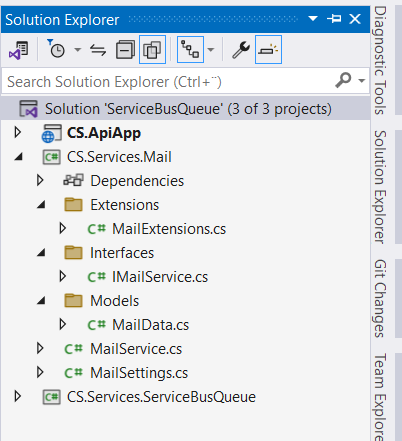
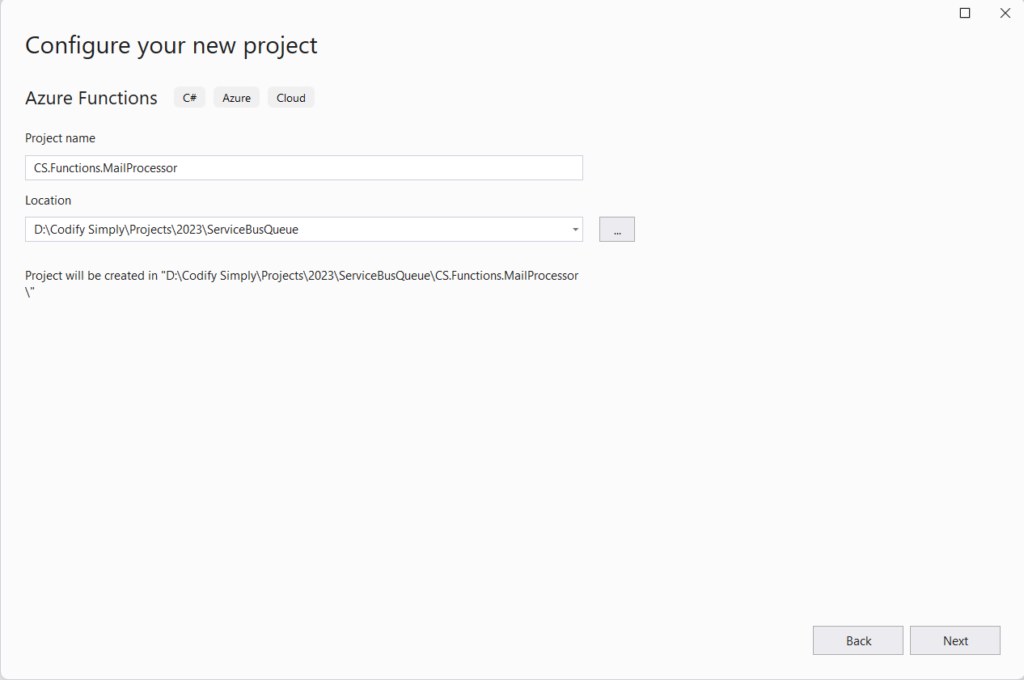
1. Right-click the ServiceBusQueue solution and add a new Azure Functions app project named CS.Functions.MailProcessor.
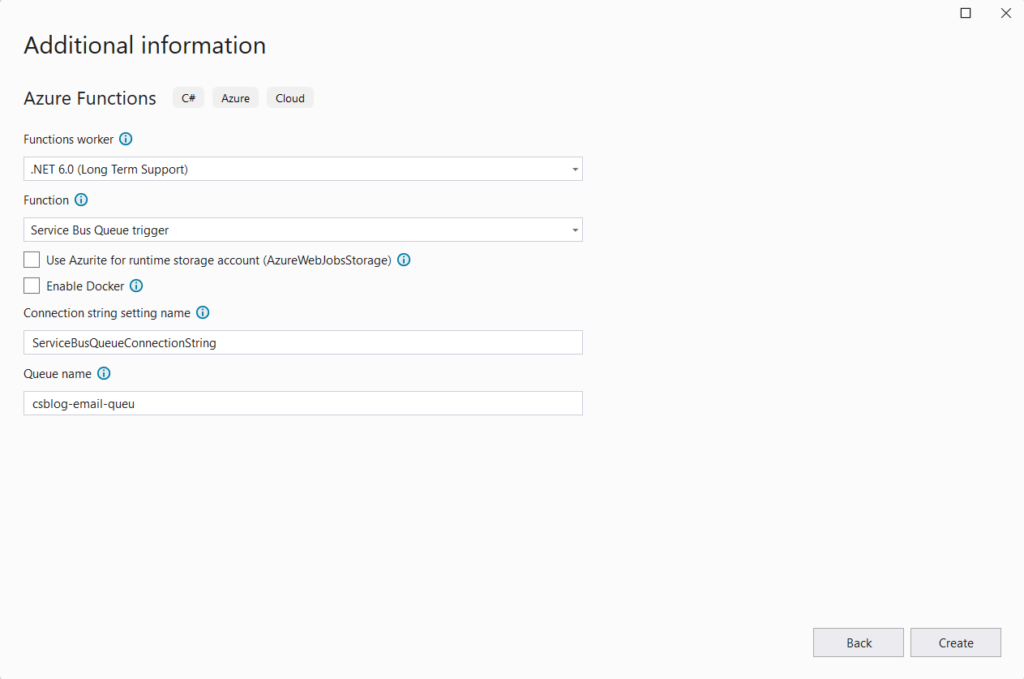
2. Select . NET 6 and Service Bus Queue Trigger and click Create, as shown below.
3. Once the project is created, update the function name to ProcessMail.
namespace CS.Functions.MailProcessor
{
    public class ProcessMail
    {
        [FunctionName("ProcessMail")]
        public void Run([ServiceBusTrigger("csblog-email-queue", Connection = "ServiceBusQueueConnectionString")]string myQueueItem, ILogger log)
        {
            log.LogInformation($"C# ServiceBus queue trigger function processed message: {myQueueItem}");
        }
    }
}
4. Install the following NuGet packages
Microsoft.Azure.Functions.Extensions
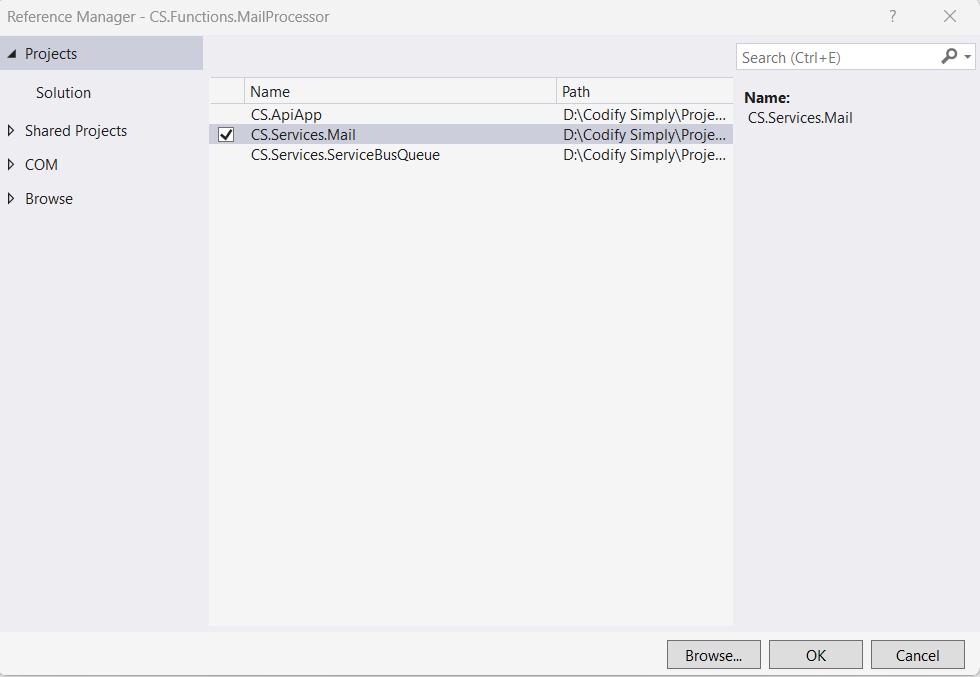
5. In Solution Explorer, right-click the CS.Functions.MailProcessor project’s Dependencies node, and select Add Project Reference and in the Reference Manager dialog, select the CS.Services.Mail project, and select OK.
6. Create a new project folder named Models, and add a class file named Appointment.
namespace CS.Functions.MailProcessor.Models
{
    public class Appointment
    {
        public int AppointmentId { get; set; }
        public int PatientId { get; set; }
        public string PatientFirstName { get; set; }
        public string PatientLastName { get; set; }
        public string DoctorFirstName { get; set; }
        public string DoctorLastName { get; set; }
        public string PatientEmail { get; set; }
        public DateTime AppointmentStart { get; set; }
        public DateTime AppointmentEnd { get; set; }
        public string Description { get; set; }
    }
}
7. Right-click the project and add a new json file named appsettings.json and add the primary connection string with ListenerPolicy and Smtp settings as follows.
{
  "ServiceBusQueueConnectionString": "YOUR CONNECTION STRINF WITH LISTEN POLICY",
  "SmtpServer": "smtp.gmail.com",
  "SmtpPort": 587,
  "SmtpUser": "YOUR SMTP USER",
  "SmtpPassword": "YOUR SMTP PASSWORD",
  "From": "YOUR EMAIL ADDRESS"
}
8. Create a Startup.cs class that inherits from the FunctionsStartup class from Microsoft.Azure.Functions.Extensions to register the dependencies as show below.
namespace CS.Functions.MailProcessor
{
    public class Startup : FunctionsStartup
    {
        public override void Configure(IFunctionsHostBuilder builder)
        {
            throw new NotImplementedException();
        }
    }
}
9. Override ConfigureAppConfiguration to load the configurations from the appsettings.json file.
namespace CS.Functions.MailProcessor
{
    public class Startup : FunctionsStartup
    {
        public override void Configure(IFunctionsHostBuilder builder)
        {
            throw new NotImplementedException();
        }
        public override void ConfigureAppConfiguration(IFunctionsConfigurationBuilder builder)
        {
            base.ConfigureAppConfiguration(builder);
            var context = builder.GetContext();
            builder.ConfigurationBuilder
                .AddJsonFile(
                    Path.Combine(context.ApplicationRootPath, "appsettings.json"),
                    optional: true,
                    reloadOnChange: false);
        }
    }
}
10. Update the Startup.cs file, add the following code to register the MailService in the Dependency Injection container.
namespace CS.Functions.MailProcessor
{
    public class Startup : FunctionsStartup
    {
        public override void Configure(IFunctionsHostBuilder builder)
        {
            var configuration = builder.GetContext().Configuration;
            builder.Services.AddMailService(settings =>
            {
                settings.SmtpServer = configuration.GetValue<string>("SmtpServer");
                settings.SmtpPort = configuration.GetValue<int>("SmtpPort");
                settings.SmtpUser = configuration.GetValue<string>("SmtpUser"); ;
                settings.SmtpPassword = configuration.GetValue<string>("SmtpPassword"); ;
                settings.From = configuration.GetValue<string>("From");
            });
        }
        public override void ConfigureAppConfiguration(IFunctionsConfigurationBuilder builder)
        {
            base.ConfigureAppConfiguration(builder);
            var context = builder.GetContext();
            builder.ConfigurationBuilder
                .AddJsonFile(
                    Path.Combine(context.ApplicationRootPath, "appsettings.json"),
                    optional: true,
                    reloadOnChange: false);
        }
    }
}
11. Update the ProcessMail function to process the incoming messages from the Service Bus Queue as follows.
namespace CS.Functions.MailProcessor
{
    public class ProcessMail
    {
        private readonly IMailService mailService;
        public ProcessMail(IMailService mailService)
        {
            this.mailService = mailService;
        }
        [FunctionName("ProcessMail")]
        public async Task RunAsync([ServiceBusTrigger("csblog-email-queue", Connection = "ServiceBusQueueConnectionString")]string myQueueItem, ILogger log)
        {
            if (myQueueItem != null)
            {
                var mail = Create(myQueueItem);
                await mailService.SendAsync(mail).ConfigureAwait(false);
            }
        }
        private static MailData Create(string data)
        {
            var appointment = JsonConvert.DeserializeObject<Appointment>(data);
            var mail = new MailData();
            mail.To = new List<string> { appointment.PatientEmail };
            mail.Subject = $"Appointment reminder for {appointment.AppointmentStart:g}";
            mail.IsHtml = true;
            StringBuilder sb = new StringBuilder();
            sb.Append($"Dear Mr./Mrs. {appointment.PatientFirstName} {appointment.PatientLastName}<br>");
            sb.Append($"This is a reminder that you have an appointment scheduled for ");
            sb.Append($"{appointment.AppointmentStart.ToString("dd.MM.yyy")} at {appointment.AppointmentStart.ToString("H:mm")}<br>");
            sb.Append("We look forward to seeing you.<br>");
            sb.Append("Best regards.");
            mail.Body = sb.ToString();
            return mail;
        }
    }
}
The ProcessMail class uses Dependecy Injection to get an instance of MailService that sends the mail using SendAsync .
The Create helper method deserializes the received data from the Azure Service Bus Queue and creates a MailData instance that is sent to the end user.
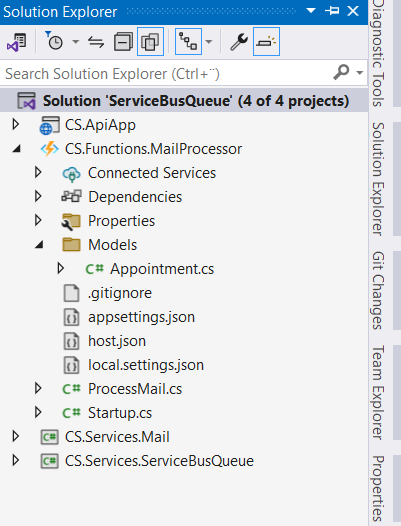
At the end of this section, your project should look like this.
Run the application
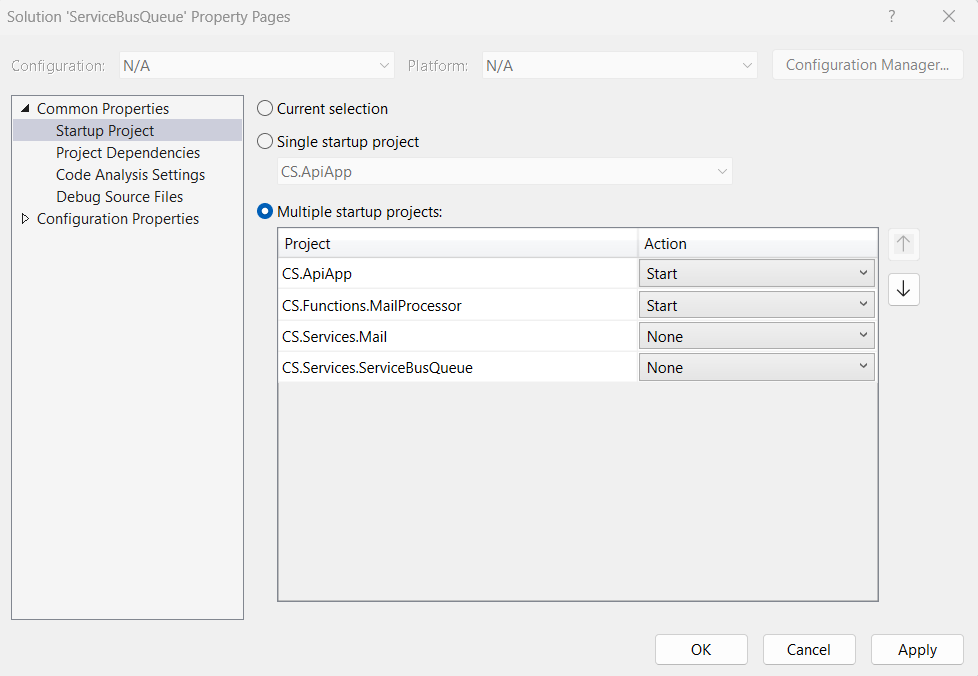
1. In Solution Explorer, right-click the solution, select Properties, and select Multiple Startup Projects.
2. Set CS.ApiApp and CS.Functions.Mail as startup projects, as shown in the following figure.
3. Run and test the application by creating a batch message.
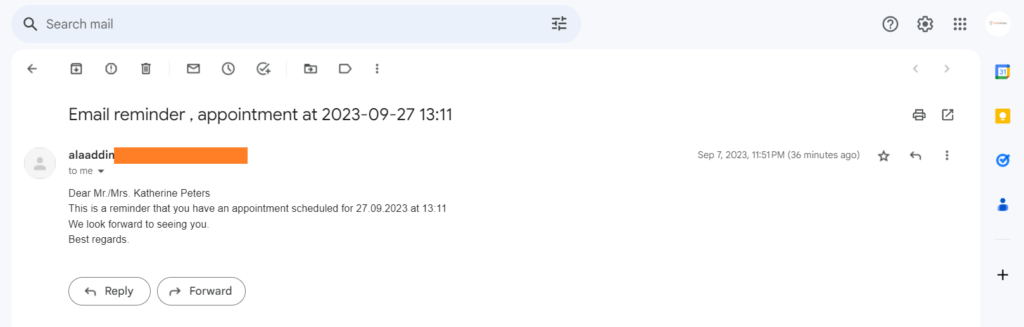
4. Observe the result.
When deploying the application, use Azure Key Vault to set the secret.
The code for the demo can be found Here
References
- Microsoft Learn: Guide for running C# Azure Functions in the isolated worker model
- Microsoft Learn: Azure Service Bus bindings for Azure Functions
- Microsoft Learn: Azure Service Bus trigger for Azure Functions
- Microsoft Learn: Configure identity-based connections in Azure Functions
- Microsoft Learn: Service Bus message transfers, locks, and settlement
- Microsoft Learn: Prevent message loss and duplicate processing
- Microsoft Learn: Service Bus dead-letter queues
Found this useful? Support more practical developer content.