Table of Contents
Introduction
In the ever-evolving landscape of software development, the Entity Framework Code First approach has proven to be a powerful tool for creating and managing databases. This methodology allows developers to define their data model using C# classes and automatically generate the corresponding database schema. As companies increasingly look for efficient and optimized ways to manage data, understanding the principles and benefits of Entity Framework Code First is essential. This blog post looks at the core concepts, benefits and practical applications of Entity Framework Code First, providing valuable insight for both beginners and experienced developers looking to improve their database management skills.
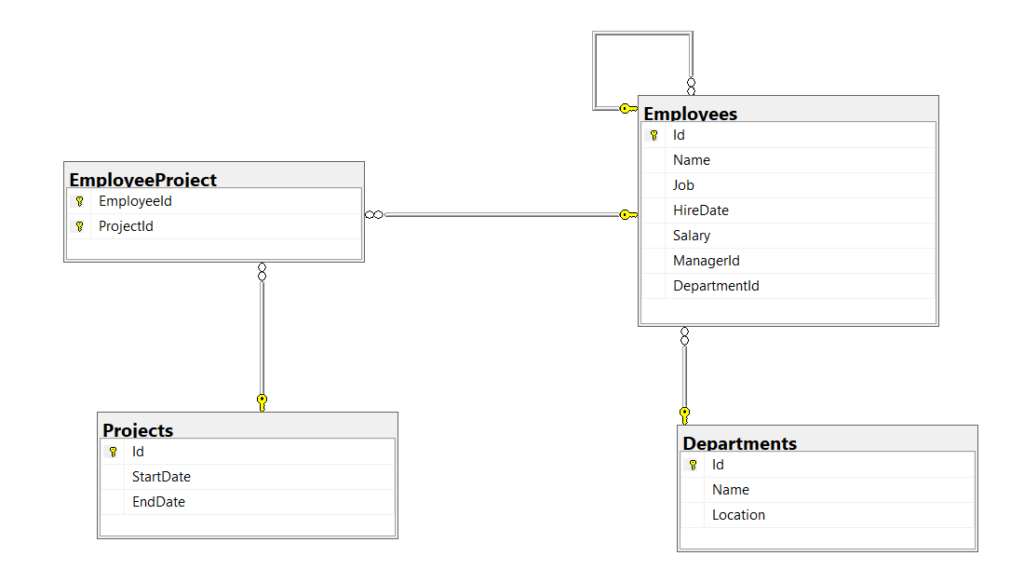
Take a look at the finished database created with the Entity Framework Code First approach.
What is Entity Framework ?
Entity Framework Core, or EF Core for short, is Microsoft’s official data access platform for building software with .NET and is a cross‑platform and open source ORM framework that allows you to create and manage mapping configurations between the database schema and the object models. Entity Framework Core supports many database providers, such as SQL Server, SQLite and supports database migrations, which allows us to update the database schema easily and is designed to be lightweight and performant.
EF Core can take over the redundant tasks of accessing data in your applications, freeing up developers’ time and brainpower for more important tasks. It is also able to track the state of objects to intelligently track changes in the database on your behalf, and it can help you keep your database schema up to date as your business model and developers can easily use LINQ to write and execute queries for the .NET classes in their solution.
Entity Framework Code First Approach
Entity Framework Core supports the Entity Framework Core code first approach, i.e. we can define the database schema with C# code and EF Core will generate the database schema automatically.
We start by defining the domain model classes and then configuring the classes using the Fluent API to keep our domain model classes clean and readable, and Entity Framework Core generates the database schema based on these classes and configuration.
Entity Framework code first approach is flexible and allows us to have full control over the database design, and completely over our code.
Prerequisites
Before we start, ensure you have the following installed:
- NET 8 SDK
- Visual Studio 2022 (or another preferred IDE)
- SQl Server. In this demo we use LocalDB, a lightweight version of SQL Server and is suitable for development
- Basic knowledge of programming with .NET and C#
Setting Up the Project
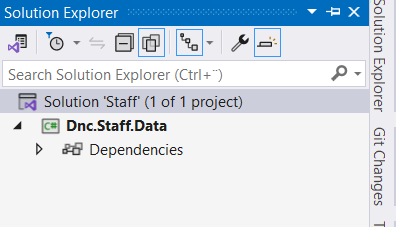
Open Visual Studio and create a blank solution named Staff . Add a new Class library named Dnc.Staff.Data to the solution. Select .NET 8 (Long Term Support) as the target Framework.
We first need to install the dotnet-ef tool. Install the tool as a global tool, so we can use it in any project.
You can install it using the following command:
dotnet tool install --global dotnet-efThe dotnet-ef CLI tool EF Core Tooling contains the commands we need to scaffold an existing database or to create and remove a database.
Once the project is created, navigate to the project folder and run the following commands to install the required Entity Framework core packages:
dotnet add package Microsoft.EntityFrameworkCore.SqlServer
dotnet add package Microsoft.EntityFrameworkCore.Design
The first package is the database provider used to connect the application to an SQL server, and the second package is a Development Dependency package that contains all the design-time logic for Entity Framework Core.
Creating models
The first step is to define the models. A model, also referred to as an entity, is a class that represents an object in the real world that is mapped to a table in the database.
First create a new directory in the Dnc.Staff.Data project with the name Models. Then Create a new directory named Entities in the Models directory , which will contain our domain models.
Finally create three files named Department.cs, Employee.cs and Project.cs , and update the code to match the following:
A Department.cs can be defined as the following class:
namespace Dnc.Staff.Data.Models.Entities
{
    public class Department
    {
        public int Id { get; set; }
        public string Name { get; set; }
        public string Location { get; set; }
    }
}
A Employee.cs can be defined as the following class:
namespace Dnc.Staff.Data.Models.Entities
{
    public class Employee
    {
        public int Id { get; set; }
        public string Name { get; set; }
        public string Job { get; set; }
        public DateTime HireDate { get; set; }
        public decimal Salary { get; set; }
    }
}
A Project.cs can be defined as the following class:
namespace Dnc.Staff.Data.Models.Entities
{
    public class Project
    {
        public int Id { get; set; }
        public DateOnly StartDate { get; set; }
        public DateOnly EndDate { get; set; }
    }
}
Creating the DbContext class
Create a file named StaffDbContext.cs in the Dnc.Staff.Data project, which is derived from the DbContext class, and add the following code:
namespace Dnc.Staff.Data
{
    public class StaffDbContext : DbContext
    {
        public DbSet<Employee> Employees => Set<Employee>();
        public DbSet<Department> Departments => Set<Department>();
        public DbSet<Project> Projects => Set<Project>();

        public StaffDbContext(DbContextOptions<StaffDbContext> options) : base(options)
        {

        }

        protected override void OnModelCreating(ModelBuilder modelBuilder)
        {
            // shape your entities using the Fluent API
        }
    }
}
The DbContext class is the main component of EF Core and enables access to the database via the Database property. In addition providing the virtual OnModelCreating method that is used to shape your entities using the Fluent API.
DbContext also provides the SaveChanges method for saving data to the database and contains all DbSet<T> properties used to query and save instances of domain class models, with all LINQ queries against DbSet properties being translated into SQL queries.
Configuring the DbContext class
When we run the EF tools commands like dotnet ef for Migrations or Scaffolding so some commands require the creation of a derived DbContext instance at design time to obtain details about the application’s entity types and their mapping to the database.
Entity Framework Core provides an interface called IDesignTimeDbContextFactory<T> that allows us to create instances of the derived DbContext at Design-Time . The interface has one method CreateDbContext() that you must implement to create an instance of your derived DbContext.
First create a new directory in the Dnc.Staff.Data project with the name DesignTime. Then add a new file class named StaffDbContextFactory.cs as shown below.
namespace Dnc.Staff.Data.DesignTime
{
    public class StaffDbContextFactory : IDesignTimeDbContextFactory<StaffDbContext>
    {
        public StaffDbContext CreateDbContext(string[] args)
        {
            var optionsBuilder = new DbContextOptionsBuilder<StaffDbContext>();
            var connectionString = @"Server=(localdb)\MSSQLLocalDB;Database=Dnc-Staff-Database;Trusted_Connection=True;MultipleActiveResultSets=true";
            optionsBuilder.UseSqlServer(connectionString);
            Console.WriteLine(connectionString);
            return new StaffDbContext(optionsBuilder.Options);
        }
    }
}
The Context Factory is not intended for production use, but should be used with Entity Framework Core Command-Lines Interface Tools to create instances of the derived DbContext at design time
it is recommended to securely manage the secret by using Azure Key Vault instead of embedding it directly into your code.
Types of Relationships
There are three main types of relationships between tables that you can define in Entity Framework:
- One-to-Many : A relationship where one entity can be associated with any number of other entities
- Many-to-Many : A relationship where Many entities can be associated to many others
- One-to-One : A relationship where one entity is associated with at most one other entity
Defining One-to-Many relationship
One-to-Many relationship is represented in the database with a foreign key column in the dependent entity that points to the principal entity.
Update the Department.cs class by adding a new property as shown below.
namespace Dnc.Staff.Data.Models.Entities
{
    public class Department
    {
       // Removed for brevity
        public IEnumerable<Employee> Employees { get; set; }
    }
}
In software development we have a paradigm called convention over configuration and Entity Framework Core has a lot of conventions to reduce the decisions made by developers, which you can override with explicit configurations as needed.
Let’s take a look at the conventions of Entity Framework Core by visualizing the relationship between Department.cs and Employee.cs when we add a new property IEnumerable<Employee> Employees to the Department.cs class.
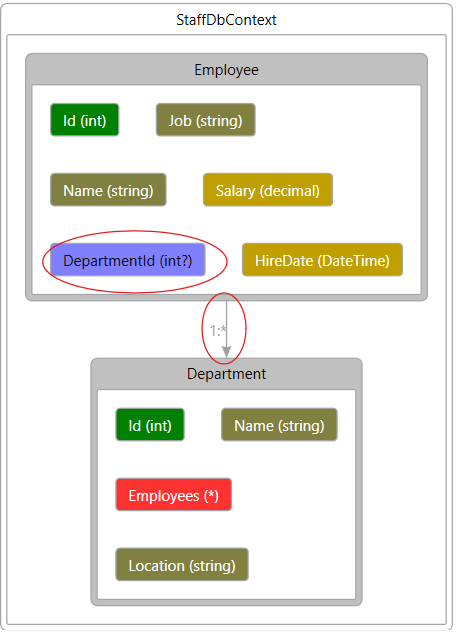
We have now One-to-Many relationship , although we have not created a DepartmentId property in the Employee.cs, which means that a property of any type of collection is sufficient for Entity Framework Core to decide that it is a one‑to‑many relationship.
Remove the IEnumerable<Employee> Employees property from the Department.cs entity and add a new property called Department to the Employee.cs entity, as shown below.
    public class Employee
    {
        // Removed for brevity
        public Department Department { get; set; }
    }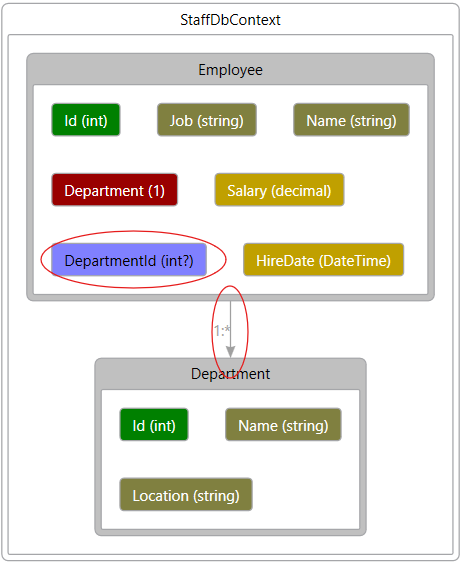
If the dependent has a property of the same type as the principal, in this case the department property, then it is also recognized as a one-to-many relationship.
Finally Update the Department.cs and the Employee.cs entities as shown below, and observe the relationship created by the Entity Framework Core.
namespace Dnc.Staff.Data.Models.Entities
{
    public class Department
    {
        public int Id { get; set; }
        public string Name { get; set; }
        public string Location { get; set; }
        public IEnumerable<Employee> Employees { get; set; }
namespace Dnc.Staff.Data.Models.Entities
{
    public class Employee
    {
        public int Id { get; set; }
        public string Name { get; set; }
        public string Job { get; set; }
        public DateTime HireDate { get; set; }
        public decimal Salary { get; set; }

        public Department Department { get; set; }
        public int DepartmentId { get; set; }

    }
}
It is recommended to add a foreign key to the dependent entity, even if your business logic does not require it, because it makes things easier, for example, if I want to know which department this employee belongs to without having to go back to the database or add a new employee to the database, I just need to fill in the foreign key myself.
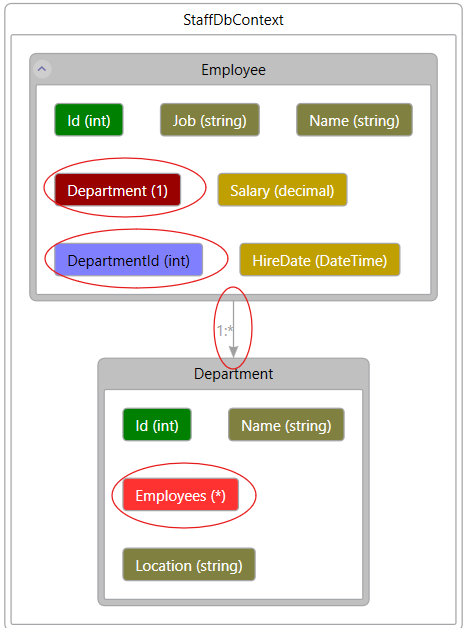
I have added a foreign key DepartmentId explicitly and Department Properties to the Department.cs entity and lets explicitly define the relationship using the Fluent API.
How to shape your entities using
the Fluent API
In the Example above, we have seen how EF Core inferred the foreign key in the Department.cs entity .
In some cases, we need to add unconventionally named foreign keys so that we can override the conventions using the Fluent API.
The DbContext base class provides the OnModelCreating method, which you can use to design your entities using the Fluent API.
Update the OnModelCreating as shown below.
        protected override void OnModelCreating(ModelBuilder modelBuilder)
        {
            modelBuilder.Entity<Department>(e =>
            {
                e.ToTable("Departments");
                e.HasKey(i => i.Id);
                e.HasMany(i => i.Employees)
                .WithOne(i => i.Department)
                .HasForeignKey(i => i.DepartmentId)
                .IsRequired(true);
            });
        }
How to separate t he mapping configurations
As your models become more complex, the OnModelCreating() method can become quite lengthy and difficult to manage.
The IEntityTypeConfiguration interface introduced in EF Core 6 and the EntityTypeConfiguration attribute make it possible to move the configuration of the Fluent API for an entity into its own class
Start by creating a new directory named Configuration in the Models directory. In this new directory, add a new file named DepartmentConfiguration.cs, make it public, and implement the IEntityTypeConfiguration interface, as shown below.
    public class DepartmentConfiguration : IEntityTypeConfiguration<Department>
    {
        public void Configure(EntityTypeBuilder<Department> builder)
        {
            builder.ToTable("Departments", "dbo");

            builder.HasKey(e => e.Id);

            builder.HasMany(e => e.Employees)
                .WithOne(e => e.Department)
                .HasForeignKey(e => e.DepartmentId)
                .OnDelete(DeleteBehavior.ClientSetNull);
    }
}
In the same way, add a new file class named EmployeeConfiguration.cs and implement the IEntityTypeConfiguration interface as shown below.
namespace Dnc.Staff.Data.Models.Configuration
{
    public class EmployeeConfiguration : IEntityTypeConfiguration<Employee>
    {
        public void Configure(EntityTypeBuilder<Employee> builder)
        {
            builder.ToTable("Employees", "dbo");

            builder.HasKey(e => e.Id);

            builder.Property(e => e.Salary)
                .HasColumnType("decimal")
                .HasPrecision(18, 2);
        }
    }
}
Replace the code we have added in the OnModelBuilding method that
configures the Department.cs and the Employee.cs classes with the following code.
protected override void OnModelCreating(ModelBuilder modelBuilder)
{
    new EmployeeConfiguration().Configure(modelBuilder.Entity<Employee>());
    new DepartmentConfiguration().Configure(modelBuilder.Entity<Department>());
}
The final step for the Employee and Department classes is to add the EntityTypeConfiguration attribute as shown below.
    [EntityTypeConfiguration(typeof(DepartmentConfiguration))]
    public class Department
    {
        public int Id { get; set; }
        // Removed code for brevity
    }
[EntityTypeConfiguration(typeof(EmployeeConfiguration))]
public class Employee
{
public int Id { get; set; }
// Removed code for brevity
}Also read https://dotnetcoder.com/in-memory-cache-in-asp-net-core/
Defining Many-to-Many relationship
In EF Core, we have many ways to define many‑to‑many relationships. The most common is a pattern called “Skip Navigations”. we need define a collection navigation property on both sides.
Update the Employee.cs and Project.cs entities as show below.
namespace Dnc.Staff.Data.Models.Entities
{
    public class Employee
    {
        // Removed code for brevity
        public IEnumerable<Project> Projects { get; set; }
    }
}
namespace Dnc.Staff.Data.Models.Entities
{
public class Project
{
public int Id { get; set; }
public DateOnly StartDate { get; set; }
public DateOnly EndDate { get; set; }
public IEnumerable<Employee> Employees { get; set; }
}
}Observe the relationship created by EF core.
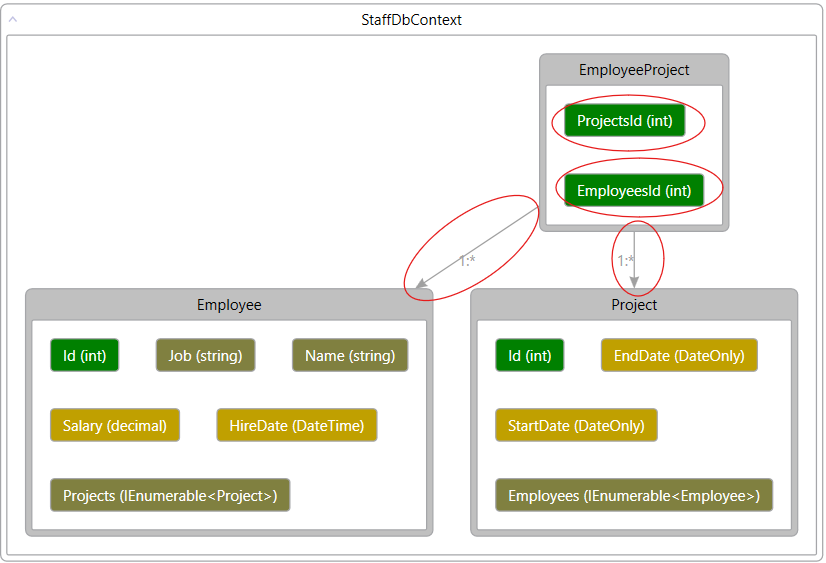
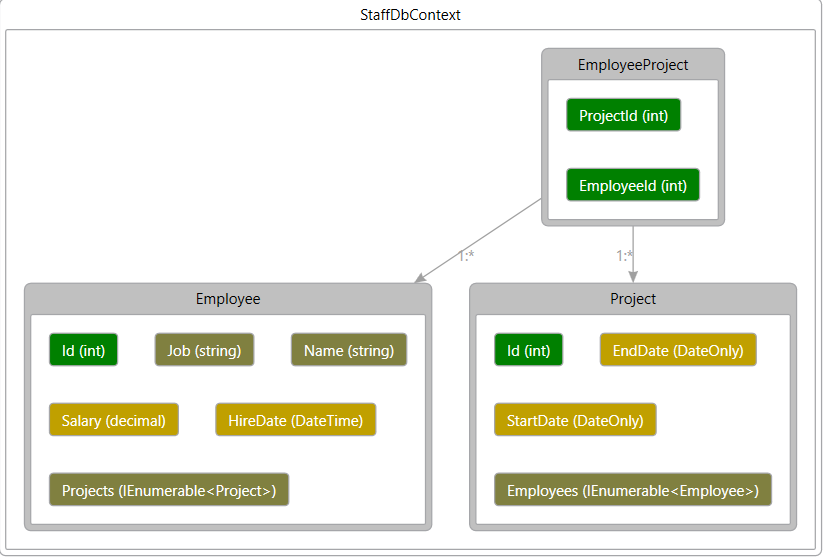
EF Core created a junction table called EmployeeProject in the database with two foreign keys that point to the parent.
The way I prefer to define many‑to‑many is to simply explicitly create an entity between the two ends that connects them.
Add a new class file in the Entities directory named EmployeeProject.cs and add the following code.
namespace Dnc.Staff.Data.Models.Entities
{
    public class EmployeeProject
    {
        public int EmployeeId { get; set; }
        public int ProjectId { get; set; }
    }
}
Then add a new class file with the name ProjectConfiguration.cs in the Configuration directory and insert the following code.
namespace Dnc.Staff.Data.Models.Configuration
{
    public class ProjectConfiguration : IEntityTypeConfiguration<Project>
    {
        public void Configure(EntityTypeBuilder<Project> builder)
        {
            builder.ToTable("Projects", "dbo");

            builder.HasKey(e => e.Id);

            builder.HasMany(e => e.Employees)
                .WithMany(e => e.Projects)
                .UsingEntity<EmployeeProject>(
                left => left.HasOne<Employee>().WithMany().HasForeignKey(e => e.EmployeeId),
                right => right.HasOne<Project>().WithMany().HasForeignKey(e => e.ProjectId));
        }
    }
}
the UsingEntity method can be used to configure this as the join entity type for the relationship the EmployeeId and ProjectId are automatically adopted as foreign keys and configured as a composite primary key for the join entity type. The properties to be used for the foreign keys can be configured explicitly for cases where they don’t match the EF convention
The final step is to add the EntityTypeConfiguration attribute as shown below.
    [EntityTypeConfiguration(typeof(ProjectConfiguration))]
    public class Project
    {
        public int Id { get; set; }
        // Removed code for brevity
    }
Finnaly update the OnModelCreating method.
 protected override void OnModelCreating(ModelBuilder modelBuilder)
 {
     new EmployeeConfiguration().Configure(modelBuilder.Entity<Employee>());
     new DepartmentConfiguration().Configure(modelBuilder.Entity<Department>());
     new ProjectConfiguration().Configure(modelBuilder.Entity<Project>());
 }
Observe the relationship after adding the join entity.
Defining a self-referential relationship
A self-referential relationship, also known as a recursive relationship, exists when an entity is related to itself.
in our organizational structure, we will define a relationship in which an employee can have a supervisor (Manager) who is also an employee.
First , update the Employee.cs entity by adding new properties as shown below.
namespace Dnc.Staff.Data.Models.Entities
{
    [EntityTypeConfiguration(typeof(EmployeeConfiguration))]
    public class Employee
    {
       // Removed code for brevity
        public Employee Manager { get; set; }
        public int? ManagerId { get; set; }
    }
}
Then update the EmployeeConfiguration.cs as shown below.
namespace Dnc.Staff.Data.Models.Configuration
{
    public class EmployeeConfiguration : IEntityTypeConfiguration<Employee>
    {
        public void Configure(EntityTypeBuilder<Employee> builder)
        {
            //Removed code for brevity
            builder.HasOne(e => e.Manager)
                .WithMany()
                .HasForeignKey(e => e.ManagerId)
                .IsRequired(false);
        }
    }
}
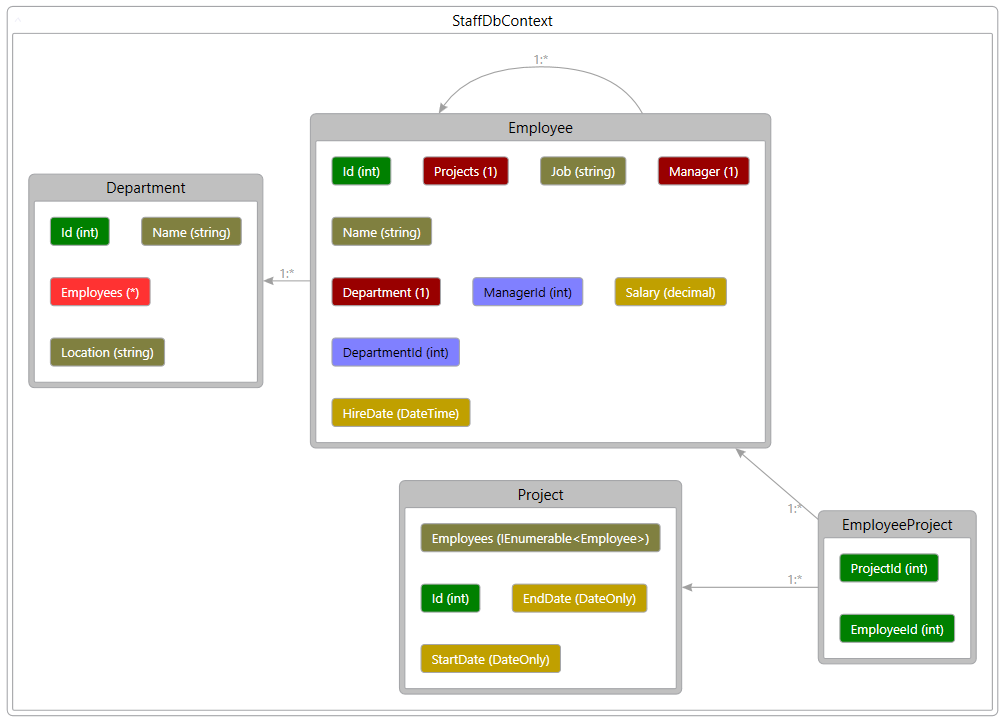
Observe the final relationships between the tables created by Entity Framework Code first approach.
Creating the database
We have defined the StaffDbContextFactory.cs class, which allows us to create instances of StaffDbContext.cs at design time when we run the EF-Tools commands such as dotnet ef for migrations.
Navigate to the Dnc.Staff.Data and run the following command.
dotnet ef migrations add Initial -o Migrations -c Dnc.Staff.Data.StaffDbContext
Then run the following command to update the database.

Observe the result, the database was created in the SQL server.

Conclusion
In this post, we explained the basics of creating a database using the Entity Framework Code First approach We started by defining the domain model classes and then configuring the classes using the Fluent API to keep our domain model classes clean and readable, and Entity Framework Core generates the database schema based on these classes and configuration.
Also read https://dotnetcoder.com/blazor-toast-notification-with-pure-c-html-and-css/
Sample Code
You can find the complete sample code for this project on my GitHub repository
Enjoy This Blog?
Discover more from Dot Net Coder
Subscribe to get the latest posts sent to your email.


