Table of Contents
On behalf of flow Entra ID Example
Take a look at the finished On Behalf Of flow Entra ID example implemented in ASP.NET 8
What is On Behalf Of flow Entra ID?
The on behalf of flow Entra ID occurs when a web API accesses another web API using a different identity. In this scenario, the API does not use its own identity.
On Behalf Of flow Entra ID Diagram
The following diagram shows the On Behalf Of Flow Entra ID in detail.
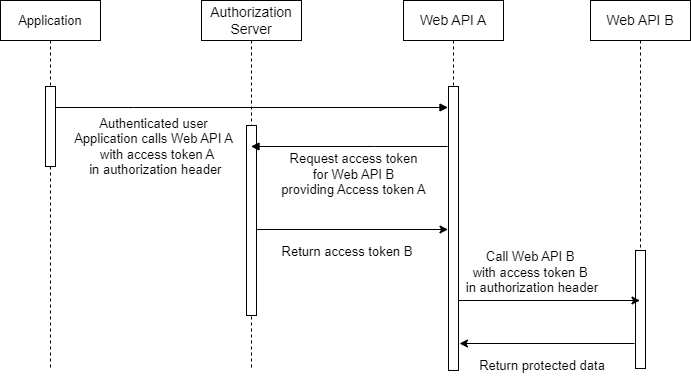
The diagram above shows how the on behalf of flow Entra ID works.
The on behalf of Flow Entra ID consists of several steps. In the first step, the client initiates the flow for the authenticated user. It sends a request to the API A with access token A. In the next step, the API A requests an access token to call the API B. The authorization server validates the credentials of the API A together with the token A and returns an access token to call the API B. The API A calls the API B with the access token B in the authorization header. Finally, the protected data is returned from API B to API A and then to the client.
Implementing On Behalf Of Flow Entra ID
In the previous section, we learned about the basic concepts of on behalf of Flow Entra ID . In this section, we will implement on behalf of flow Entra ID. We will create a solution that includes four projects. Then we will register the apps in Azure Entra ID Azure (Azure Ad).
The first project is an ASP.NET Core Blazor Web APP secured with Microsoft Identity, and the other two projects are Asp.Net APIs and one shared project for data transfer objects.
Setting up the project
Open Visual Studio and create a blank solution named OboEntraID .
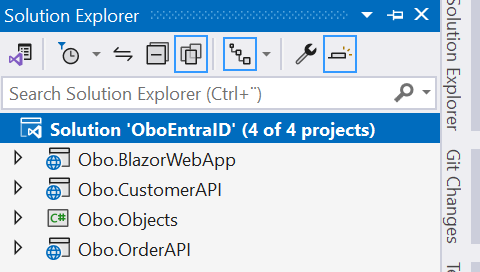
Then add a new Blazor Server project template named Obo.BlazorWebApp and select .NET 8 (Long Term Support) as the target Framework. and then add two ASP.NET Core Web API projects named Obo.CustomerAPI and Obo.OrderApi to the solution. Finally add a class library project named Obo.Objects as shown below.
Registering the Web APIs in Microsoft Entra ID (Azure Ad)
Our example consists of two Web APIs and a Blazor Web APP, as you can see in the following figure.

We will register our APIs and the Blazor Web APP in Microsoft Entra ID and expose the appropriated scopes and grant permissions, as you will see in the next section.
Registering the Order API in Microsoft Entra ID (Azure Ad)
You need An Azure account, subscription, go to the Azure Portal .
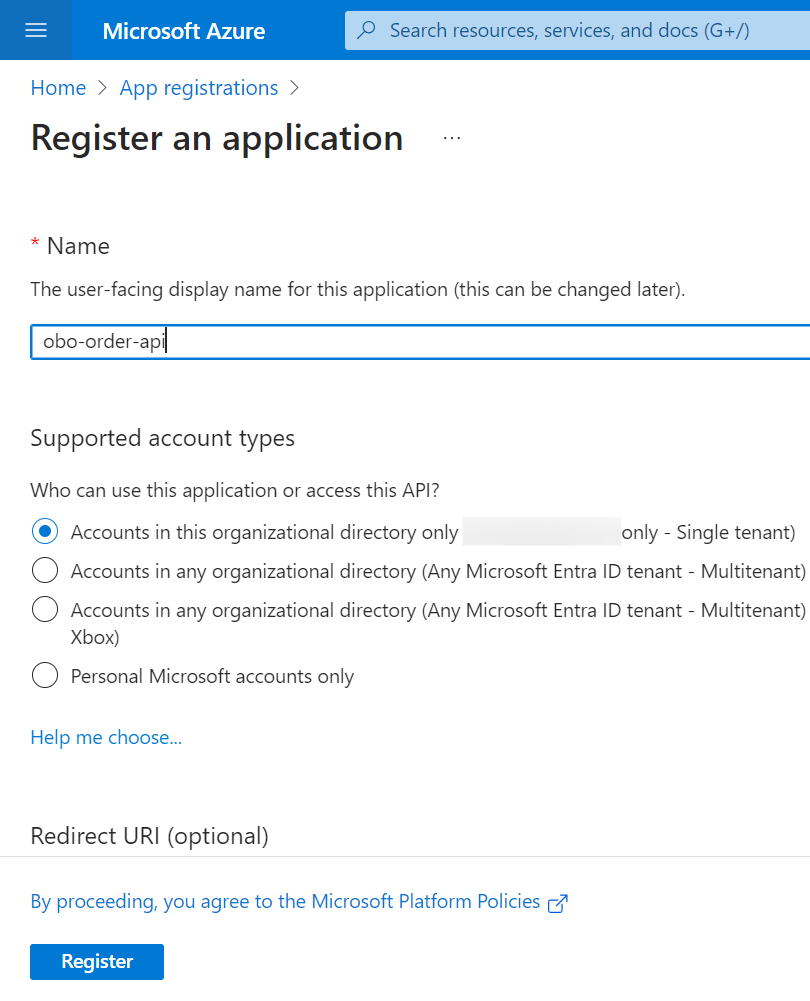
Go to Microsoft Entra ID in the left navigation pane. Click App Registrations and then click New Registration. Finally, enter the following information as shown below.
Click Register.
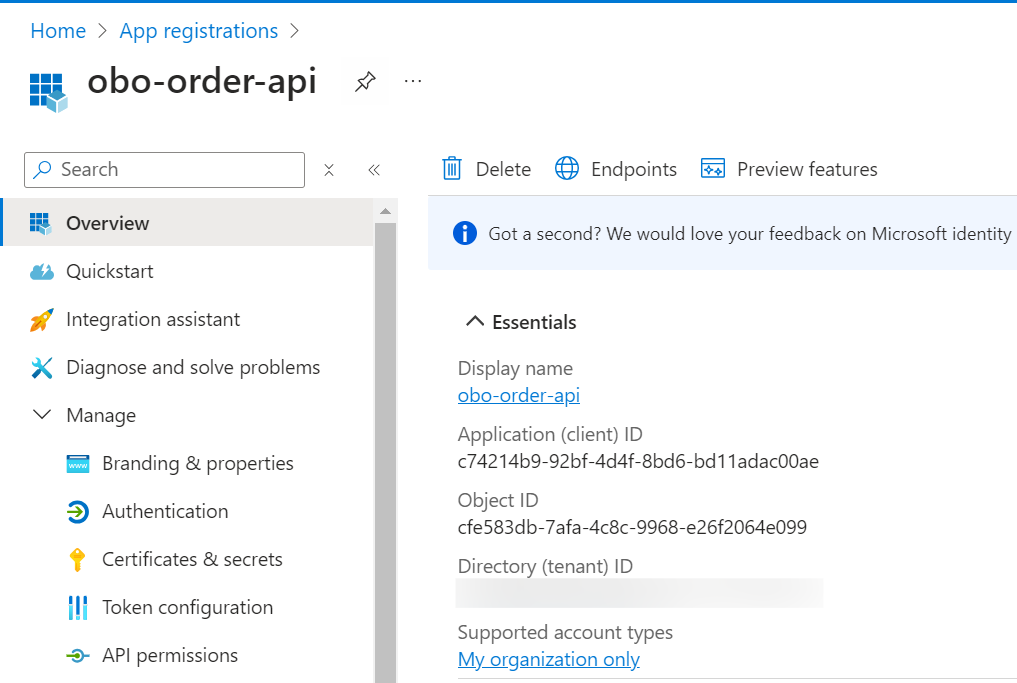
Find the application (client) ID and the required information in the overview bar and make a note of it. You will use these values later in your code in the configuration files of your application.
We now need to expose our API to make it consumable by adding a scope named access_on_behalf_of . The scope defines the level of access that an application requests when interacting with APIs.
Go to Expose an API. Set the Application ID URI (use something like api://{clientId}). Click Save, as shown below.
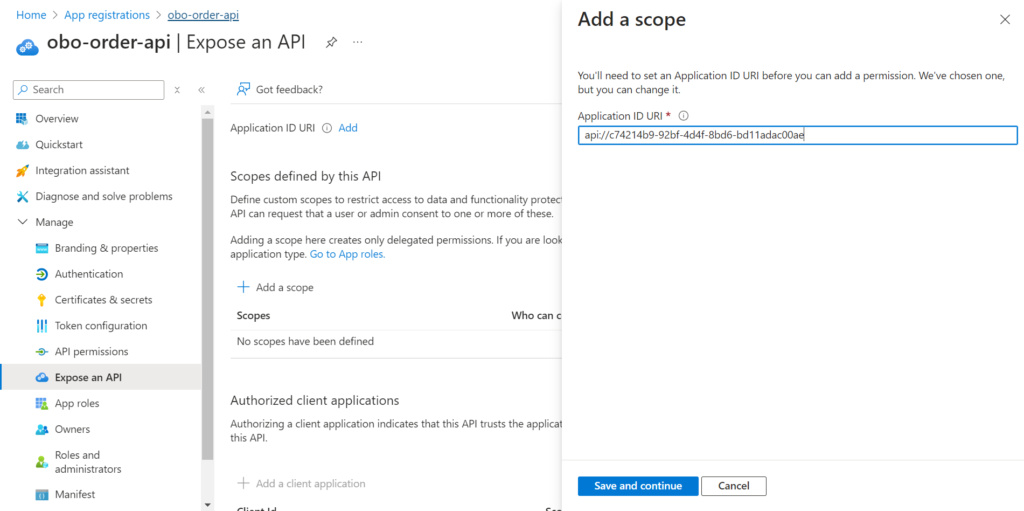
Then select Add a scope, enter the required information and click Apply as shown below.
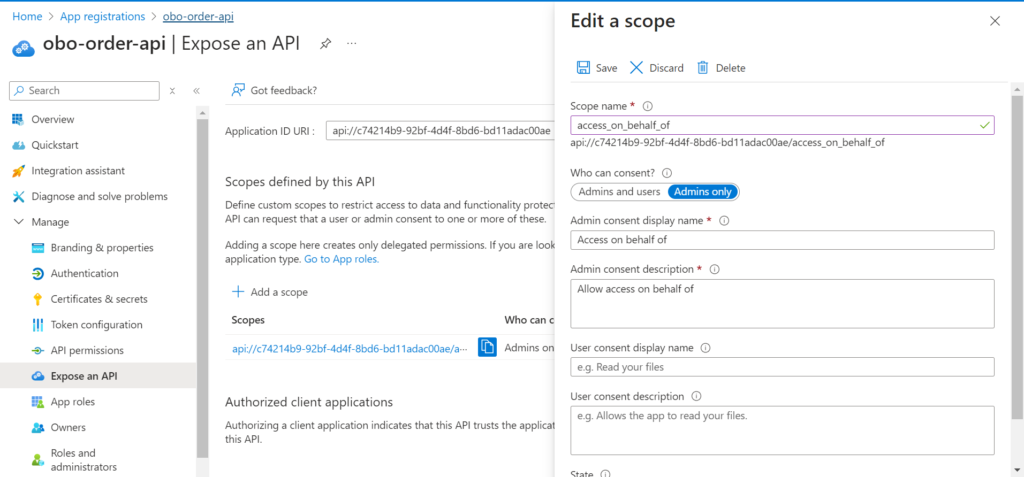
The last step is to protect the Order Web API 8 with Microsoft Entra ID. To do add the required NuGet packages with the following commands.
dotnet add package Microsoft.Identity.Web
dotnet add package Microsoft.AspNetCore.Authentication.JwtBearer
Set up the Microsoft Entra ID credentials in the appsettings.Development.json file as shown below.
{
  "EntraId": {
    "Instance": "https://login.microsoftonline.com",
    "Domain": "alaaiddin30gmail.onmicrosoft.com",
    "TenantId": "{your-tenant-id}",
    "ClientId": "c74214b9-92bf-4d4f-8bd6-bd11adac00ae"
  }
}
Avoid storing security information in your code. Use Azure Key Vault to securely manage the secret. Do not embed it directly in your code.
Second : update the Program.cs file by adding the following code.
 builder.Services.AddAuthentication(JwtBearerDefaults.AuthenticationScheme)
     .AddMicrosoftIdentityWebApi(builder.Configuration.GetSection("EntraId"));

 builder.Services.AddAuthorizationBuilder()
     .AddPolicy("OnBehalfOf", policy =>
     policy.RequireScope("access_on_behalf_of"));
We have also created a policy that can be applied at the action or controller level. This policy ensures that the API caller includes the expected application permission.
Finally, create a new controller named OrderController , and update it as shown below.
namespace Obo.OrderAPI.Controllers
{
    [Route("api/orders")]
    [ApiController]
    public class OrderController : ControllerBase
    {
        [HttpGet("all")]
        [Authorize(Policy = "OnBehalfOf")]
        public IEnumerable<Order> GetOrders()
        {
            return
            [
                new Order { OrderId = 102, CustomerId = 1, TotalAmount = 75.00m },
                new Order { OrderId = 101, CustomerId = 1, TotalAmount = 250.00m },
                new Order { OrderId = 201, CustomerId = 2, TotalAmount = 200.00m },
                new Order { OrderId = 102, CustomerId = 2, TotalAmount = 150.50m },
                new Order { OrderId = 103, CustomerId = 3, TotalAmount = 325.75m },
                new Order { OrderId = 302, CustomerId = 3, TotalAmount = 200.00m }
            ];
        }
    }
}
Also read https://dotnetcoder.com/azure-face-api-face-detection-service-in-net-8/
Registering the Customer Web API in Microsoft Entra ID (Azure Ad)
In the same way as with the Order Web API. Go to Microsoft Entra ID in the left navigation pane. Click on App registrations and then on New registration. Finally, enter the required information and click Register, and copy the required information for later use.
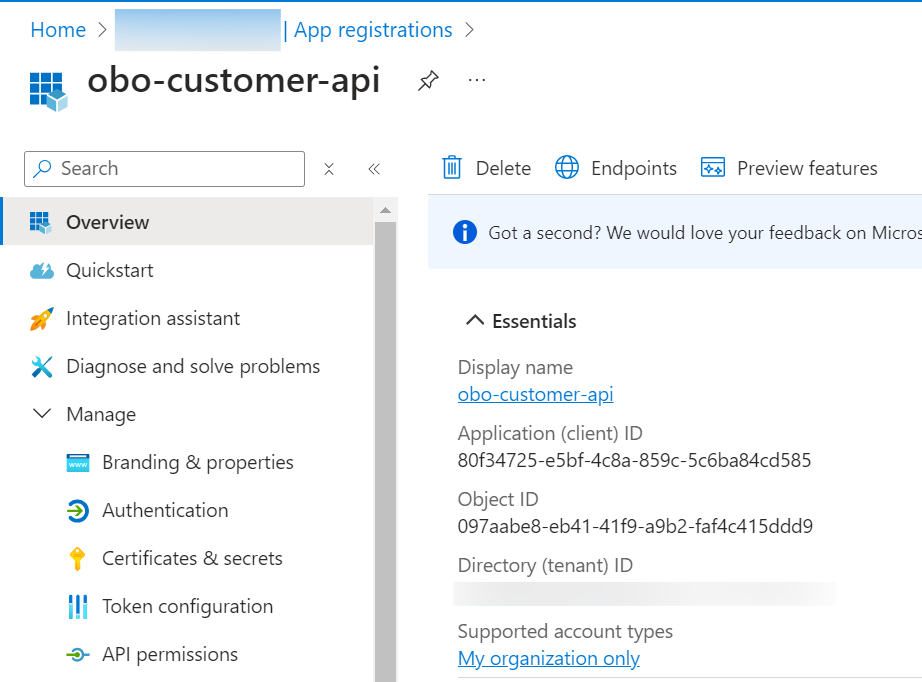
Second: Go to Certificate and secrets. Then go to New Client Secret and enter the required information. Click Add as shown below.
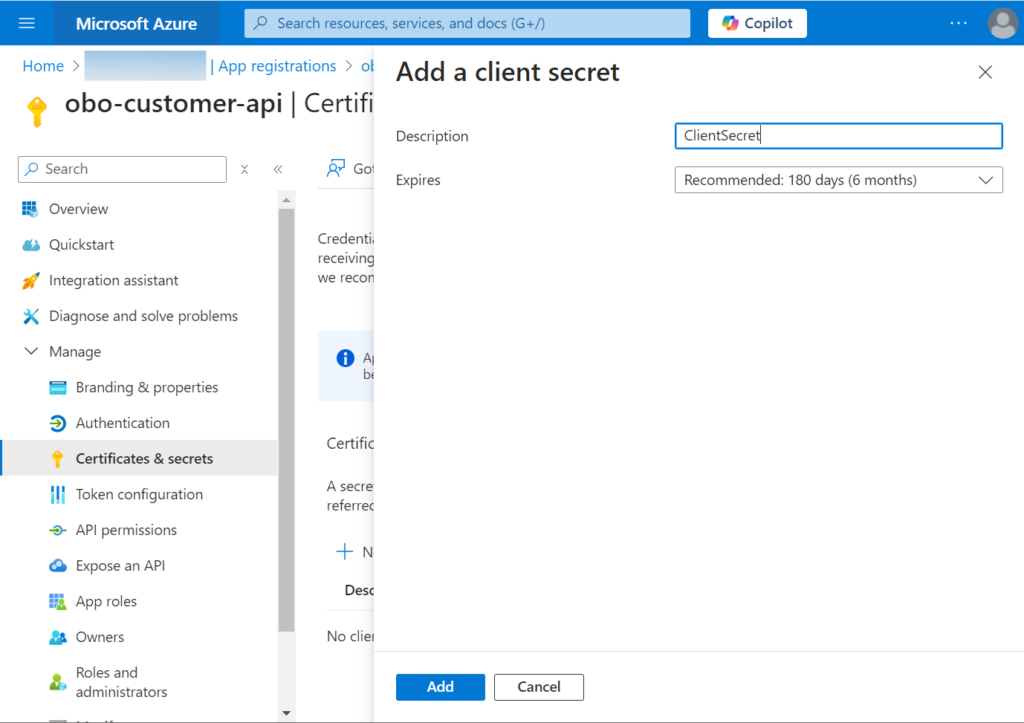
Copy the key and save it in a safe place. This key is no longer visible after you have closed the tile.
We now need to configure Customer Web API to use on behalf of flow Entra ID for calling Order Web API. This requires assigning a permission to our Customer Web API.
Go to API Permissions and then to Add a permission. Select the access_on_behalf_of permission and click Add permissions as shown below.
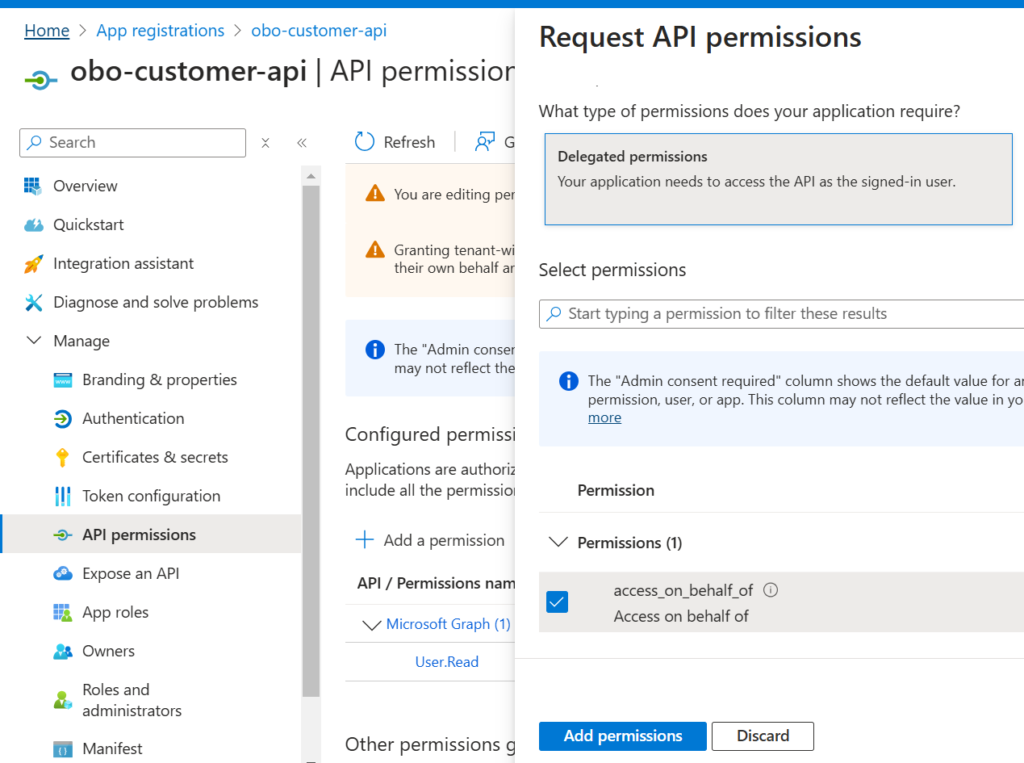
Finally, click on the Grant Admin Consent button as shown below.

Before securing our Customer Web API with Microsoft Identity, we need to expose our API. We make it consumable by setting a permission.
Go to Expose an API. Set the Application ID URI (use something like api://{clientId}). Click Add a scope and enter the required information. Finally, click Add scope as shown below.
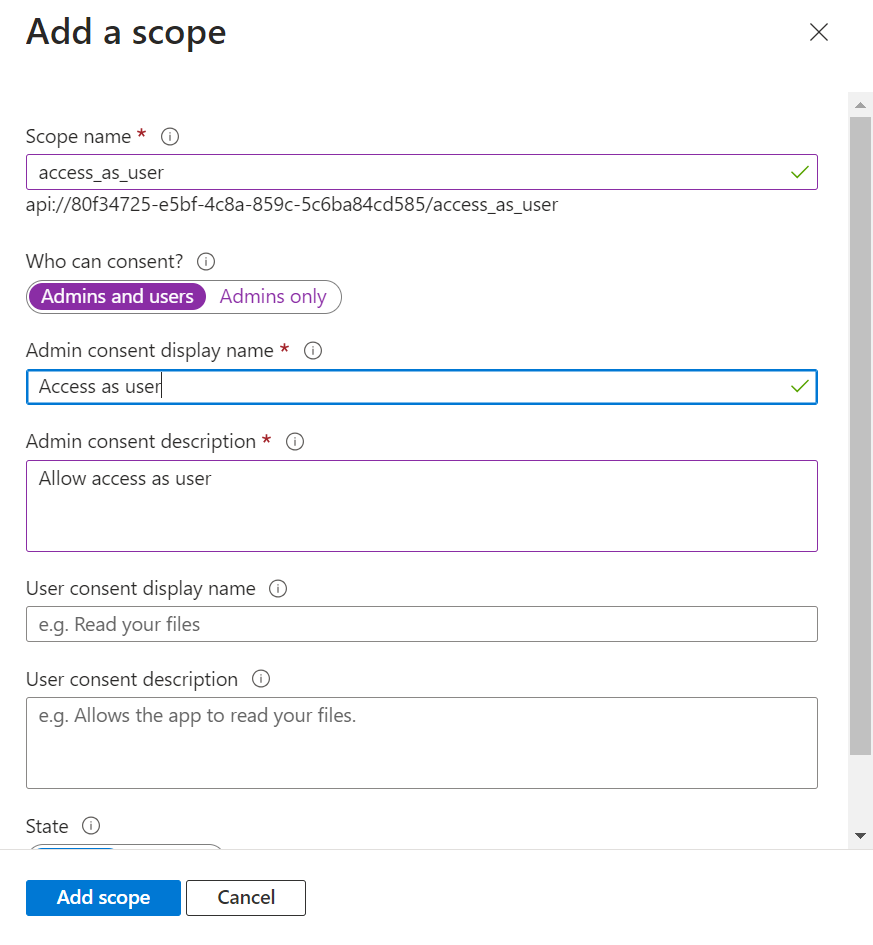
The last step is to protect the Customer Web API 8 with Microsoft Entra ID. To do add the required NuGet packages with the following commands.
dotnet add package Microsoft.Identity.Web
dotnet add package Microsoft.AspNetCore.Authentication.JwtBearer
Set up the Microsoft Entra ID credentials in the appsettings.Development.json file as shown below.
{
  "EntraId": {
    "Instance": "https://login.microsoftonline.com",
    "Domain": "{your-domain}",
    "TenantId": "{your-tenant-id}",
    "ClientId": "80f34725-e5bf-4c8a-859c-5c6ba84cd585",
    "ClientSecret": "VzB8Q~jZfNeWWvN1XEvO0iNpD7~RqWqrmlLtgdlt",
    "Scopes": "access_as_user"
  },
  "OrderApi": {
    "Audience": "c74214b9-92bf-4d4f-8bd6-bd11adac00ae",
    "Scope": "access_on_behalf_of"
  }
}
Avoid storing security information in your code. Use Azure Key Vault to securely manage the secret. Do not embed it directly in your code.
Second : update the Program.cs file by adding the following code.
builder.Services.AddAuthentication(JwtBearerDefaults.AuthenticationScheme)
    .AddMicrosoftIdentityWebApi(builder.Configuration.GetSection("EntraId"))
    .EnableTokenAcquisitionToCallDownstreamApi()
    .AddInMemoryTokenCaches();

builder.Services.AddAuthorizationBuilder()
    .AddPolicy("AccessAsUser", policy =>
    policy.RequireScope("access_as_user"));
Finally, create a new controller named CustomerController , and update it as shown below.
namespace Obo.CustomerAPI.Controllers
{
    [Route("api/customers")]
    [ApiController]
    public class CustomerController : ControllerBase
    {
        private readonly IConfidentialClientApplication confidentialClientApplication;
        private readonly IConfiguration configuration;
        public CustomerController(IConfiguration configuration)
        {
            this.configuration = configuration;

            var builder = ConfidentialClientApplicationBuilder.CreateWithApplicationOptions(new ConfidentialClientApplicationOptions
            {
                ClientId = configuration.GetValue<string>("EntraId:ClientId"),
                ClientSecret = configuration.GetValue<string>("EntraId:ClientSecret"),
                TenantId = configuration.GetValue<string>("EntraId:TenantId")
            });

            confidentialClientApplication = builder.Build();
        }

        [HttpGet("all")]
        [Authorize(Policy = "AccessAsUser")]
        public async Task<IEnumerable<Customer>> GetCustomers()
        {
            var orders = await CallOrderApi();

            if (orders.Any())
            {
                return
                [    new Customer { Id = 1, FirstName = "John", LastName = "Doe", Email = "john.doe@example.com", Orders= orders.Where(v=>v.CustomerId == 1) },
                     new Customer { Id = 2, FirstName = "Jane", LastName = "Smith", Email = "jane.smith@example.com", Orders= orders.Where(v=>v.CustomerId == 2)},
                     new Customer { Id = 3, FirstName = "Emily", LastName = "Joe", Email = "emily.Joe@example.com", Orders= orders.Where(v=>v.CustomerId == 3) }
                ];
            }
            return null;
        }

        private async Task<string> GetAccessToken()
        {
            var assertion = string.Empty;
            var audience = configuration.GetValue<string>("OrderApi:Audience");
            var scope = configuration.GetValue<string>("OrderApi:Scope");

            string[] scopes = [$"api://{audience}/{scope}"];

            var inboundToken = HttpContext?.Request?.Headers?.Authorization.FirstOrDefault();

            if (inboundToken != null && inboundToken.StartsWith("Bearer "))
            {
                assertion = inboundToken[7..];
            }
            var builder = confidentialClientApplication.AcquireTokenOnBehalfOf(scopes, new UserAssertion(assertion));

            var authResult = await builder.ExecuteAsync();

            var accessToken = authResult.AccessToken;
            return accessToken;
        }

        private async Task<IEnumerable<Order>> CallOrderApi()
        {
            var accessToken = await GetAccessToken();

            using var httpClient = new HttpClient { BaseAddress = new Uri("https://localhost:7153/api/orders/") };
            httpClient.DefaultRequestHeaders.Authorization = new AuthenticationHeaderValue("Bearer", accessToken);
            var orders = await httpClient.GetFromJsonAsync<IEnumerable<Order>>("all");
            return orders;
        }
    }
}
Registering the Blazor Web App in Microsoft Entra ID (Azure Ad)
Go to Microsoft Entra ID in the left navigation pane. Click App Registrations and then click New Registration. Finally, enter the following information as shown below.
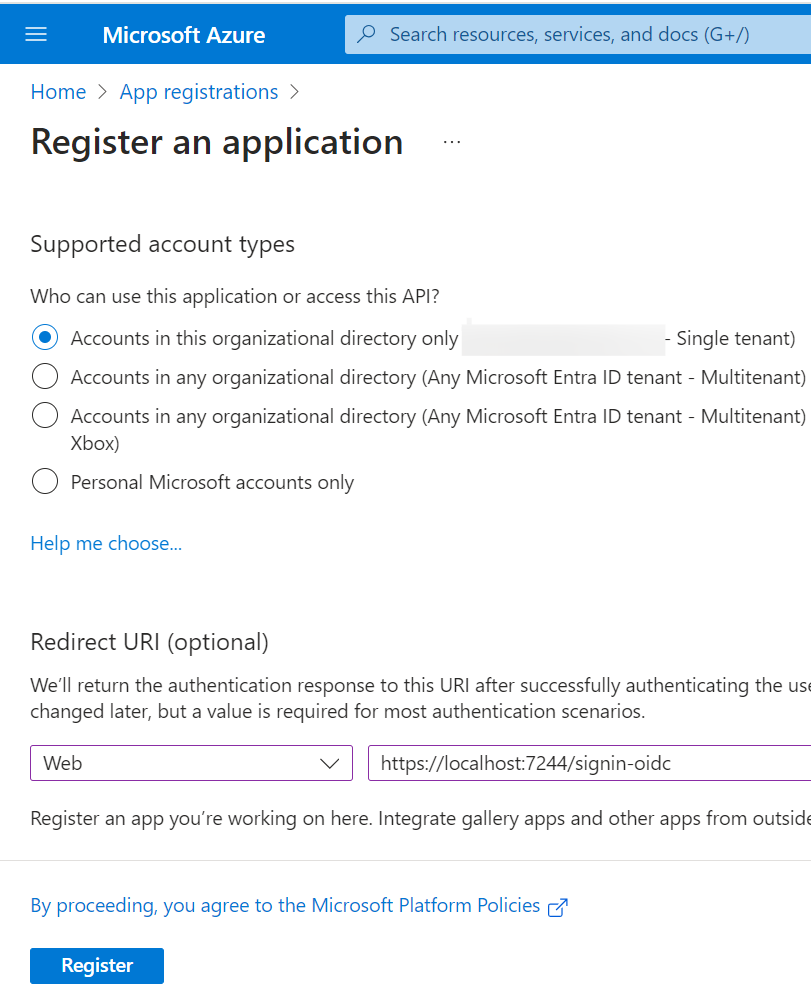
Click Register.
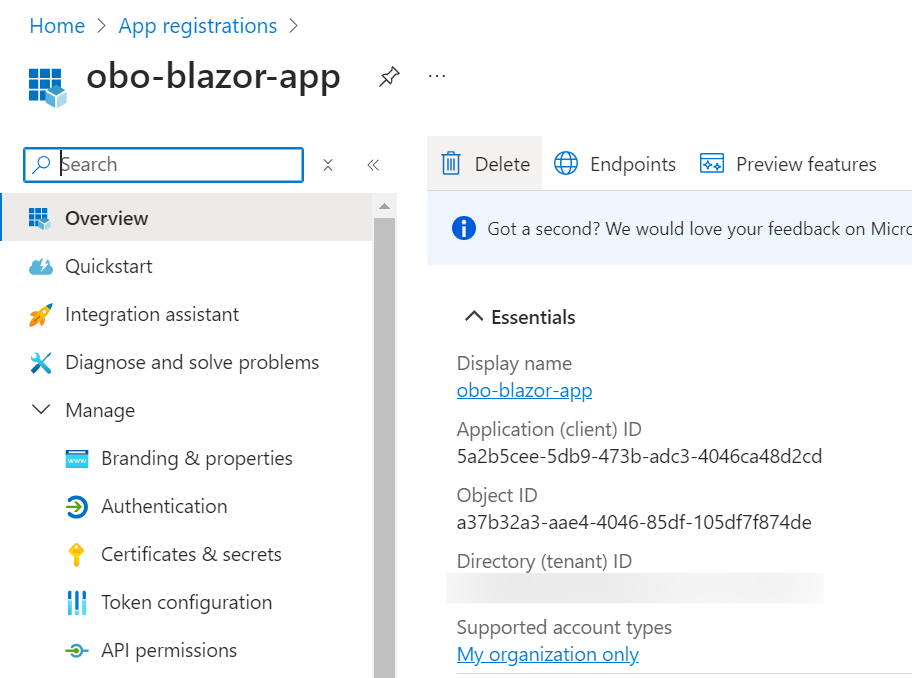
Find the application (client) ID and the required information in the overview bar and make a note of it. You will use these values later in your code in the configuration files of your application.
In the app’s registration screen, go to the Certificate and Secrets blade on the left. This opens the page where you can generate secrets. Next, click New Client Secret as shown below.
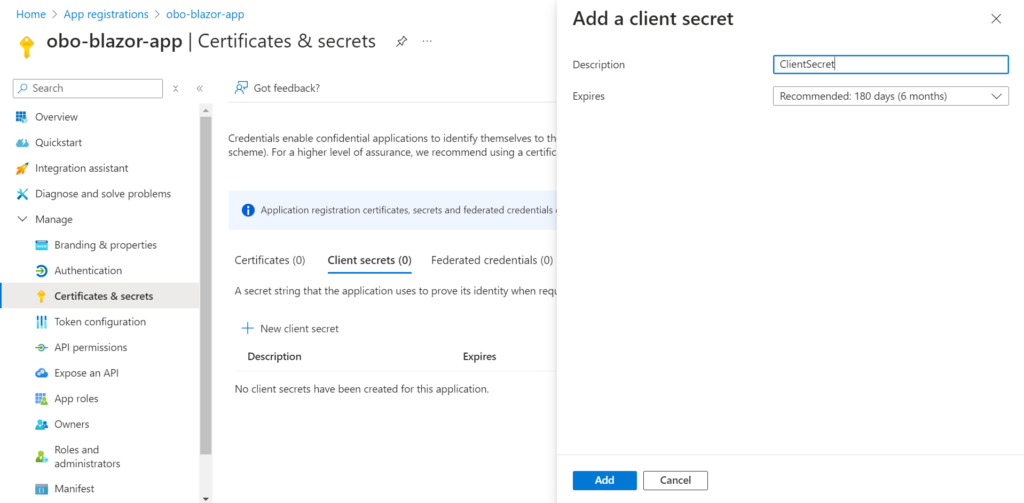
Copy the key and save it in a safe place. This key is no longer visible after you have closed the tile.
Finally, go to API Permissions and then to Add a permission. Select the access_as_user permission of Customer web API and click Add permissions as shown below.
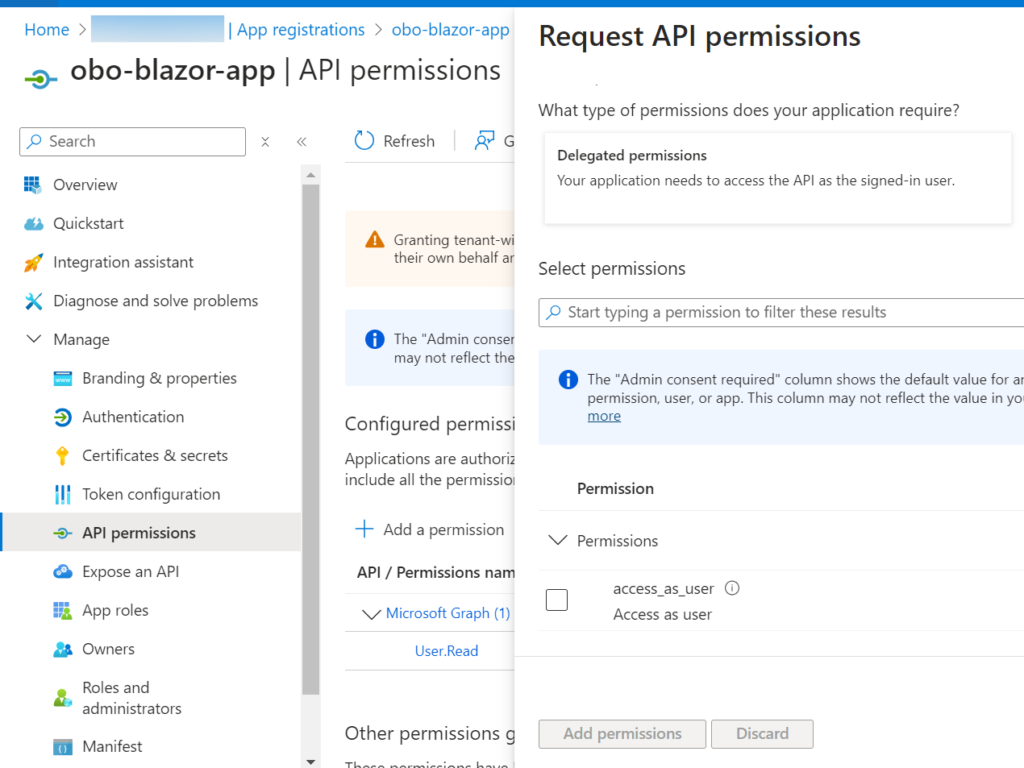
The Blazor Server App Authentication with Entra ID is explained in details in a previous post.
Now that our app is registered, we can start integrating the Microsoft Entra ID into the Blazor app. To do this, we first need to install some NuGet packages.
<ItemGroup>
  <PackageReference Include="Microsoft.AspNetCore.Authentication.OpenIdConnect" Version="8.0.10" />
  <PackageReference Include="Microsoft.Identity.Web" Version="3.2.2" />
  <PackageReference Include="Microsoft.Identity.Web.UI" Version="3.2.2" />
</ItemGroup>
Second: We need to configure our Azure AD credentials also. These credentials should be set in the appsettings.Development.json file as shown below.
{
  "EntraId": {
    "ClientId": "6be1f956-4524-4c55-b68c-984da973859b",
    "ClientSecret": "KN78Q~boR2I_-65.pdNjc3xGxJBmCcWUcUag-bNZ",
    "Domain": "{your-doamin}",
    "TenantId": "{your-tenant-id}",
    "ResponseType": "code id_token",
    "CallbackPath": "/signin-oidc",
    "Instance": "https://login.microsoftonline.com/"
  }
}
Avoid storing security information in your code. Securely manage the secret by using Azure Key Vault. Do not embed it directly in your code.
Finally, update the Program.cs file by adding the following code.
namespace Obo.BlazorWebApp
{
    public class Program
    {
        public static void Main(string[] args)
        {
            var builder = WebApplication.CreateBuilder(args);

            // Add services to the container.
            builder.Services.AddRazorComponents()
                .AddInteractiveServerComponents();

            builder.Services.AddAuthentication(OpenIdConnectDefaults.AuthenticationScheme)
                .AddMicrosoftIdentityWebApp(options =>
                {
                    options.ClientId = builder.Configuration.GetValue<string>("EntraId:ClientId");
                    options.ClientSecret = builder.Configuration.GetValue<string>("EntraId:ClientSecret");
                    options.TenantId = builder.Configuration.GetValue<string>("EntraId:TenantId");
                    options.ResponseType = builder.Configuration.GetValue<string>("EntraId:ResponseType");
                    options.Domain = builder.Configuration.GetValue<string>("EntraId:Domain");
                    options.Instance = builder.Configuration.GetValue<string>("EntraId:Instance");
                    options.CallbackPath = builder.Configuration.GetValue<string>("EntraId:CallbackPath");
                })
                .EnableTokenAcquisitionToCallDownstreamApi()
                .AddInMemoryTokenCaches();

            builder.Services.AddAuthorization();

            builder.Services.AddHttpContextAccessor();

            builder.Services.AddControllersWithViews(options =>
            {
                var policy = new AuthorizationPolicyBuilder()
                    .RequireAuthenticatedUser()
                    .Build();
                options.Filters.Add(new AuthorizeFilter(policy));
            }).AddMicrosoftIdentityUI();

            var app = builder.Build();

            // Removed code for brevity


            app.UseAuthentication();
            app.UseAuthorization();
            app.MapControllers();

            // Removed Code for brevity

            app.Run();
        }
    }
}
Update the Home.razor component with the following code.
@page "/"
@rendermode InteractiveServer
@using Microsoft.Identity.Web
@using Obo.Objects
@using System.Net.Http.Headers
@inject ITokenAcquisition tokenAcquisition
@inject IHttpContextAccessor Context


<PageTitle>Home</PageTitle>

@if (Context.HttpContext.User.Identity.IsAuthenticated)
{
    <div class="container mt-5">
        <div class="text-center mb-4">
            <div class="row mb-3">
                <div class="col"><img src="obo.png" alt="image" class="img-fluid" /></div>
            </div>
            <div class="row">
                <div class="col">
                    <button class="btn btn-primary" style="width:315px;" @onclick="CallCustomerAPI">Get Customers with Orders</button>
                </div>
            </div>
        </div>
        @if (Customers.Any())
        {
            <div class="container mt-5">
                @if (!obo)
                {
                    <h3 class="text-center mb-4">Customers from Customer API</h3>

                }
                else
                {
                    <h3 class="text-center">Customers from Customer API</h3>
                    <h3 class="text-center">Orders from Order API (OBO flow)</h3>
                }
                <div class="row">
                    @foreach (var customer in Customers)
                    {
                        <div class="col-md-4 mb-4">
                            <div class="card border-primary">
                                <div class="card-header bg-primary text-white">
                                    <h5 class="card-title">@customer.FirstName @customer.LastName</h5>
                                </div>
                                <div class="card-body">
                                    <p class="card-text"><strong>Email:</strong> @customer.Email</p>
                                    <h6 class="card-subtitle mb-2 text-danger">Orders:</h6>
                                    @if (customer.Orders != null && customer.Orders.Any())
                                    {
                                        <ul class="list-group">
                                            @foreach (var order in customer.Orders)
                                            {
                                                <li class="list-group-item d-flex justify-content-between align-items-center">
                                                    Order ID: @order.OrderId
                                                    <span class="badge bg-primary rounded-pill">@order.TotalAmount.ToString("C")</span>
                                                </li>
                                            }
                                        </ul>
                                    }
                                    else
                                    {
                                        <p class="text-muted">No Orders</p>
                                    }
                                </div>
                            </div>
                        </div>
                    }
                </div>
            </div>
        }
        @if (loading)
        {
            <div class="d-flex justify-content-center">
                <div class="spinner-border custom-spinner" role="status">
                    <span class="visually-hidden">Loading...</span>
                </div>
            </div>
        }
    </div>
}
else
{
    <p>Login in to see this page</p>

}

@code{

    private IEnumerable<Customer> Customers = [];
    private bool loading = false;
    private bool obo = false;


    protected async Task CallCustomerAPI()
    {
        loading = true;

        string[] scopes = [$"api://80f34725-e5bf-4c8a-859c-5c6ba84cd585/access_as_user"];
        var accessToken = await tokenAcquisition.GetAccessTokenForUserAsync(scopes);

        using var httpClient = new HttpClient { BaseAddress = new Uri("https://localhost:7019/api/customers/") };
        httpClient.DefaultRequestHeaders.Authorization = new AuthenticationHeaderValue("Bearer", accessToken);
        Customers = await httpClient.GetFromJsonAsync<IEnumerable<Customer>>("all");
        loading = false;

    }
}
Our On Behalf Of Flow Entra ID project is ready. We need to run multiple projects at the same time in our Visual Studio 2022. To do this, select Properties. Then choose Multiple Startup Projects in the solution. Set the action for the projects to Start. Finally, press F5 to launch.
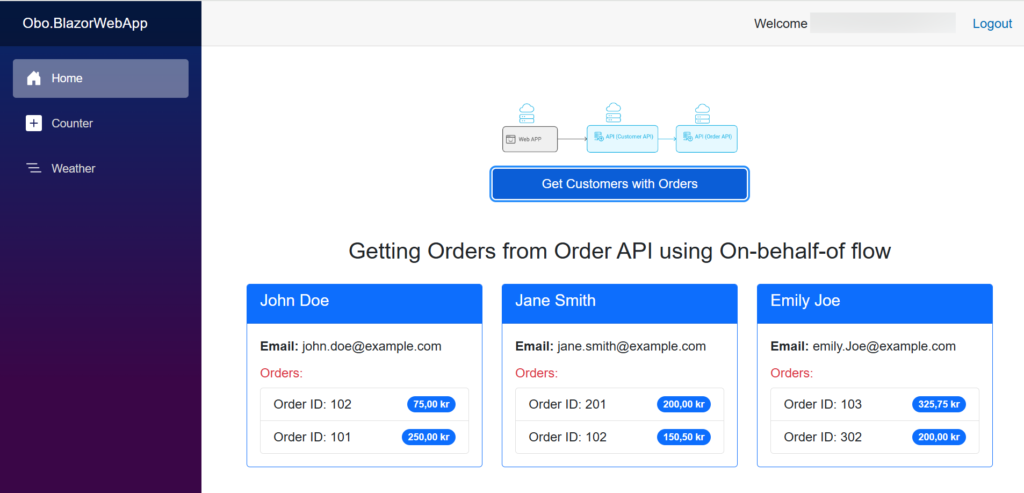
Conclusion
In this post, we implemented On Behalf Of Flow Entra ID. Microsoft Entra ID in combination with the implementation of an OBO flow using .NET 8 provides a secure and smooth way to protect Blazor Server applications and chained ASP.NET Core Web APIs.
Also read https://dotnetcoder.com/authorization-code-flow-azure-ad/
Sample code
You can find the entire example code for On Behalf Of flow Entra ID project on my GitHub repository
Enjoy This Blog?
Discover more from Dot Net Coder
Subscribe to get the latest posts sent to your email.


