Table of Contents
Introduction
Azure Key Vault is a cloud-based service that provides a centralized configuration source offered by Microsoft Azure to manage keys, secrets, and certificates. This helps keep our applications secure. Azure Key Vault gives developers the ability to avoid storing security information in their code.
In a previous post we discovered how Azure Service Bus Queue trigger Azure Function.
In this post we will discover step-by-step Azure Key Vault configuration in ASP.NET Core to securely manage your application’s secrets.
Create an Azure Key Vault and add secrets
We will use Azure Cloud Shell to create a key vault service and add secrets to the created key vault.
1. Sign in to the Azure portal using https://portal.azure.com and select the Cloud Shell icon as shown in the following picture

2. You can select Bash or PowerShell. I will choose PowerShell.

3. Create a resource group with the following command.
<b>{RESOURCE GROUP NAME}</b> represents the name of the resource group and<b>{LOCATION}</b> represents the Azure region.
az group create --name "{RESOURCE GROUP NAME}" --location {LOCATION}The prefix I use in my demos <strong>CS-</strong> stands for Codify Simply. Here is the command I ran to create a resource group:
az group create --name "CS-KeyVault-RG" --location "Sweden Central"4. Use the following command to create a new key vault.
az keyvault create --name {KEY VAULT NAME} --resource-group "{RESOURCE GROUP NAME}" --location {LOCATION}{KEY VAULT NAME} represents the unique name of the key vault.
Here is the command I ran to create a key vault in the CS-KeyVault-RG resource group we created in the prior step:
az keyvault create --name "CS-KeyVault-KV" --resource-group "CS-KeyVault-RG" --location "Sweden Central"5. Use the following command to add secrets to the key vault as name-value pairs:
az keyvault secret set --vault-name {KEY VAULT NAME} --name "SecretName" --value "secretValue"The command I executed to add a secret to the CS-KeyVault-KV key vault:
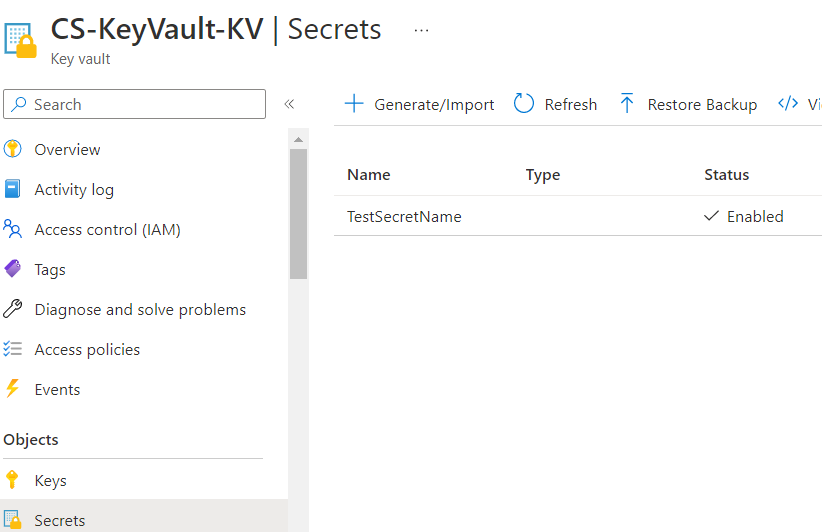
az keyvault secret set --vault-name "CS-KeyVault-KV" --name "SecretName" --value "I am a secret from the azure key vault"We added a secret to the <strong>CS-KeyVault-KV</strong> using Azure Cloud Shell, as shown in the following figure
Create an ASP.NET Core Web API
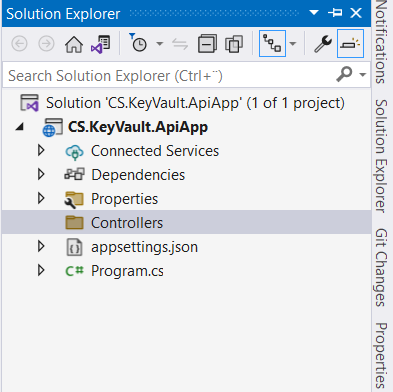
1. Create an ASP.NET Core Web API project using Visual Studio or using .NET Core CLI (Command Line Interface) with the name <strong>CS.KeyVault.ApiApp</strong> ,I will be using .NET Core CLI.
Here is the command I ran to create the web API:
dotnet new webapi --output CS.KeyVault.ApiApp --framework "net6.0" --use-program-mainNote that this will create .NET 6 Web API project without the top-level statements
Register the Application in Azure Active Directory (AAD)
To grant Web API access to the Key Vault resource, we proceed as follows:
First of all, we need to register our Web API in Azure Active Directory (AAD).
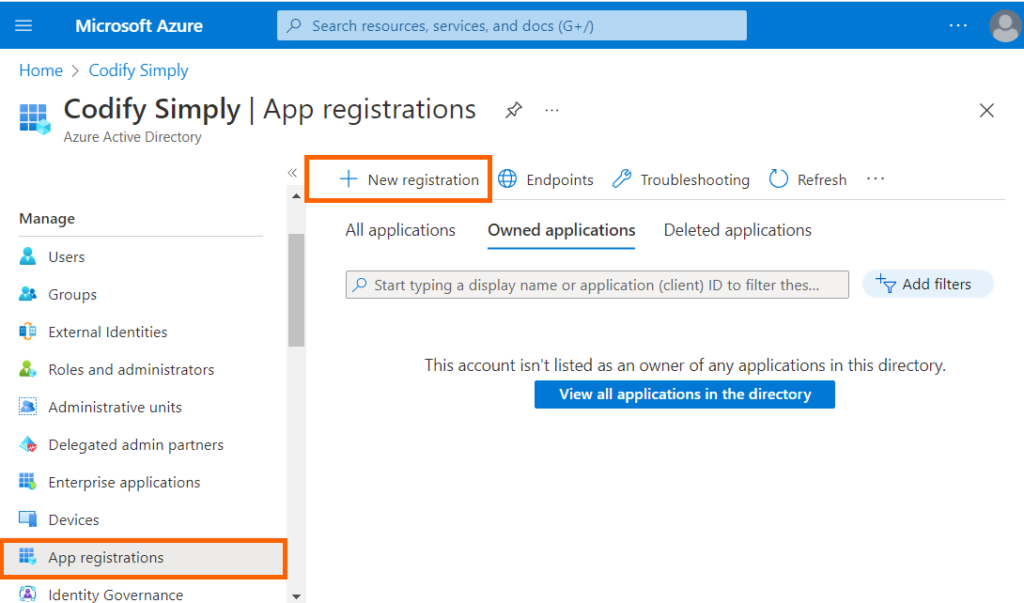
1. Sign in to the Azure portal using https://portal.azure.com and navigate to Azure Active Directory and click on App registrations
2. In the Name field, enter a name to display to users and click on Register
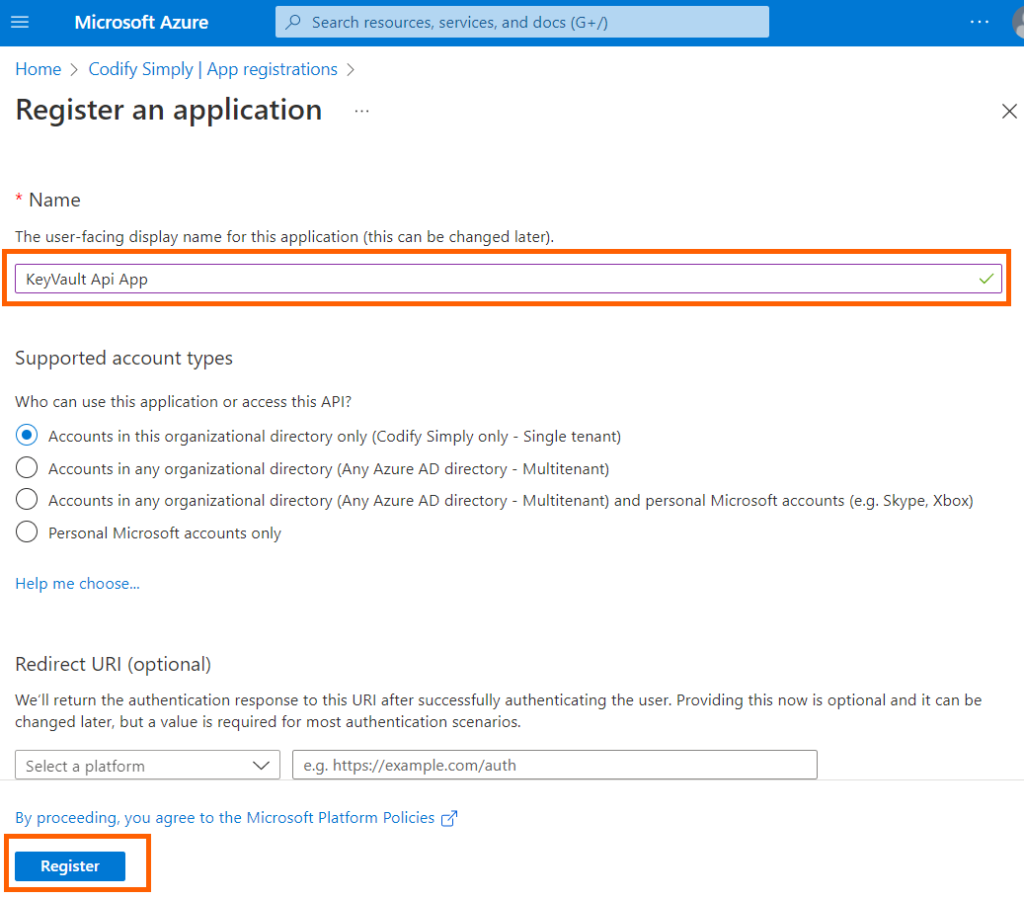
Once the process is finished write down the Application (client) ID value. This will be required later to access Key Vault:
3. Select the created App in App registrations and click on Certificates & secrets and then click on + New Client Secret
4. Enter a Description and appropriate Expiry and click Add
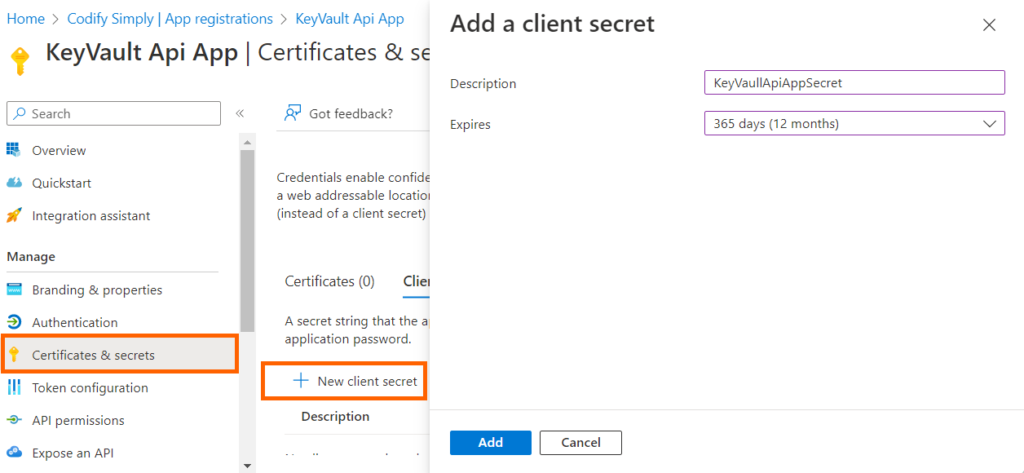
The generated secret will be displayed once in the portal.

Grant the application access to Azure Key Vault
1. Search for the key Key Vault CS-KeyVault-KV you just created and navigate to it.

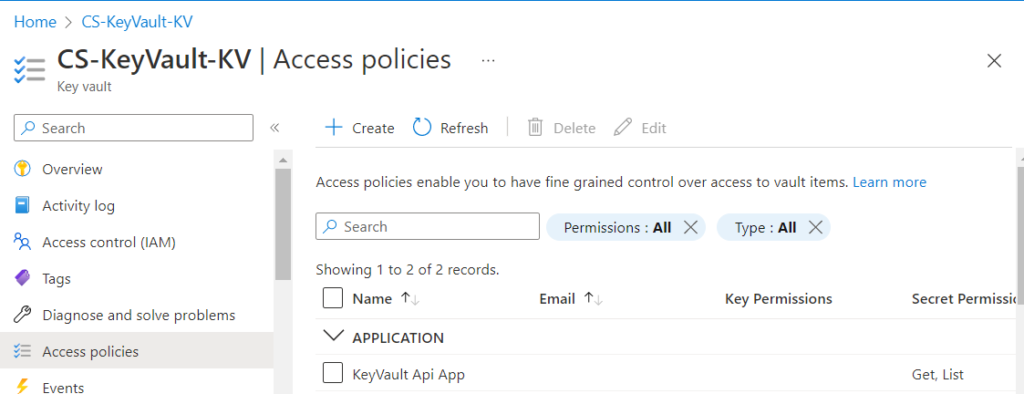
2. Select Access policies, then click on Create.
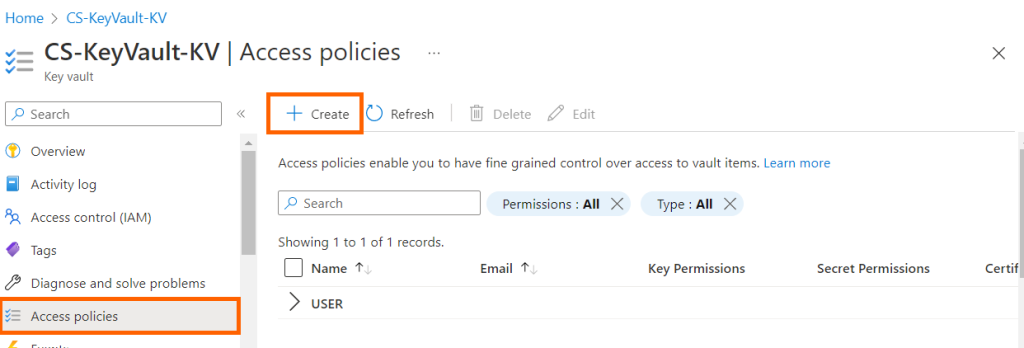
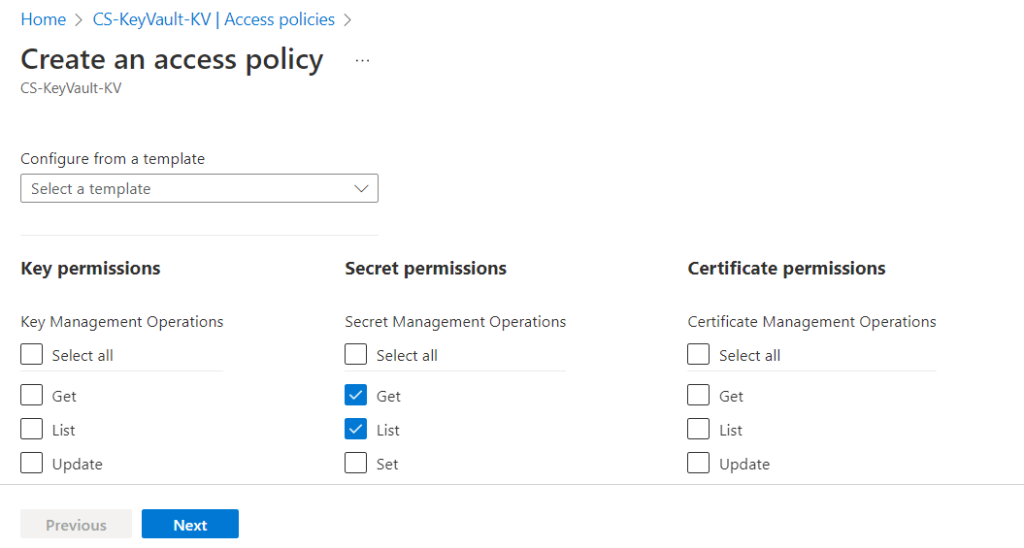
3. Select the Get, and List permissions under Secret permissions which is sufficient for our Demo or you can select the required permissions for your application to access Key Vault.
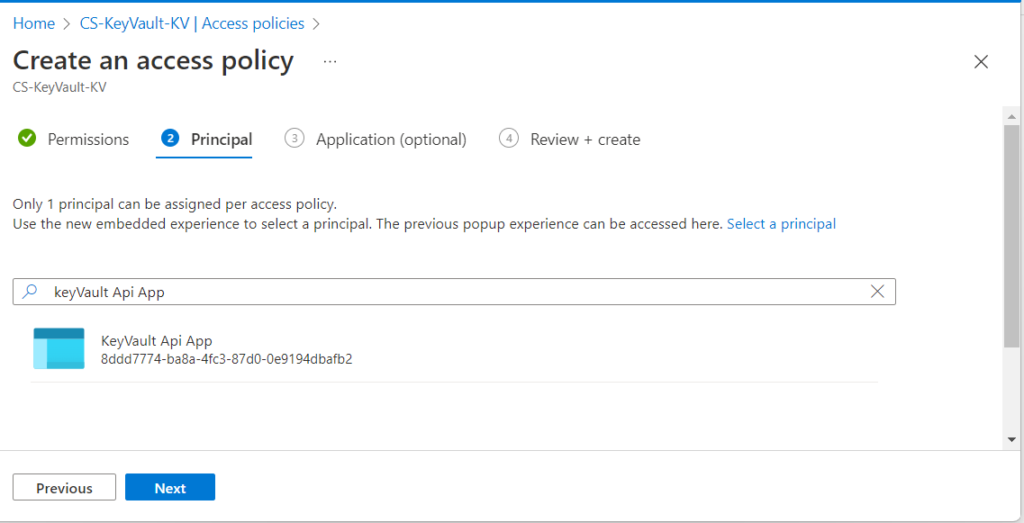
4. Enter the name of the application in the search field under the Principal selection pane and select it and click next.
5. Review the access policy changes and select Create to save the access policy.
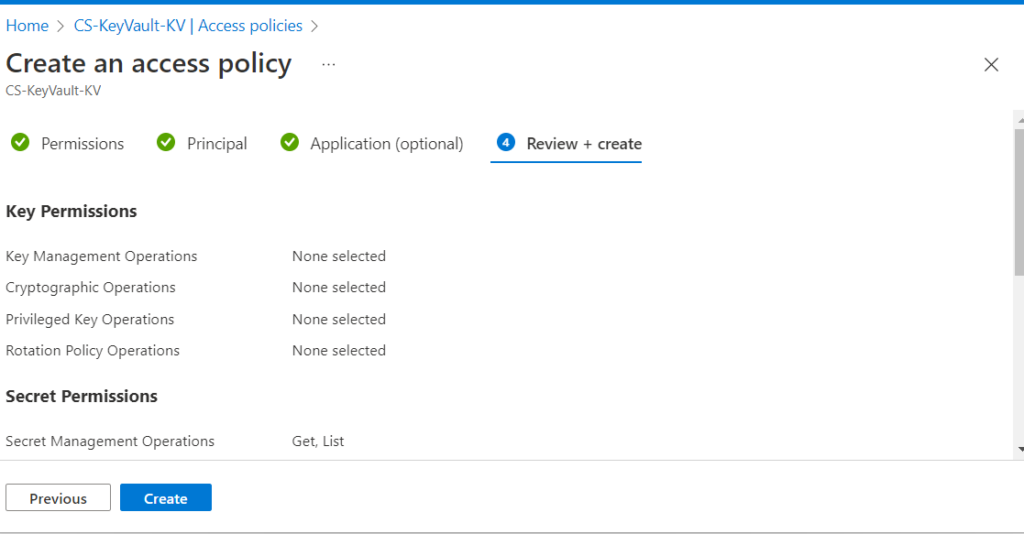
6. This completes the process of granting Your application access to Key Vault.
Also read https://dotnetcoder.com/creating-a-reusable-blazor-search-component/
Add Code in our application to access secrets from Azure Key Vault
In order for our application to access secrets from the key vault, we need to extend our configuration.
1. add the ClientId , ClientSecret and TenantId we noted when registering the application in Azure Active Directory (AAD) to our appsettings.json

2. Install the following NuGet packages to support key vault integration:
Azure.IdentityAzure.Security.KeyVault.SecretsAzure.Extensions.AspNetCore.Configuration.Secrets
3. Update Program.cs, The following code adds Azure Key Vault as a configuration source and retrieves all configurations
var builder = WebApplication.CreateBuilder(args);
//I Removed code for brevity
var keyVaultUrl = new Uri($"https://{builder.Configuration["KeyVault:Name"]}.vault.azure.net/");
var Credentials = new ClientSecretCredential(builder.Configuration["KeyVault:TenantId"],
builder.Configuration["KeyVault:ClientId"],
builder.Configuration["KeyVault:ClientSecret"]);
var secretClient = new SecretClient(keyVaultUrl, Credentials);
builder.Configuration.AddAzureKeyVault(secretClient, new AzureKeyVaultConfigurationOptions());
var app = builder.Build();
4. Create a controller named KVSController and add the following method that returns the secret we added when we created Azure Key Vault.
namespace CS.KeyVault.ApiApp.Controllers
{
    [Route("api/[controller]")]
    [ApiController]
    public class KVSController : ControllerBase
    {
        private readonly IConfiguration configuration;
        public  KVSController(IConfiguration configuration)
        {
             this.configuration = configuration;
        }
        [HttpGet("keyvault")]
        public string GetSecret()
        {
            return configuration["SecretName"];
        }
    }
}
5. Run the application and hit the controller action

6. Watch the output, now we can access secrets from Azure Key Vault

You can also retrieve the secret using the GetSecret method:
var Credentials = new ClientSecretCredential(builder.Configuration["KeyVault:TenantId"],
    builder.Configuration["KeyVault:ClientId"],
    builder.Configuration["KeyVault:ClientSecret"]);
var secretClient = new SecretClient(keyVaultUrl, Credentials);
KeyVaultSecret kvs = secretClient.GetSecret("SecretName");
var secretValue = kvs.Value;
Run the application again with a breakpoint on the secretValue

It is not a good idea to store sensitive data locally in your application’s configuration files. In our case, ClientId, ClientSecret, and TenantId were added to the appsettings.json configuration file, and that is not secure.
We can fix this with a feature called Managed Identity.
Access Azure Key Vault using Managed Identity
We need a mechanism to securely access our secrets stored in Azure Key Vault without storing credentials in code.
Managed Identity allows Azure resources to authenticate to cloud services. We can use Managed Identity to assign an identity to an Azure resource. In our case, the Azure resource is an API application, and the identity assigned to the application is similar to an Azure user. You can then assign permissions or roles to this identity, and the application can then use the permissions assigned to it to access relevant Azure resources – let us see how to configure this
1 . Install the following NuGet packages:
Azure.IdentityAzure.Extensions.AspNetCore.Configuration.Secrets
2. Update Program.cs, The following code creates an instance of the DefaultAzureCredential that attempts to obtain an access token
public class Program
{
    public static void Main(string[] args)
    {
        var builder = WebApplication.CreateBuilder(args);
        // Removed code for brevity
        // Access key vault using Managed Identity
        var keyVaultUrl = new Uri($"https://{builder.Configuration["KeyVault:Name"]}.vault.azure.net/");
        builder.Configuration.AddAzureKeyVault(keyVaultUrl, new DefaultAzureCredential(),
            new AzureKeyVaultConfigurationOptions
            {
                ReloadInterval = TimeSpan.FromMinutes(5)
            });
        var app = builder.Build();
3. Sign in to the Azure portal using https://portal.azure.com , search for App Services in the search box, and click Create

4. Fill in the fields as shown in the following figure and click Review + create
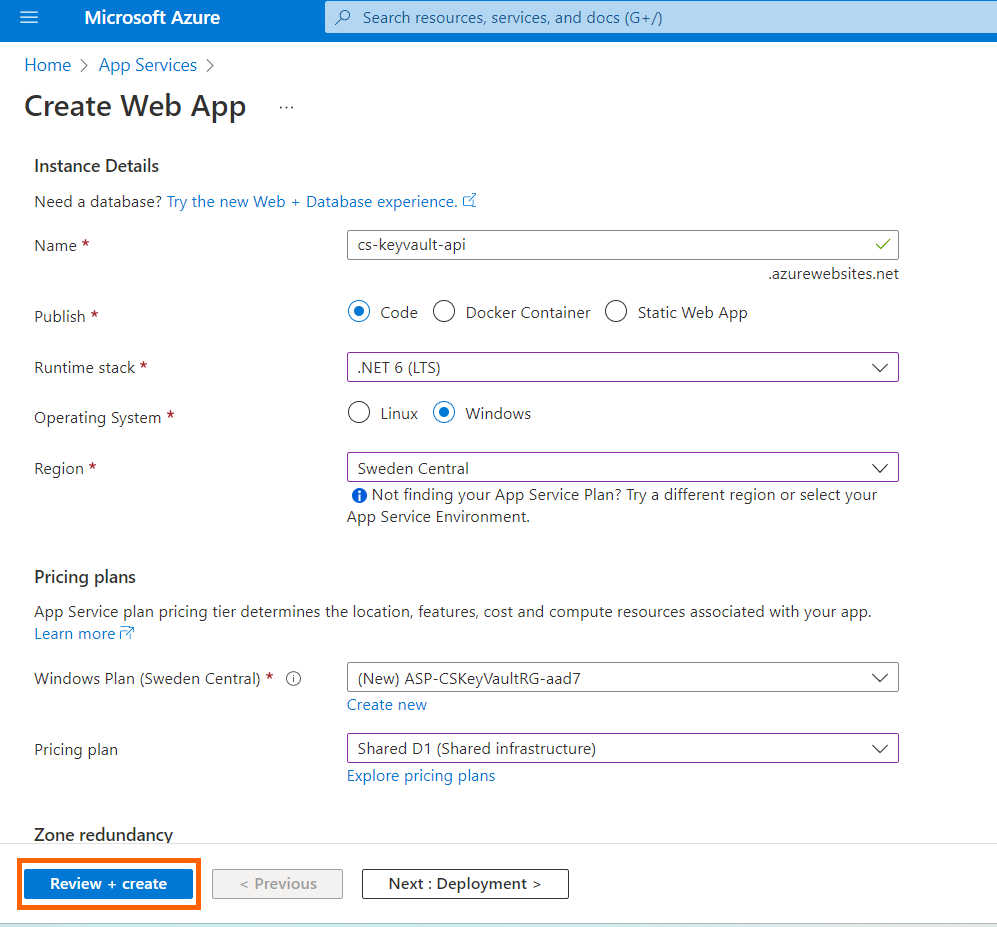
5. Publish the application to an Azure cloud service by using the Publish Azure Application wizard.
Right-click on the project in Solution Explorer, and click Publish. Provide the required details and click Create | Finish
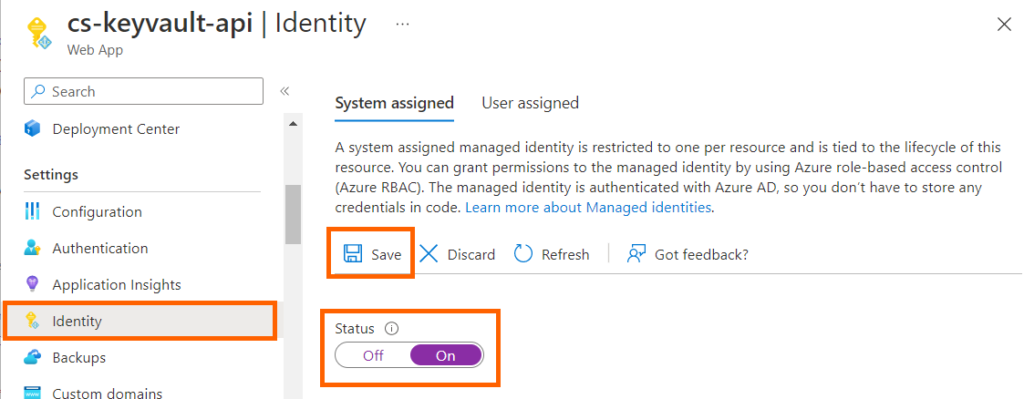
6. Search for the cs-keyvault-api Web App you just created, navigate to it, and from the blade, under settings click on Identity.
Under System assigned, change Status to On and click Save.
Grant the application access to Azure Key Vault
1. Search for the key Key Vault CS-KeyVault-KV

2. Select Access policies, then click on Create.
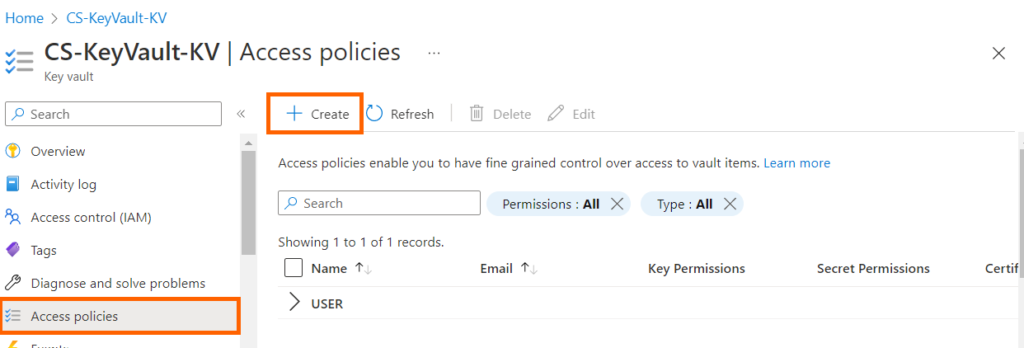
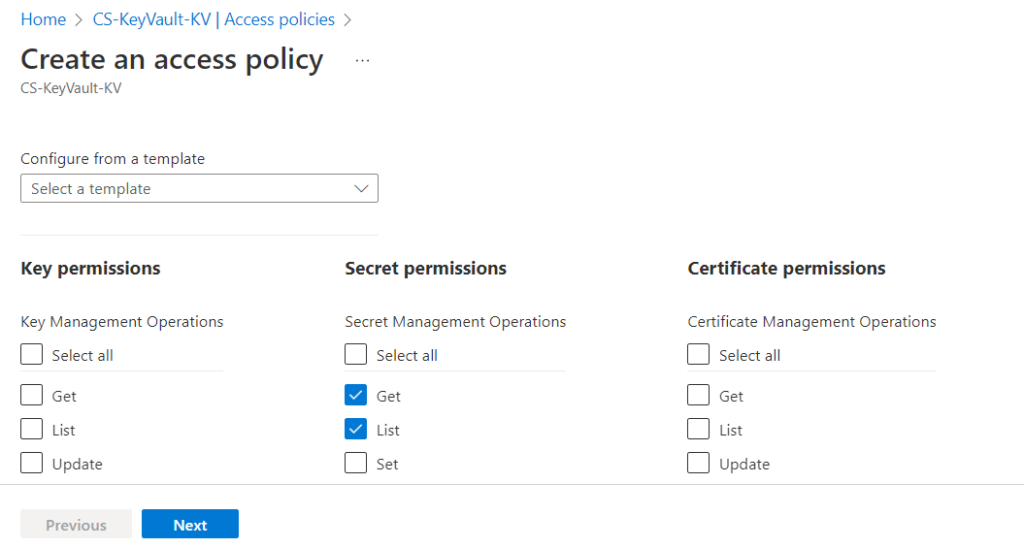
3. Select the Get, and List permissions under Secret permissions
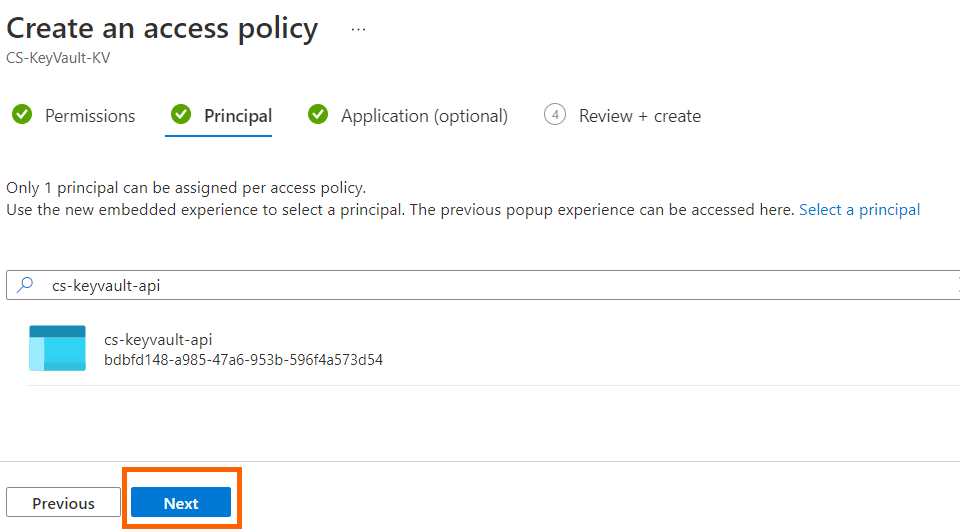
4. Enter cs-keyvault-api in the search field under the Principal selection pane and select it and click next
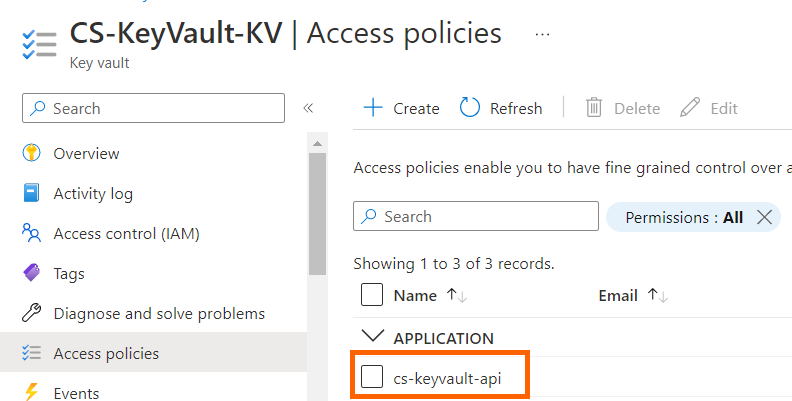
5. Review the access policy and select Create to save the access policy

6. This completes the process of granting Your application access to Key Vault.
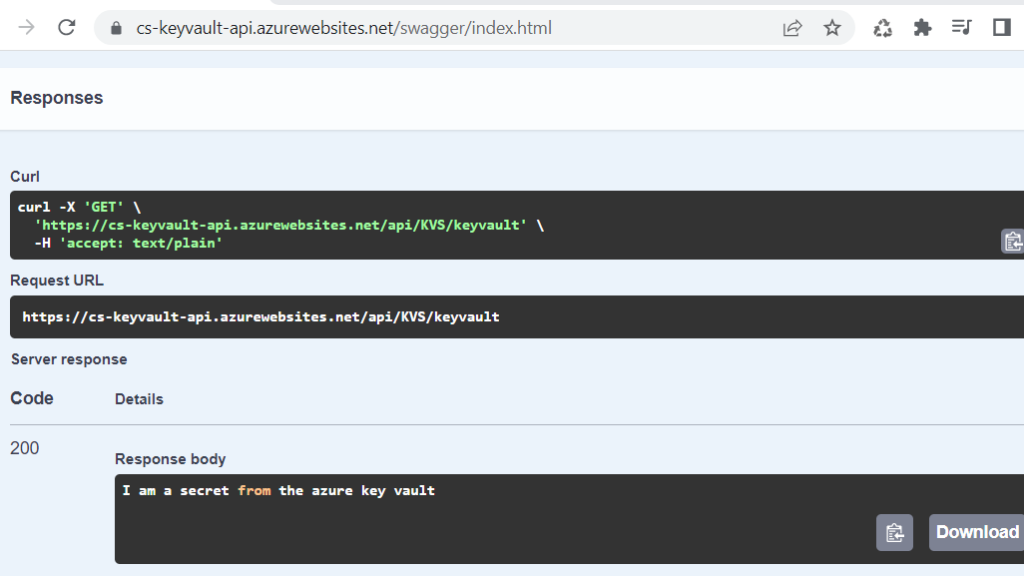
5. Run the application and hit the controller action
Conclusion
In this post, we explained how to create an Azure Key Vault service using Azure Cloud Shell and how to add and retrieve secrets in various ways and use managed identities to access Azure resources that allows to authenticate with Azure Key Vault using AAD authentication without storing credentials in code.
The code for the demo can be found Here
Also read https://dotnetcoder.com/entity-framework-code-first-approach-in-net-8/
Enjoy This Blog?
Discover more from Dot Net Coder
Subscribe to get the latest posts sent to your email.


