Table of Contents
Localization is a process of translating the labels of elements from UI to another language. In this article, we will create a custom json-based localization service for the Blazor server application that can be used in different components, e.g. in the Reusable DataGrid Blazor created in the previous post.
Take a look at the final JSON-based localization service for the Blazor server application project:
Creating a Localization Solution and adding a class library project
1. Open Visual Studio 2022 and click the Create a new project button.
2. Select the Class library project and click the Next button.
3. Enter CS.Services.Localizer in the Project name textbox and Localization in the Solution name and click the Next button.
4. Select .NET 7.0 as the version of the Framework to use and click the Create button.

5. Install the following NuGet packages :
Microsoft.Extensions.HostingNewtonsoft.JsonBlazored.LocalStorage
Creating a custom Localization service
1. Create a new project folder called Objects, and add a class file called Translation that contains the translation in different languages for a given key.
namespace CS.Services.Localizer.Objects
{
    public class Translation
    {
        public string English { get; set; }
        public string Russian { get; set; }
        public string Arabic { get; set; }
    }
}
2. Create a new project folder named Interfaces, and add an interface file named ILocalizerStorageService
namespace CS.Services.Localizer.Interfaces
{
    public interface ILocalizerStorageService
    {
        Task<IDictionary<string, string>> GetLocalizedDictionary(string language);
        string GetLocalizedString(IDictionary<string, string> localizedDictionary, string key);
    }
}
The LocalizerStorageService is responsible for creating the JSON file if it does not exist and returns the localized dictionary and the translated string according to the selected language.
3. Add a class file named LocalizerStorageService , that implements the ILocalizerStorageService interface.
namespace CS.Services.Localizer
{
    public class LocalizerStorageService : ILocalizerStorageService
    {
        private readonly IHostEnvironment hostEnvironment;
        private static readonly SemaphoreSlim semaphore = new SemaphoreSlim(1);
        public LocalizerStorageService(IHostEnvironment hostEnvironment)
        {
            this.hostEnvironment = hostEnvironment;
        }
        public Task<IDictionary<string, string>> GetLocalizedDictionary(string language)
        {
            var storage = GetOrCreateStorage();
            return Task.FromResult((IDictionary<string, string>)storage.
                SelectMany(v => v).
                ToDictionary(
                kvp => kvp.Key,
                kvp => JObject.Parse(JsonConvert.SerializeObject(kvp.Value))[language].ToString()));
        }
        public string GetLocalizedString(IDictionary<string, string> localizedDictionary, string key)
        {
            if (key == null)
            {
                return string.Empty;
            }
            else if (localizedDictionary.ContainsKey(key))
            {
                if (localizedDictionary.TryGetValue(key, out string value) && !string.IsNullOrEmpty(value))
                {
                    return value;
                }
                else
                {
                    return "{" + key + "}";
                }
            }
            else
            {
                InsertTranslation(key).ConfigureAwait(false);
                return "{" + key + "}";
            }
        }
        private async Task InsertTranslation(string key)
        {
            if (hostEnvironment.IsDevelopment())
            {
                try
                {
                    await semaphore.WaitAsync();
                    var list = GetOrCreateStorage().ToList();
                    var test = list.SelectMany(v => v);
                    if (!list.SelectMany(v => v).Any(kvp => string.Compare(kvp.Key, key, true) == 0))
                    {
                        list.Add(new Dictionary<string, Translation>
                        {
                            { key, new Translation() }
                        });
                        var path = Directory.GetCurrentDirectory();
                        var fileName = $"{path}/translations.json";
                        using StreamWriter writer = File.CreateText(fileName);
                        var json = JsonConvert.SerializeObject(list, Formatting.Indented);
                        writer.Write(json);
                    }
                }
                finally
                {
                    semaphore.Release();
                }
            }
        }
        private IEnumerable<IDictionary<string, Translation>> GetOrCreateStorage()
        {
            var result = new List<IDictionary<string, Translation>>();
            var path = Directory.GetCurrentDirectory();
            var fileName = $"{path}/translations.json";
            if (!File.Exists(fileName))
            {
                if (hostEnvironment.IsDevelopment())
                {
                    using var writer = File.CreateText(fileName);
                    writer.Write(JsonConvert.SerializeObject(new List<IDictionary<string, Translation>>(), Formatting.Indented));
                }
                else
                {
                    throw new NotSupportedException("You can not create json file in Development Environment");
                }
            }
            using (var reader = File.OpenText(fileName))
            {
                var json = reader.ReadToEnd();
                result = JsonConvert.DeserializeObject<List<IDictionary<string, Translation>>>(json);
            }
            return result ?? new List<IDictionary<string, Translation>>();
        }
    }
}
Line 14: GetLocalizedDictionary method returns the localized dictionary IDictionary<string, string> based on the language parameter,
Line 16: GetOrCreateStorage either returns the JSON file or creates it if it does not exist
Line 26: GetLocalizedString returns the localized string or inserts the new key if it does not exist.
Line 45: InsertTranslation writes the new key to the JSON file if it does not exist.
4. Add a class file called Preference to the Objects folder.
namespace CS.Services.Localizer.Objects
{
    public class Preference
    {
        public string Language { get; set; }
    }
}
5. Add an interface file named ILocalizerServiceto Interfaces folder
namespace CS.Services.Localizer.Interfaces
{
    public interface ILocalizerService
    {
        Task<Preference> GetOrSetPreferences();
        string GetLocalizedString(string key);
        Task<string> ChangeLanguage(string language);
        Preference Preference { get; }
    }
}
The LocalizerService is responsible for loading or saving Preferenceto browser localStorage and returns the localized string based on the data stored in localStorage.
6. Add a class file named LocalizerService , that implements the ILocalizerService interface.
namespace CS.Services.Localizer
{
    public class LocalizerService : ILocalizerService
    {
        private readonly ILocalizerStorageService storageService;
        private readonly ILocalStorageService localStorageService;
        private Preference preference;
        private IDictionary<string, string> translations;
        public LocalizerService(ILocalizerStorageService storageService, ILocalStorageService localStorageService)
        {
            this.storageService = storageService;
            this.localStorageService = localStorageService;
        }
        public Preference Preference => preference;
        public string GetLocalizedString(string key)
        {
            return storageService.GetLocalizedString(translations, key);
        }
        public async Task<Preference> GetOrSetPreferences()
        {
            var pref = await localStorageService.GetItemAsync<Preference>("preference");
            preference = pref ?? new Preference() { Language = "English" };
            translations = await storageService.GetLocalizedDictionary(preference.Language);
            await SavePreference();
            return preference;
        }
        public async Task<string> ChangeLanguage(string language)
        {
            preference.Language = language;
            translations = await storageService.GetLocalizedDictionary(preference.Language);
            await SavePreference();
            return preference.Language;
        }
        // Helper methods
        private async Task SavePreference()
        {
            await localStorageService.SetItemAsync("preference", preference);
        }
    }
}
Line 23: GetOrSetPreferences method gets the preferred language stored in LocalStorage or sets it to English as the default value and set the localized dictionary translations local variable.
Line 18: GetLocalizedString returns a localized string.
Line 36: ChangeLanguage is responsible to change the language.
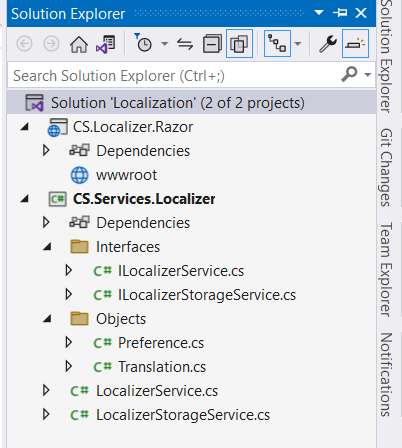
The project should look like below:

Creating a Razor class library
1. Right-click the solution and select the Add, New Project option from the menu.
2. Select the Razor Class Library project template and click the Next button.
3. Name the project CS.Localizer.Razor and click the Next button.
4. Select .NET 7.0 as the version of the Framework and click the Create button.
5. Delete the files created by default.
6. Right-click the CS.Localizer.Razorproject and select the Add, Project Reference option from
the menu and check the CS.Services.Localizercheckbox and click the OK button.
Creating the Localizer components
In this section we will create three components CSStateProviderComponent , CSLocalizerComponent, CSSwitcherComponent.
CSStateProviderComponent
Many components rely on LocalStorage of the browser and during prerendering it’s not possible to interact with LocalStorage.
CSStateProviderComponent renders its child content only after loading is complete so other components can easily work with the stored data .
To make the data accessible to all components of the application, we need to wrap it around the Router component.
1. Right-click the CS.Localizer.Razor project and add a new folder named StateProvider.
2. Right-click the StateProvider folder and add a class that derives from ComponentBase named CSStateProviderComponent
namespace CS.Localizer.Razor.StateProvider
{
    public class CSStateProviderComponent: ComponentBase
    {
        [Inject]
        ILocalizerService LocalizerService { get; set; }
        [Parameter] public RenderFragment ChildContent { get; set; }
        public bool HasLoaded { get; set; }
        public string CurrentLanguage => LocalizerService.Preference.Language;
        public async Task ChangeLanguage(string language)
        {
            await LocalizerService.ChangeLanguage(language);
            StateHasChanged();
        }
        protected override async Task OnAfterRenderAsync(bool firstRender)
        {
            if (firstRender)
            {
                await LocalizerService.GetOrSetPreferences();
                HasLoaded = true;
                StateHasChanged();
            }
        }
    }
}
OnAfterRenderAsync is executed once the application is loaded and rendered in the browser. At this point we can check if this is the firstRender, and if so, call the GetOrSetPreferences method and then explicitly tell Blazor to render again by calling StateHasChanged.
3. Right-click the StateProvider folder and add a Razor component file named CSStateProvider
@inherits CSStateProviderComponent
@if (HasLoaded)
{
    <CascadingValue Value="@this">
        @ChildContent
    </CascadingValue>
}
else
{
    <p>Loading...</p>
}
Also read https://dotnetcoder.com/creating-a-blazor-confirm-dialog-component/
CSLocalizerComponent
CSLocalizerComponentis responsible for retrieving the localized string based on the key parameter.
1. Right-click theCS.Localizer.Razor project and add a new folder named Localizer.
2. Right-click the Localizer folder and add a class that derives from ComponentBase named CSLocalizerComponent.
namespace CS.Localizer.Razor.Localizer
{
    public class CSLocalizerComponent:ComponentBase
    {
        [Inject]
        protected ILocalizerService localizerService { get; set; }
        [CascadingParameter] CSStateProvider cSStateProvider { get; set; }
        [Parameter]
        public RenderFragment ChildContent { get; set; }
        [Parameter]
        public string Key { get; set; }
    }
}
3. Right-click the Localizer folder and add a Razor component file named CSLocalizer.
@inherits CSLocalizerComponent
@(LocalizerService.GetLocalizedString(Key))
CSSwitcherComponent
CSSwitcherComponent is responsible for switching the language and setting the dir attribute when the Arabic language is selected.
1. Right-click theCS.Localizer.Razorproject and add a new folder named Switcher.
2. Right-click the Switcher folder and add a class that derives from ComponentBasenamedCSSwitcherComponent.
namespace CS.Localizer.Razor.Switcher
{
    public class CSSwitcherComponent:ComponentBase
    {
        [CascadingParameter] CSStateProviderComponent CSStatePtovider { get; set; }
        [Inject]
        public IJSRuntime JSRuntime { get; set; }
        protected string CurrentLanguage { get; set; }
        protected Dictionary<string, string> languages = new Dictionary<string, string>
        {
            {"English", "English" },
            {"Russian", "Русский" },
            {"Arabic", "العربية" }
        };
        protected override async Task OnInitializedAsync()
        {
            CurrentLanguage = CSStatePtovider.CurrentLanguage;
            await ChangeDirection(CurrentLanguage);
        }
        public async Task OnLanguageChange(ChangeEventArgs e)
        {
            await CSStatePtovider.ChangeLanguage(e.Value.ToString());
            await ChangeDirection(e.Value.ToString());
        }
        private async Task ChangeDirection(string lang)
        {
            if (lang == "Arabic")
            {
                await JSRuntime.InvokeVoidAsync("document.body.setAttribute", "dir", "rtl");
            }
            else
            {
                await JSRuntime.InvokeVoidAsync("document.body.setAttribute", "dir", "ltr");
            }
        }
    }
}
3. Right-click the Localizer folder and add a Razor component file named CSSwitcher.
@inherits CSSwitcherComponent
<Select Value="@CurrentLanguage" @onchange="OnLanguageChange">
    @foreach (var kvp in languages)
    {
        <option value="@kvp.Key" selected="@(kvp.Key == CurrentLanguage)">
            @kvp.Value
        </option>
    }
</Select>
Creating Blazor Server App Empty
1. Right-click the Localization solution and select the Add, New Project option from the menu.
2. Select the Blazor Server App Empty project template and click the Next button.
3. Name the project CS.Localizer.WebApp and click the Next button.
4. Select .NET 7.0 as the version of the Framework and click the Create button.
6. Right-click the CS.Localizer.WebAppproject and select the Add, Project Reference option from
the menu and check the CS.Localizer.Razorcheckbox and click the OK button.
7. Right-click the wwwroot/css folder and select Add, Client-Side Library from
the menu, type bootstrap in the Library search textbox and click the Install button.
8. Update _Host.cshtml file
<link href="~/bootstrap/css/bootstrap.min.css" rel="stylesheet" />Using the custom Localizer in our code
1. Register your custom Localizer services in the Program class in CS.Localizer.WebApp by adding the following services to the DI Container
builder.Services.AddBlazoredLocalStorage();
builder.Services.AddScoped<ILocalizerStorageService, LocalizerStorageService>();
builder.Services.AddScoped<ILocalizerService, LocalizerService>();
2. Add the following using statements to the _Import.razor file.
@using CS.Localizer.Razor.StateProvider
@using CS.Localizer.Razor.Localizer
@using CS.Localizer.Razor.Switcher
3. WrapCSStateProvidercomponentt around theRouter component to make the state accessible to all components in our application.
<CSStateProvider>
    <Router AppAssembly="@typeof(App).Assembly">
        <Found Context="routeData">
            <RouteView RouteData="@routeData" DefaultLayout="@typeof(MainLayout)" />
            <FocusOnNavigate RouteData="@routeData" Selector="h1" />
        </Found>
        <NotFound>
            <PageTitle>Not found</PageTitle>
            <LayoutView Layout="@typeof(MainLayout)">
                <p role="alert">Sorry, there's nothing at this address.</p>
            </LayoutView>
        </NotFound>
    </Router>
</CSStateProvider>
4.Update the Index.razor component by adding the following code to it.
@page "/"
<PageTitle>Index</PageTitle>
            <h4><CSLocalizer Key="employee.add-employee"></CSLocalizer></h4>
                <label><CSLocalizer Key="employee.first-name"></CSLocalizer></label>
                 <input type="email">
                <label><CSLocalizer Key="employee.last-name"></CSLocalizer></label>
                <input type="email">
                <label><CSLocalizer Key="employee.job"></CSLocalizer></label>
                <input type="email">
                <label><CSLocalizer Key="employee.salary"></CSLocalizer></label>
                <input type="email">
                <label><CSLocalizer Key="employee.hire-date"></CSLocalizer></label>
                <input type="email">
                <button type="submit" style="width:150px;">
                    <CSLocalizer Key="employee.save"></CSLocalizer>
                </button>
                <button type="submit" style="width:150px;">
                    <CSLocalizer Key="employee.cancel"></CSLocalizer>
                </button>
            <h4><CSLocalizer Key="employee.employees"></CSLocalizer></h4>
            <table>
                <thead>
                    <tr>
                        <th><CSLocalizer Key="employee.first-name"></CSLocalizer></th>
                        <th><CSLocalizer Key="employee.last-name"></CSLocalizer></th>
                        <th><CSLocalizer Key="employee.job"></CSLocalizer></th>
                        <th><CSLocalizer Key="employee.salary"></CSLocalizer></th>
                        <th>#</th>
                        <th>#</th>
                    </tr>
                </thead>
                <tbody>
                    @foreach(var employee in employees)
                    {
                        <tr>
                            <td>@employee.FirstName</td>
                            <td>@employee.LastName</td>
                            <td>@employee.Job</td>
                            <td>@employee.Salary</td>
                            <td><button style="width:150px;"><CSLocalizer Key="employee.update"></CSLocalizer></button></td>
                            <td><button style="width:150px;"><CSLocalizer Key="employee.delete"></CSLocalizer></button></td>
                        </tr>
                    }
                </tbody>
            </table>
@code{
    List<Employee> employees = new List<Employee>
    {
        new Employee{FirstName= "John", LastName= "Bond", Job = "ANALYST", Salary= "2000"},
        new Employee{FirstName= "Kimberly", LastName= "McLean", Job = "CLERK", Salary= "2500"},
        new Employee{FirstName= "Kevin", LastName= "Pullman", Job = "MANAGER", Salary= "3000"},
        new Employee{FirstName= "Amy", LastName= "Skinner", Job = "MANAGER", Salary= "3500"},
        new Employee{FirstName= "Katherine", LastName= "Peters", Job = "PRESIDENT", Salary= "5100"}
    };
    class Employee
    {
        public string FirstName{ get; set; }
        public string LastName{ get; set; }
        public string Job { get; set; }
        public string Salary{ get; set; }
    }
}
5. Update the MainLayout.razor file by adding the CSSwitcher component
<main>
    <nav dir="ltr">
            <a>
                    <CSLocalizer Key="internationalization"></CSLocalizer>
            </a>
                <CSSwitcher></CSSwitcher>
    </nav>
    <article>
        @Body
    </article>
</main>
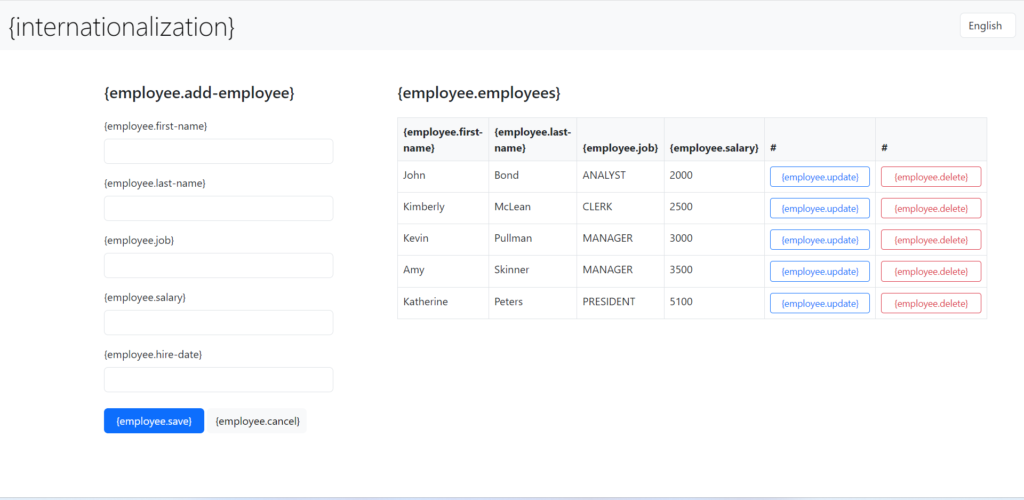
5. Run the application and observe the output.
Note that the translations.json file was created when you ran the application.
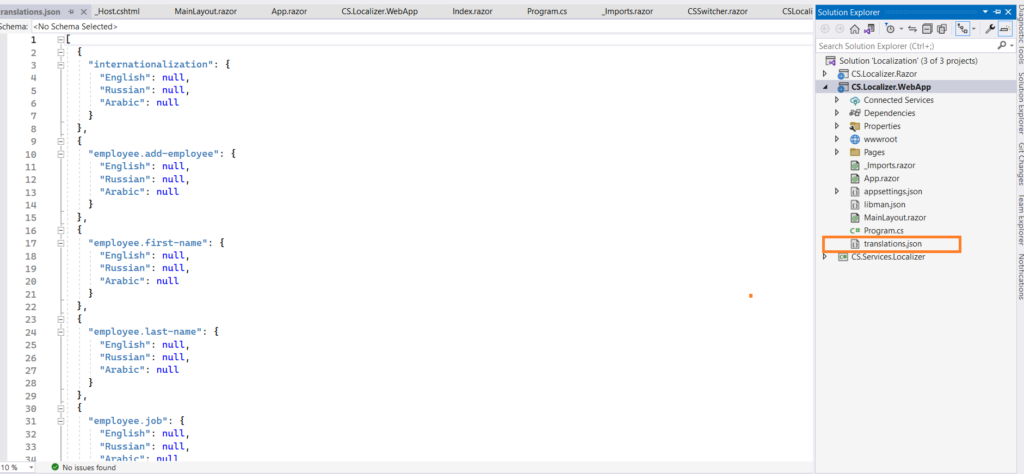
Whenever you use CSLocalizer in your code and run the application in the development environment, a new object is added to the translations.json file.
6. Add your translations manually.
[
  {
    "internationalization": {
      "English": "Internationalization",
      "Russian": "Интернационализация",
      "Arabic": "التدويل"
    }
  },
  {
    "employee.first-name": {
      "English": "First name",
      "Russian": "Имя",
      "Arabic": "الاسم الأول"
    }
  },
  {
    "employee.last-name": {
      "English": "Last name",
      "Russian": "Фамилия",
      "Arabic": "الكنية"
    }
  },
  {
    "employee.job": {
      "English": "Job",
      "Russian": "Профессия",
      "Arabic": "المهنة"
    }
  },
  {
    "employee.salary": {
      "English": "Salary",
      "Russian": "Заработная плата",
      "Arabic": "المرتب"
    }
  },
  {
    "employee.hire-date": {
      "English": "Hire date",
      "Russian": "Дата приема на работу",
      "Arabic": "تاريخ التعيين"
    }
  },
  {
    "employee.save": {
      "English": "Save",
      "Russian": "Сохранять",
      "Arabic": "حفظ"
    }
  },
  {
    "employee.cancel": {
      "English": "Cancel",
      "Russian": "Отмена",
      "Arabic": "إلغاء"
    }
  },
  {
    "employee.update": {
      "English": "Update",
      "Russian": "Редактировать",
      "Arabic": "تحرير"
    }
  },
  {
    "employee.delete": {
      "English": "Delete",
      "Russian": "Удалить",
      "Arabic": "حذف"
    }
  },
  {
    "employee.employees": {
      "English": "Employees",
      "Russian": "Сотрудники",
      "Arabic": "الموظفين"
    }
  },
  {
    "employee.add-employee": {
      "English": "Add Employee",
      "Russian": "Добавить сотрудника",
      "Arabic": "الرجاء إضافة موظف"
    }
  }
]
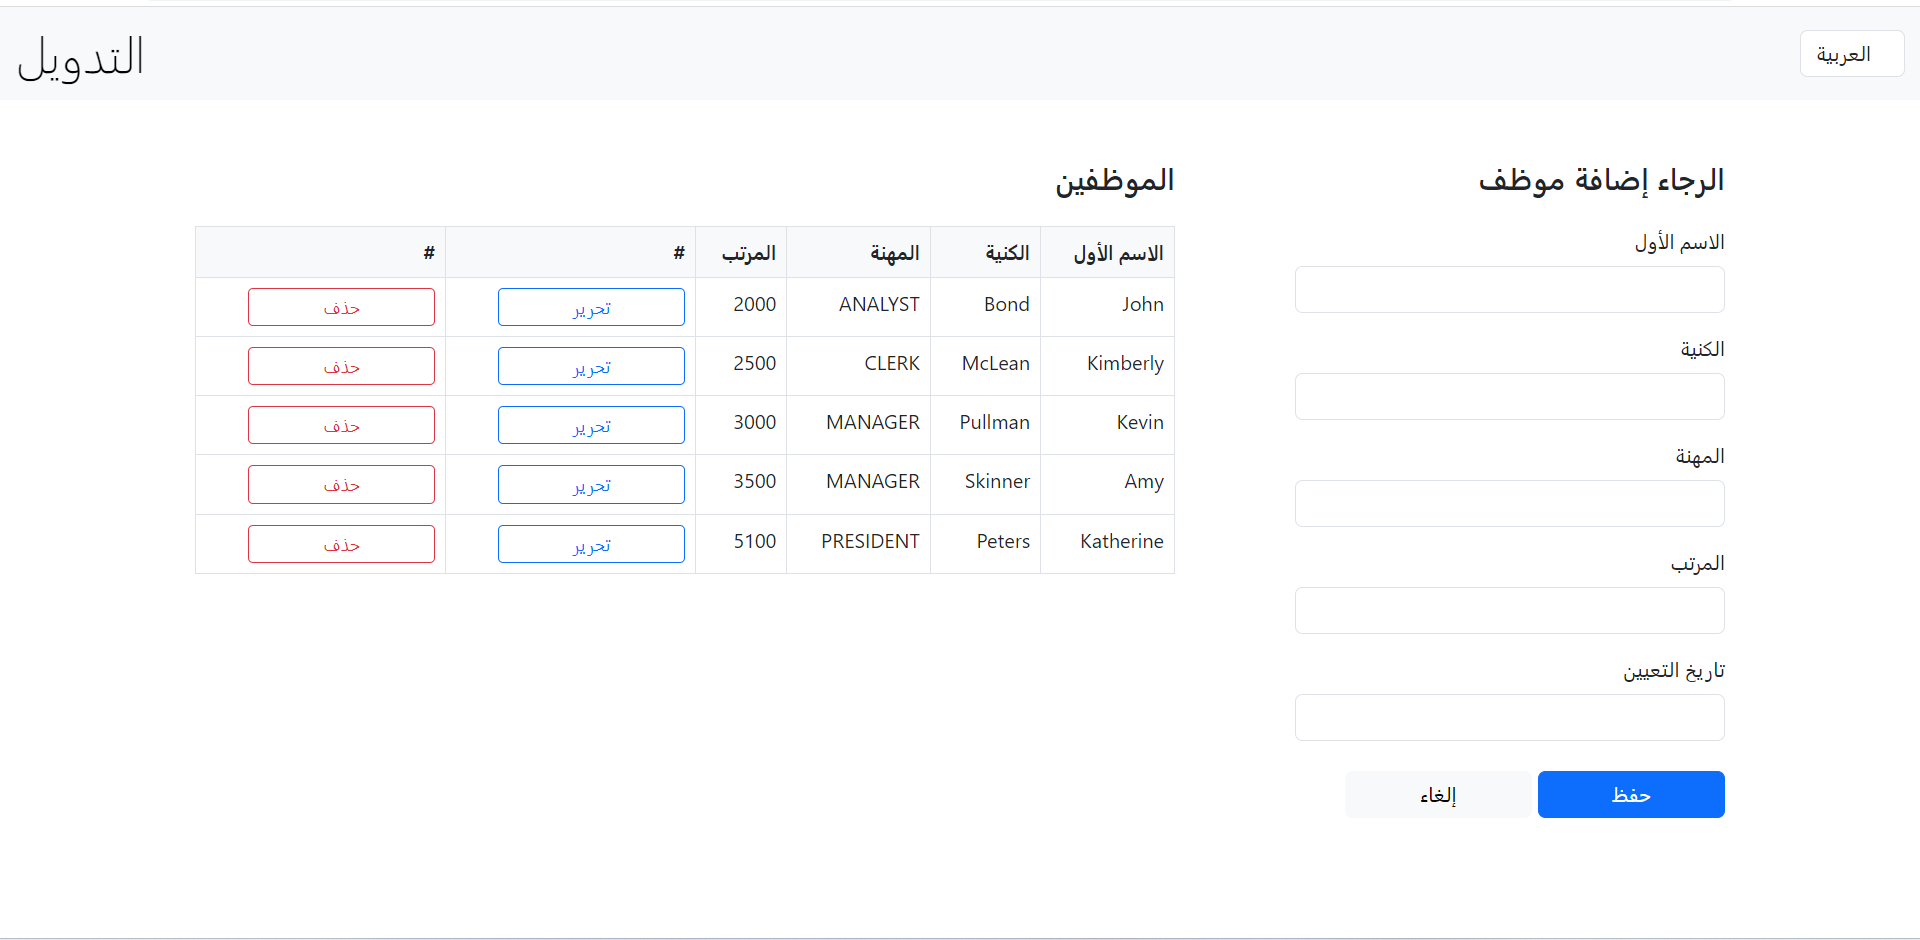
7. Run the application again and observe the output.
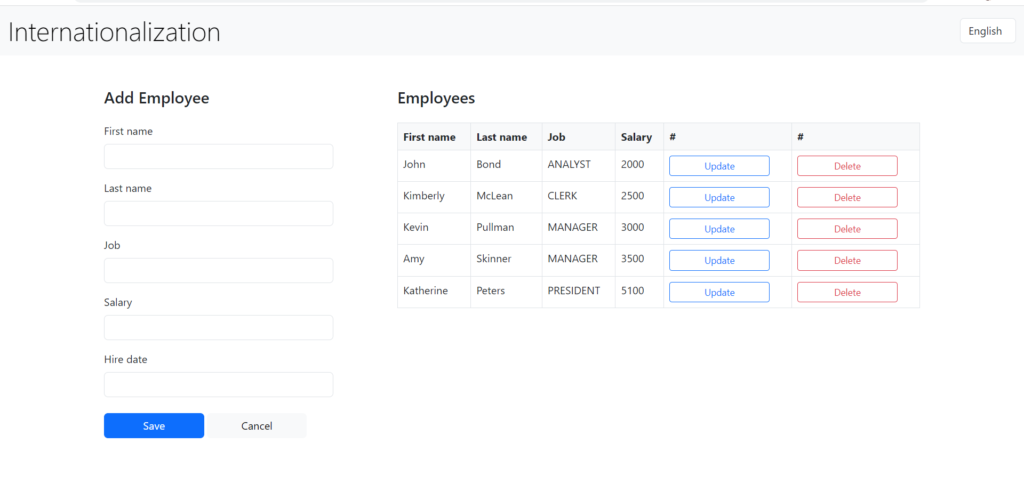
8. Switch the language to Russian and then to Arabic.
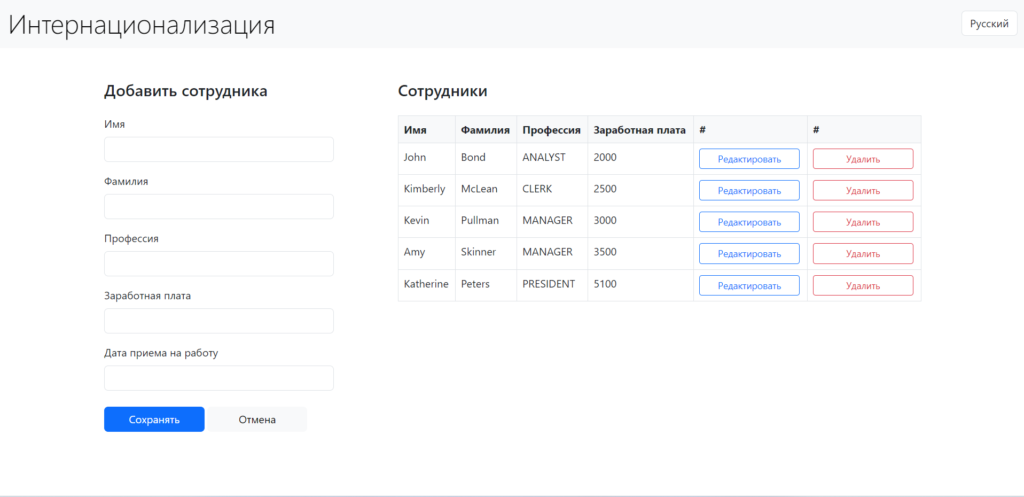
Note that the dir attribute has been changed from ltr to rtl when the selected language is Arabic.
The code for the demo can be found Here
Also read https://dotnetcoder.com/creating-a-blazor-toast-component-using-c-only-html-and-css/
Enjoy This Blog?
Discover more from Dot Net Coder
Subscribe to get the latest posts sent to your email.


