Table of Contents
Introduction
In the previous article, we learned the most important concepts about the authorization code flow with PKCE in Azure Ad. In this post, we will go into Swagger Azure Ad Authentication by allowing the user to authenticate with Swagger, a tool from SmartBear used for document API projects.
Swagger Azure Ad Authentication Example
In our Swagger Azure Ad Authentication example, we will see how to secure our API with Azure Ad (Entra ID) and then allow a resource owner (user) to authenticate with Azure Active Directory (Entra ID).
Take a look at the finished Swagger Azure Ad Authentication example implemented in .Net Core and Azure Ad (Entra ID).
What is Swagger?
Swagger is a set of tools from SmartBear for describing the structure of APIs using the OpenAPI Specification (OAS) that helps developers design, build, document and use RESTful web services. The main goal of Swagger is to standardize the description of APIs so that they are easy to understand, use and maintain.
Swagger is integrated with ASP.NET Core via the Swashbuckle library, which is one of the tools available to generate the Open API specifications for your current API project.
It is beneficial to use a Swachbuckle.AspNetCore package which includes an embedded package of Swagger UI, a tool that can be used to display the documentation in a nice UI format.
Setting up the project
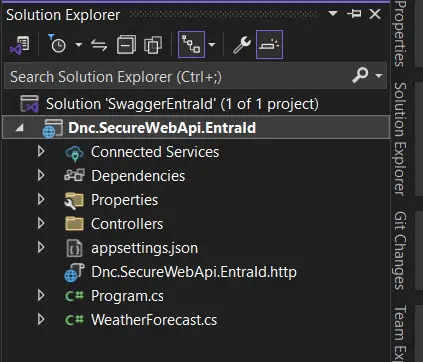
To implement Swagger Azure Ad Authentication in practice , open Visual Studio and create a blank solution named SwaggerEntraId .
Then add a new ASP.NET Core Web API project template named Dnc.SecureWebApi.EntraId and select .NET 8 (Long Term Support) as the target Framework and we need to register it in Azure Ad ( Entra ID) as you will see in next next section.
Registering the Web API in Microsoft Entra ID (Azure Ad)
You need An Azure account, subscription, go to the Azure Portal .
Go to Azure Active Directory “Entra ID” in the left navigation pane and click “App Registrations” and then click “New Registration” and finally enter the following information as shown below.
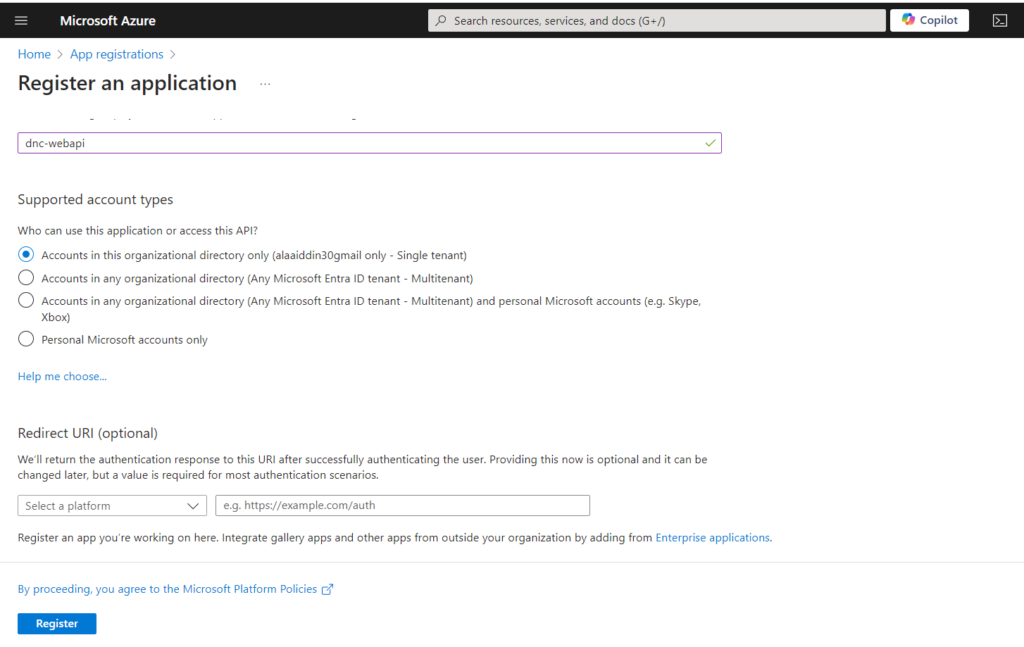
Then click “Register”.

We now need to expose our API to make it consumable.
Go to “Expose an API”, set the Application ID URI (use something like api://{clientId}) , I will use my domain name/dnc-webapi , and click “Add a scope” and enter the required information and click “Add scope” as shown below.
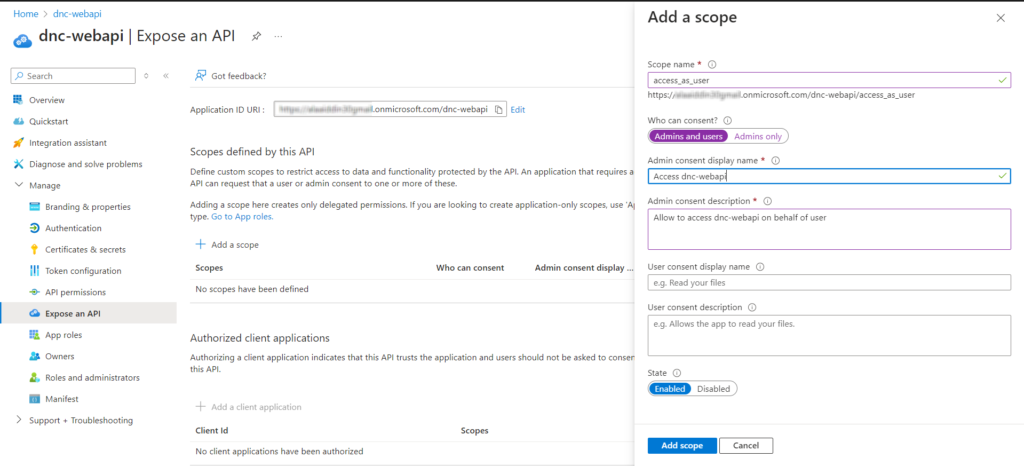
We have exposed our API by adding a scope named “access_as_user”.
The scope defines the level of access that an application requests when interacting with APIs. In simple words, APIs can expose multiple things that a user or application can do.

Secure the API with Azure Active Directory
To secure our ASP.NET Core Web API 8 with Azure Active Directory (Entra ID), we first need to configure our Azure AD credentials in the appsettings.json file as shown below.
{
    "AzureAd": {
        "Instance": "https://login.microsoftonline.com/",
        "Domain": "YOUR DOMAIN",
        "TenantId": "YOUR TENANT ID",
        "ClientId": "6e109f71-5ad2-4a39-bd19-24213d618746",
        "Audience": "YOUR DOMAIN/dnc-webapi"
    }
}
Avoid storing security information in your code. It is recommended to securely manage the secret by using Azure Key Vault instead of embedding it directly in your code.
Second, add the required NuGet packages with the following commands.
dotnet add package Microsoft.Identity.Web
dotnet add package Microsoft.AspNetCore.Authentication.JwtBearer
Finally, update the Program.cs file by adding the following code.
// Removed code for brevity
builder.Services.AddAuthentication(JwtBearerDefaults.AuthenticationScheme)
      .AddMicrosoftIdentityWebApi(builder.Configuration.GetSection("AzureAd"));

  builder.Services.AddAuthorizationBuilder()
      .AddPolicy("access_as_user", policy =>
          policy.RequireScope("access_as_user"));

  var app = builder.Build();
// Removed code for brevity
builder.Services.AddAuthentication(JwtBearerDefaults.AuthenticationScheme) : tells the Web API to use JWT bearer token for authentication.
.AddMicrosoftIdentityWebApi(builder.Configuration.GetSection("AzureAd")) : adds Microsoft Identity Platform as the authentication provider.
We have also defined a custom policy to protect our routes, which can be used in our controller at the controller or action level, as shown below.
namespace Dnc.SecureWebApi.EntraId.Controllers
{
    [ApiController]
    [RequiredScope(RequiredScopesConfigurationKey ="AzureAd:scopes")]
    [Authorize]
    [Route("[controller]")]
    public class WeatherForecastController : ControllerBase
    {
        [HttpGet(Name = "GetWeatherForecast")]
        public IEnumerable<WeatherForecast> Get()
        {
            //Removed code for brevity
        }
    }
}
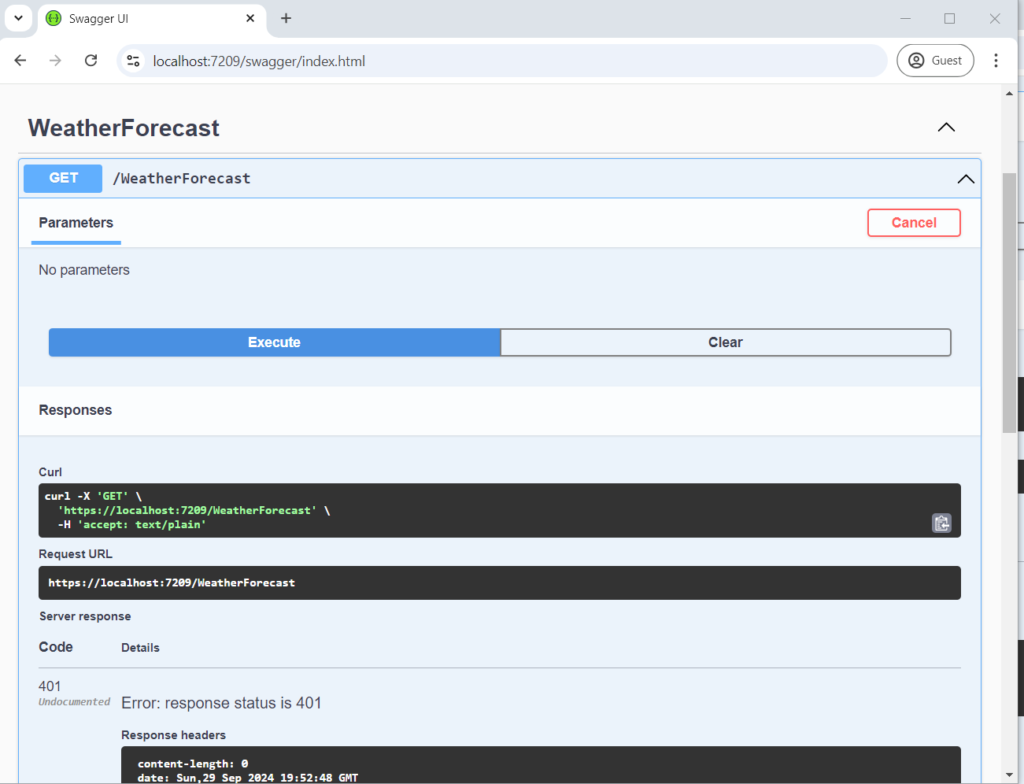
Set the Dnc.SecureWebApi as Startup project and observe the result (401 status code) when you call the protected route.
Registering Swagger client in Azure Ad
Go to Azure Active Directory “Entra ID” in the left navigation pane and click “App Registrations” and then click “New Registration” and finally enter the following information as shown below.
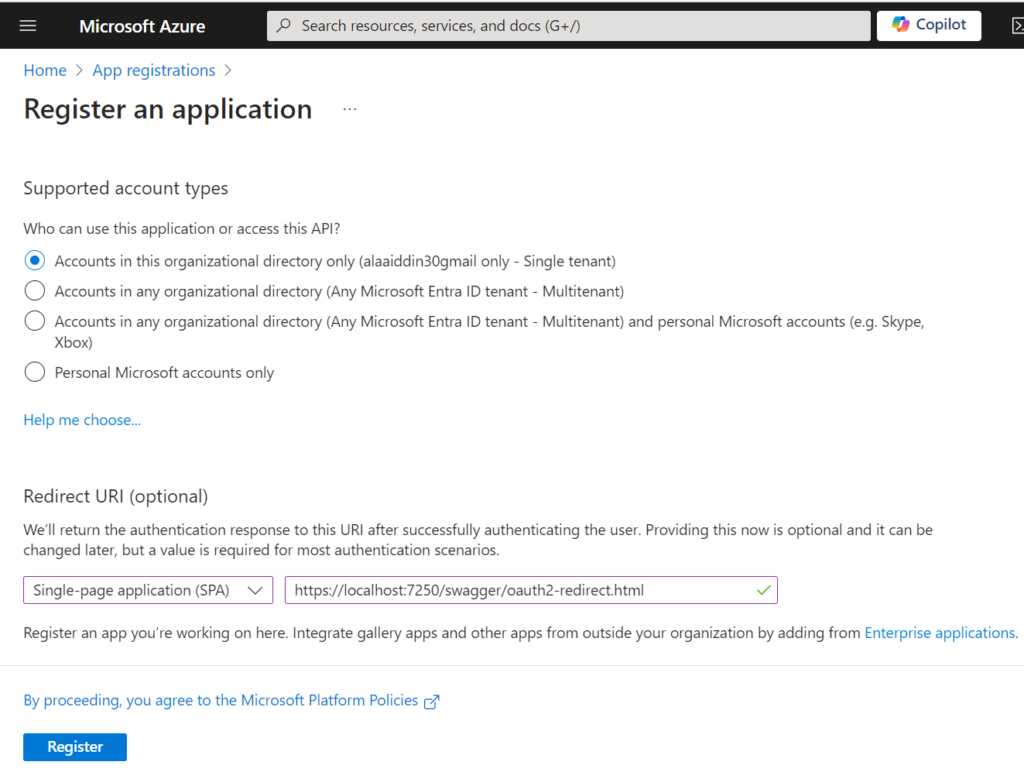
Click on “Register” and copy the required information for later use.

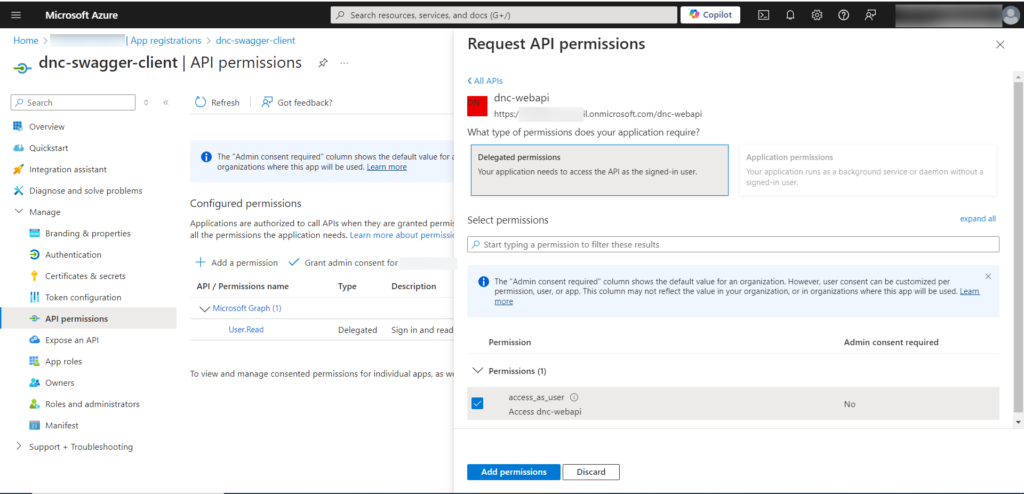
Finally , our client must have a permission to call the ASP.NET Core API registered in the previous section.
Go to “API Permissions” and then to “Add a permission”. Select the access_as_user permission and click “Add permissions” as shown below.
Also read https://dotnetcoder.com/azure-key-vault-configuration-in-asp-net-core/
Implementing Swagger Azure Ad Authentication
The Azure configurations are ready for both the Swagger client and the Web API, and the Web API is secured with Microsoft Management Identity.
The next step is to configure our client to enable Swagger Azure Ad Authentication to call the secure ASP.NET Core Web API 8 using Azure Active Directory (Entra ID).
First, we need to configure our Azure AD credentials for the Swagger client in the appsettings.json file, as shown below.
  "SwaggerAzureAd": {
    "Instance": "https://login.microsoftonline.com",
    "Domain": "YOUR DOMAIN",
    "TenantId": "YOUR TENANT",
    "ClientId": "ceb8affd-4aad-4aeb-962d-343ba47acd1f",
    "Audience": "YOUR DOMAIN/dnc-webapi",
    "Scopes" : "access_as_user"
  }
The following code in the Program.cs file is the default swagger configuration that was added by Visual Studio when we created our Dnc.SecureWebApi.EntraId Web API.
// Removed code for brevity
builder.Services.AddSwaggerGen();

var app = builder.Build();

// Configure the HTTP request pipeline.
if (app.Environment.IsDevelopment())
{
    app.UseSwagger();
    app.UseSwaggerUI();
}
// Removed code for brevity
Update the AddSwaggerGen method by adding the following code.
builder.Services.AddSwaggerGen(swaggerGenOptions =>
{
    swaggerGenOptions.SwaggerDoc("v1", new OpenApiInfo { Title = "DotNetCoder Swagger Azure Ad Authentication Demo", Version = "v1" });

    swaggerGenOptions.AddSecurityDefinition("oauth2", new OpenApiSecurityScheme
    {
        Name = "oauth2",
        Description = "Authorozation Code flow with PKCE",
        Type = SecuritySchemeType.OAuth2,
        Flows = new OpenApiOAuthFlows
        {
            AuthorizationCode = new OpenApiOAuthFlow
            {
                AuthorizationUrl = new Uri($"{builder.Configuration["SwaggerAzureAd:Instance"]}/{builder.Configuration["SwaggerAzureAd:TenantId"]}/oauth2/v2.0/authorize"),
                TokenUrl = new Uri($"{builder.Configuration["SwaggerAzureAd:Instance"]}/{builder.Configuration["SwaggerAzureAd:TenantId"]}/oauth2/v2.0/token"),
                Scopes = new Dictionary<string, string>
                {
                    {$"{builder.Configuration["SwaggerAzureAd:Audience"]}/{builder.Configuration["SwaggerAzureAd:Scopes"]}", "Access API as user" }
                }
            }
        }
    });

    swaggerGenOptions.AddSecurityRequirement(new OpenApiSecurityRequirement
    {
        {
            new OpenApiSecurityScheme
            {
                Reference = new OpenApiReference
                {
                    Type = ReferenceType.SecurityScheme,
                    Id = "oauth2"
                }
            },
            new[] { $"{builder.Configuration["SwaggerAzureAd:Audience"]}/{builder.Configuration["SwaggerAzureAd:Scopes"]}" }
        }
    });
});
AddSwaggerGen is responsible for generating the API documentation and creating a user-friendly interface for interacting with your API and is part of the Swashbuckle library, a NuGet package for generating the Open API specifications for the current API project.
AddSwaggerGen accepts a lambda expression as a parameter and provides an instance of the SwaggerGenOptions class, as you can see in the following code snippet.
builder.Services.AddSwaggerGen(swaggerGenOptions =>
{
   // swaggerGenOptions instance
});
This allows us to customize the way Swagger generates the documentation and configure the security schemas according to our needs.
The following code defines the Swagger document and provides some information that is displayed in the Swagger user interface (Swagger UI).
swaggerGenOprions.SwaggerDoc("v1", new OpenApiInfo { Title = "DotNetCoder Swagger Azure Ad Authentication Demo", Version = "v1" });
The AddSecurityDefinition method tells Swagger how the user or developer or consumer should authenticate in order to use our Web API. In simple words, the Swagger Azure Ad Authentication security mechanism is defined by the AddSecurityDefinition method. In our case. Swagger Azure Ad Authentication is configured to use the Authorization Code Flow security mechanism with PKCE.
AddSecurityDefinition accepts two parameters . the Id as the first parameter, which is important and is used later in the AddSecurityRequirement method to refer to the defined authentication scheme. The second parameter is an instance of the OpenApiSecurityScheme class, which specifies the Type of security mechanism used in your API and tells Swagger which Flow to use for authentication to the Web API, as you can see in the code snippet below.
swaggerGenOptions.AddSecurityDefinition("oauth2", new OpenApiSecurityScheme
{
    Name = "oauth2",
    Description = "Authorozation Code flow with PKCE",
    Type = SecuritySchemeType.OAuth2,
    Flows = new OpenApiOAuthFlows
    {
        AuthorizationCode = new OpenApiOAuthFlow
        {
            AuthorizationUrl = new Uri($"{builder.Configuration["SwaggerAzureAd:Instance"]}/{builder.Configuration["SwaggerAzureAd:TenantId"]}/oauth2/v2.0/authorize"),
            TokenUrl = new Uri($"{builder.Configuration["SwaggerAzureAd:Instance"]}/{builder.Configuration["SwaggerAzureAd:TenantId"]}/oauth2/v2.0/token"),
            Scopes = new Dictionary<string, string>
            {
                {$"{builder.Configuration["SwaggerAzureAd:Audience"]}/{builder.Configuration["SwaggerAzureAd:Scopes"]}", "Access API as user" }
            }
        }
    }
});
The AddSecurityRequirement method tells Swagger that authentication is required and enforces authentication, so the user should be authenticated before using your API by specifying the security scheme and optionally scopes.
It accepts an instance of the OpenApiSecurityRequirement , which refers to the security scheme we defined earlier in the AddSecurityDefinition method, and optionally scopes .
In our case, it refers to the OAuth2 scheme via its Id (“oauth2”), as you can see below.
swaggerGenOptions.AddSecurityRequirement(new OpenApiSecurityRequirement
{
    {
        new OpenApiSecurityScheme
        {
            Reference = new OpenApiReference
            {
                Type = ReferenceType.SecurityScheme,
                Id = "oauth2"
            }
        },
        new[] { $"{builder.Configuration["SwaggerAzureAd:Audience"]}/{builder.Configuration["SwaggerAzureAd:Scopes"]}" }
    }
});
In short: AddSecurityDefinition specifies how the user should authenticate, and AddSecurityRequirement enforces authentication using the security scheme defined in AddSecurityDefinition.
Finally, update the UseSwaggerUI method, which activates the Swagger user interface as follows.
app.UseSwaggerUI(swaggerUIOptions =>
{
    swaggerUIOptions.SwaggerEndpoint("/swagger/v1/swagger.json", "DotNetCoder Swagger Azure Ad Authentication Demo V1");
    swaggerUIOptions.OAuthClientId(builder.Configuration["SwaggerAzureAd:ClientId"]);
    swaggerUIOptions.OAuthUsePkce();
    swaggerUIOptions.OAuthScopeSeparator(" ");
    swaggerUIOptions.OAuthUseBasicAuthenticationWithAccessCodeGrant();
});
The UseSwaggerUI method accepts a lambda expression as a parameter and provides an instance of swaggerUIOptions, which we can use to configure the behavior of the Swagger UI.
The following code sets up the endpoint of the Swagger API documentation.
swaggerUIOptions.SwaggerEndpoint("/swagger/v1/swagger.json", "DotNetCoder Swagger Authentication Demo V1");
While this line tells Swagger UI which client ID to use for authentication.
swaggerUIOptions.OAuthClientId(builder.Configuration["SwaggerAzureAd:ClientId"]);The following code instructs Swagger UI to activate PKCE and separate the scopes.
swaggerUIOptions.OAuthUsePkce();
swaggerUIOptions.OAuthScopeSeparator(" ");
The last line in our configuration tells Swagger UI to use a basic communication when it exchanges the authorization code for an access token when we use the authorization code flow with PKCE, since we do not have a client secret in our Swagger Azure Ad authentication example.
swaggerUIOptions.OAuthUseBasicAuthenticationWithAccessCodeGrant();Conclusion
In this post, we implemented Swagger Azure Ad Authentication using the Authorization Code Flow with PKCE to allow users to authenticate to Azure Ad before they can use the secure API. We discovered the Swashbuckle library and learned how to use it to integrate Swagger with ASP.NET Core and Azure Active Directory.
Also read https://dotnetcoder.com/datagrid-blazor-with-sorting-and-filtering/
Sample code
You can find the complete example code for this project on my GitHub repository
Enjoy This Blog?
Discover more from Dot Net Coder
Subscribe to get the latest posts sent to your email.


